RawCull is a robust, native macOS application developed using Swift and SwiftUI for macOS Tahoe. Tailored specifically for photographers, it simplifies the photo culling process, enabling users to swiftly identify and retain only their most exceptional photographs. The initial version exclusively supports culling Sony A1 Mk I and Mk II RAW files.
Security & Privacy: RawCull is digitally signed and notarized by Apple to protect against tampering. It runs as a sandboxed application, ensuring your data and system remain secure.
Both scanning and creating thumbnails, as well as extracting JPGs from ARW files, can be terminated using the shortcut ⌘K or by the menu Actions, Abort task.
Key Features
RawCull lacks any editing capabilities, solely providing the ability to view and select images for copying.
High Performance: Developed natively with Swift and SwiftUI, optimized for Apple Silicon-based Macs, utilizing only Apple’s official Swift and SwiftUI frameworks, eliminating the need for third-party libraries
Small application: The DMG file is about 3 MB in size
User-Friendly Interface: Intuitive controls designed for efficient culling workflows
Privacy-First: All data remains on your Mac, eliminating cloud synchronization and data collection
Security: Digitally signed and notarized by Apple, it is also a sandboxed application, providing enhanced security
Free and Open Source: Available under the MIT license
Non-Destructive: It only reads ARW files, creating and storing thumbnails separately in the sandbox
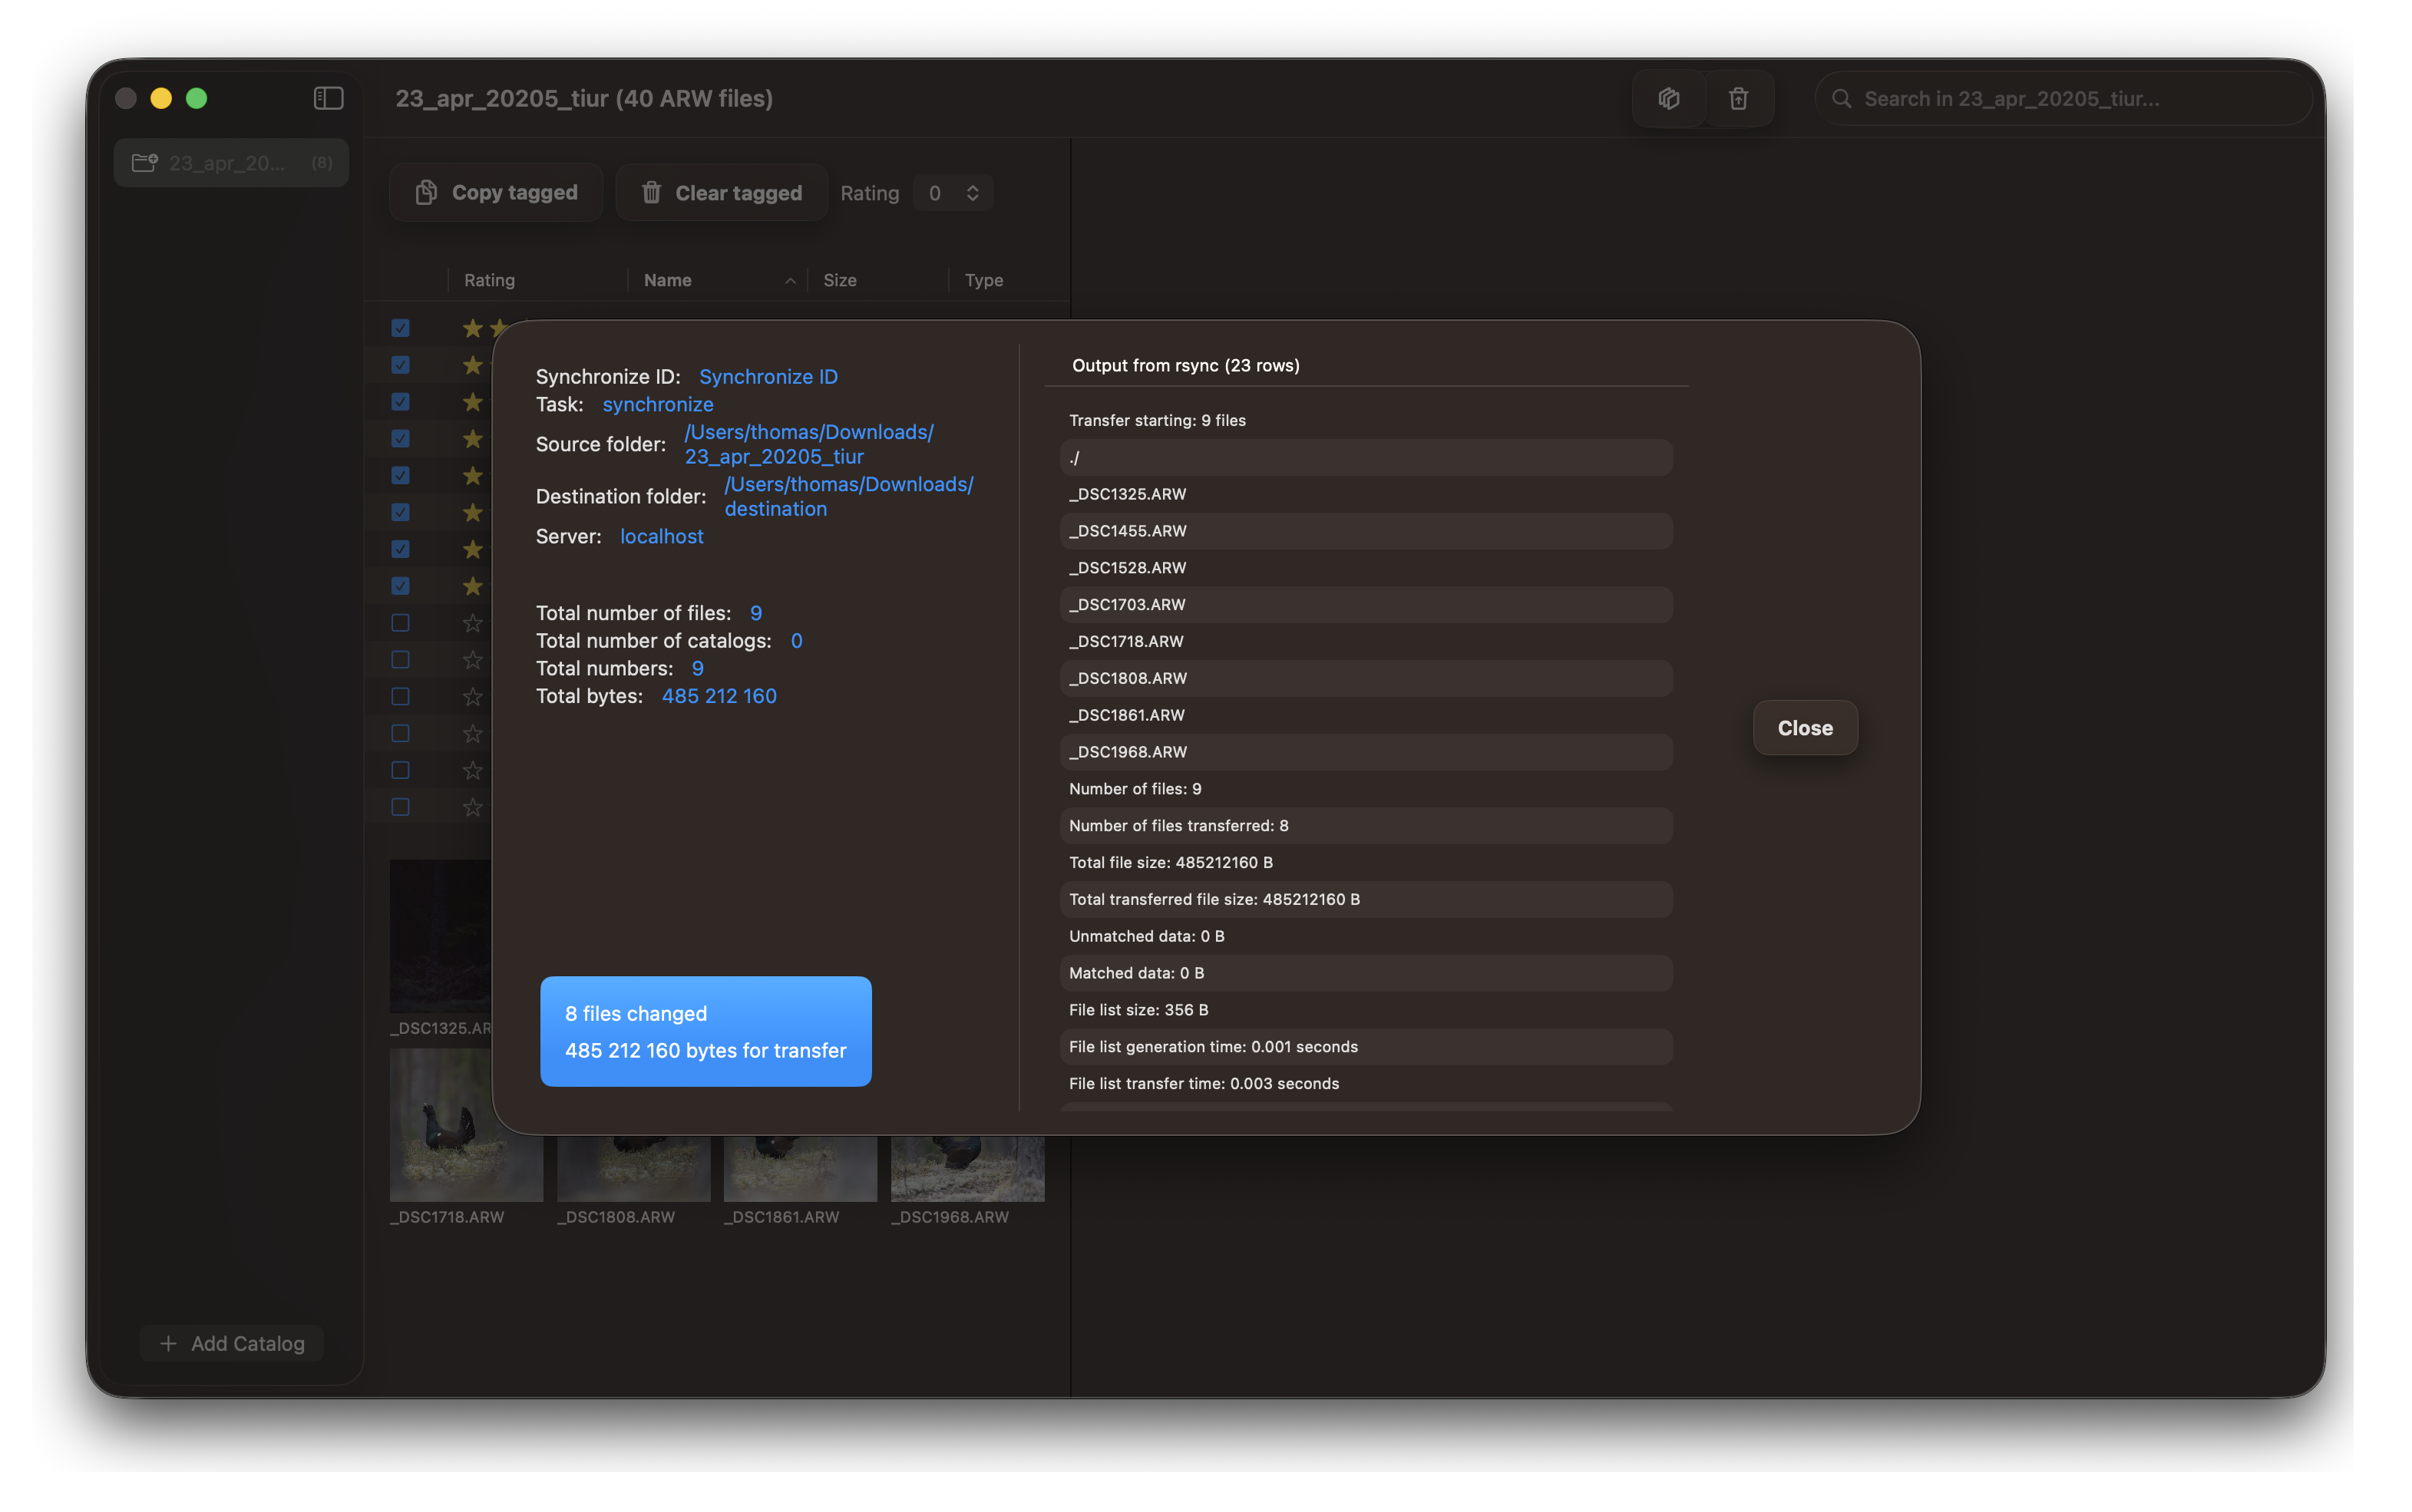
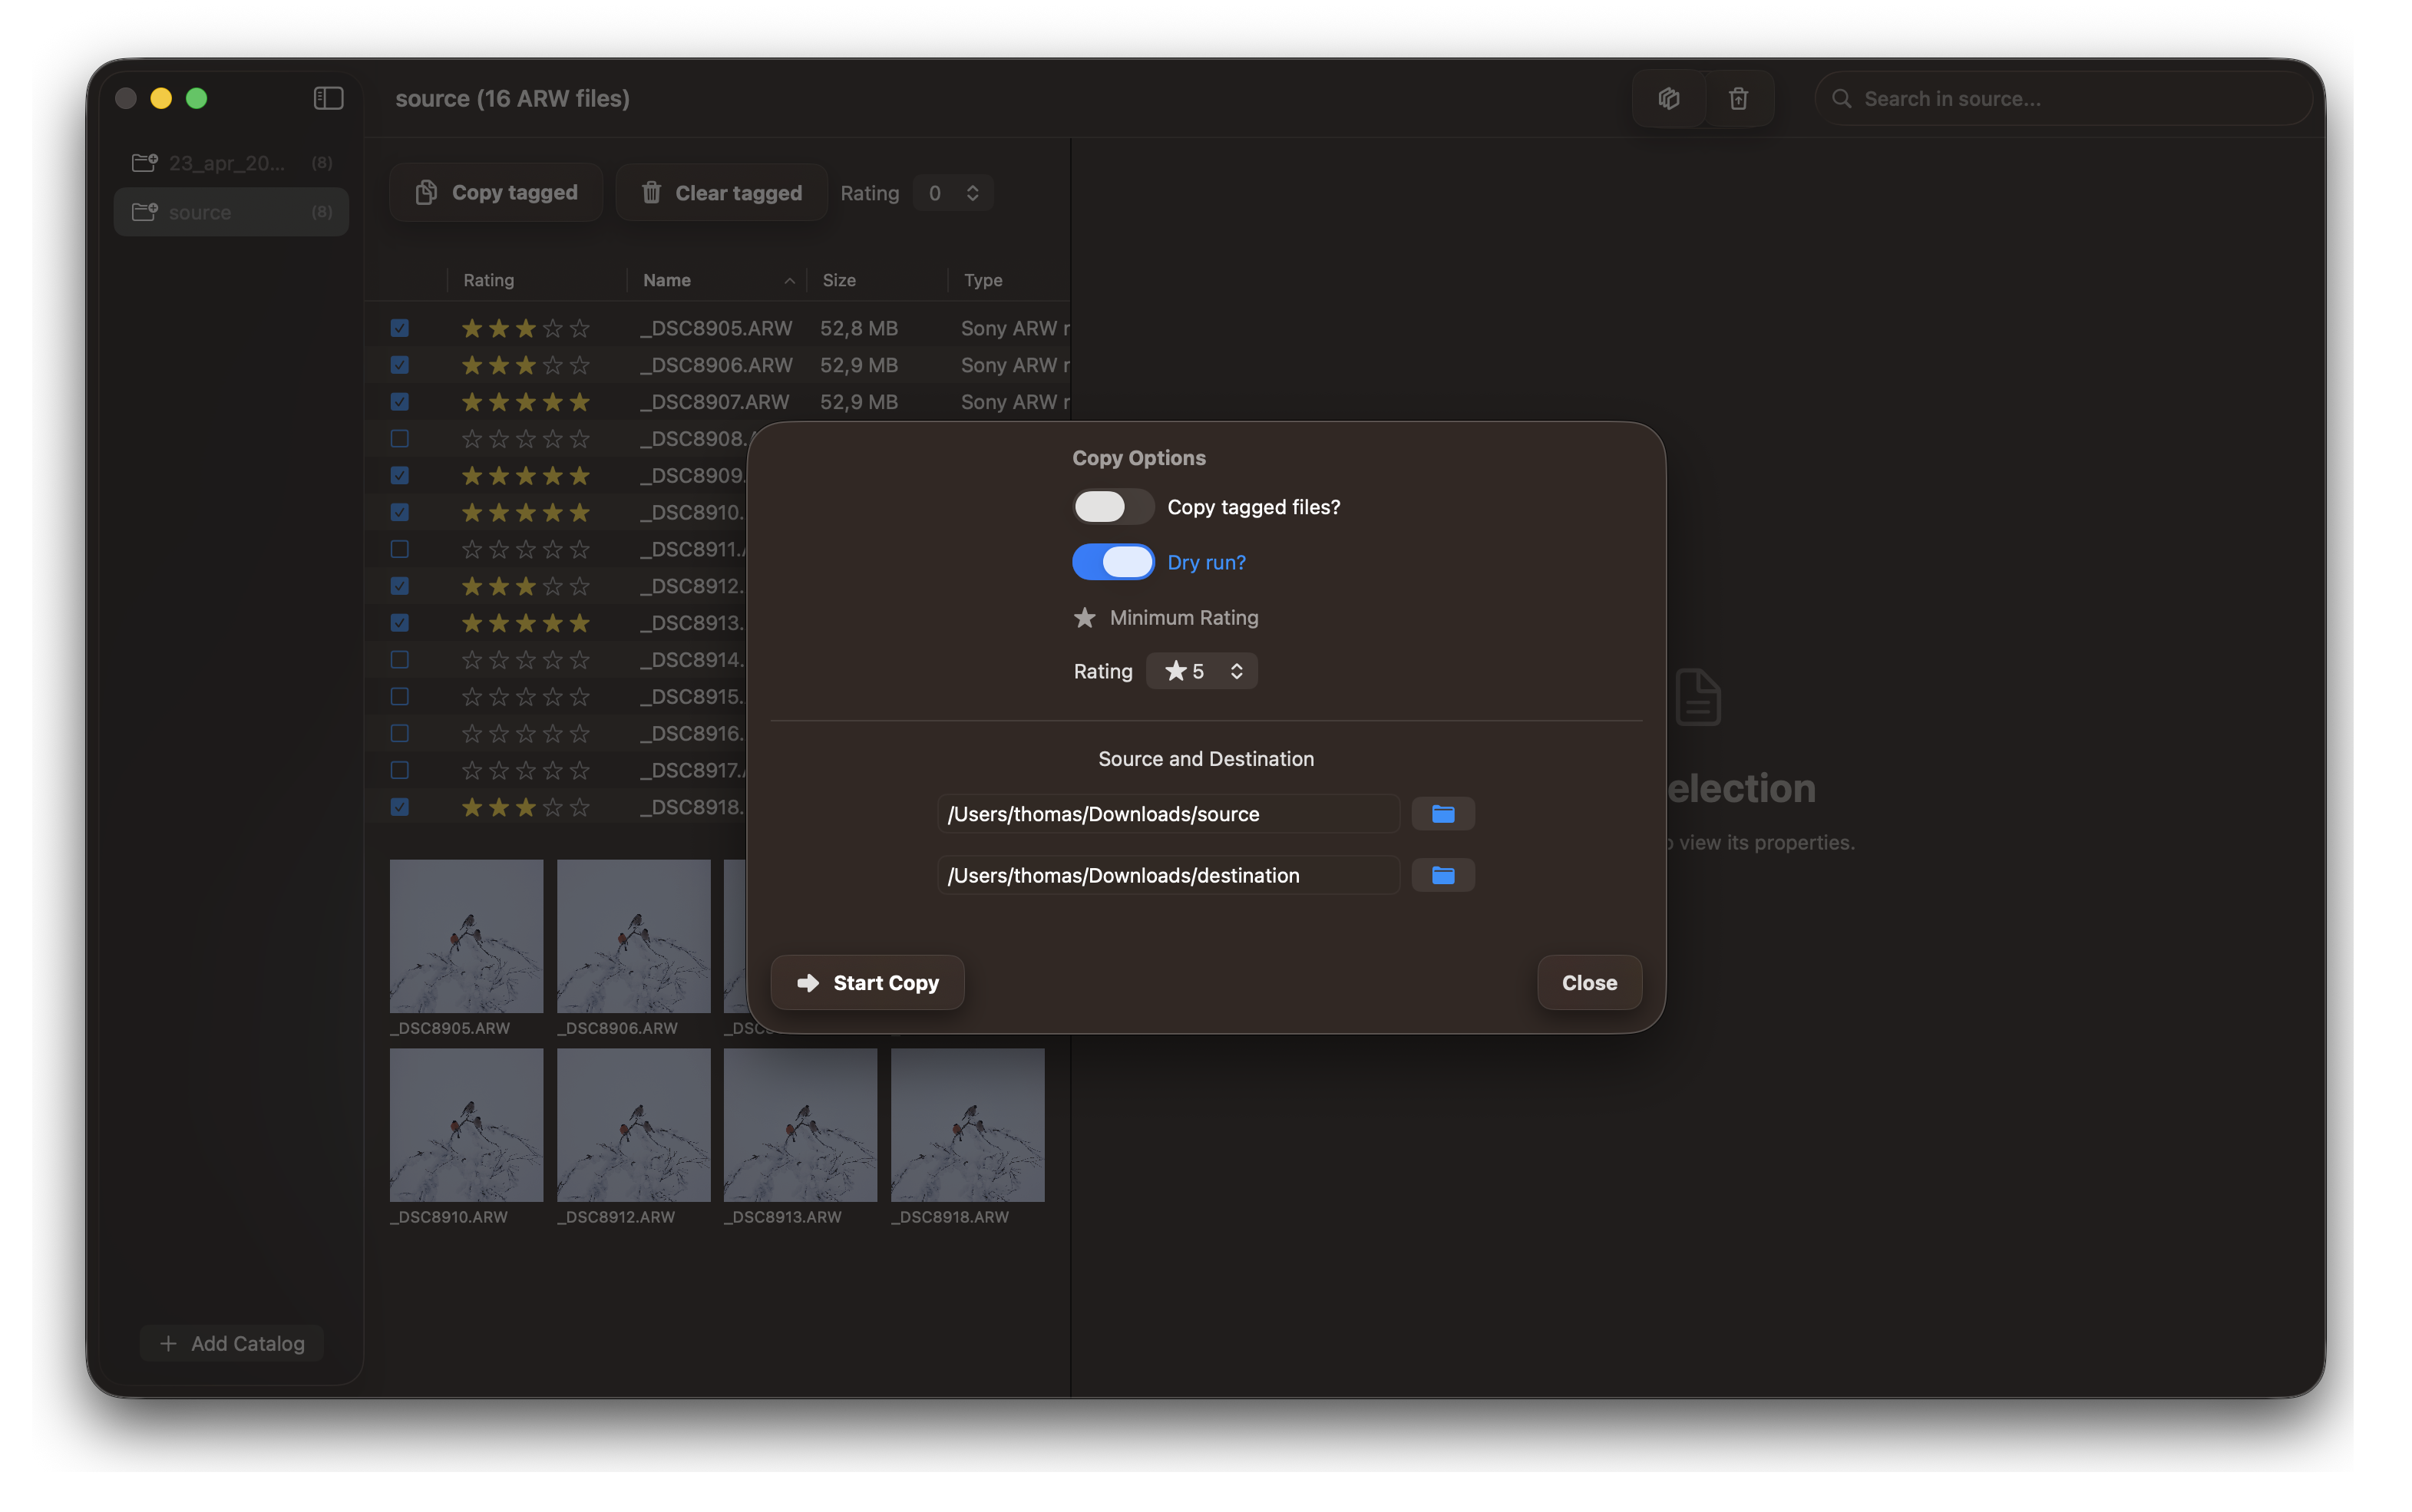
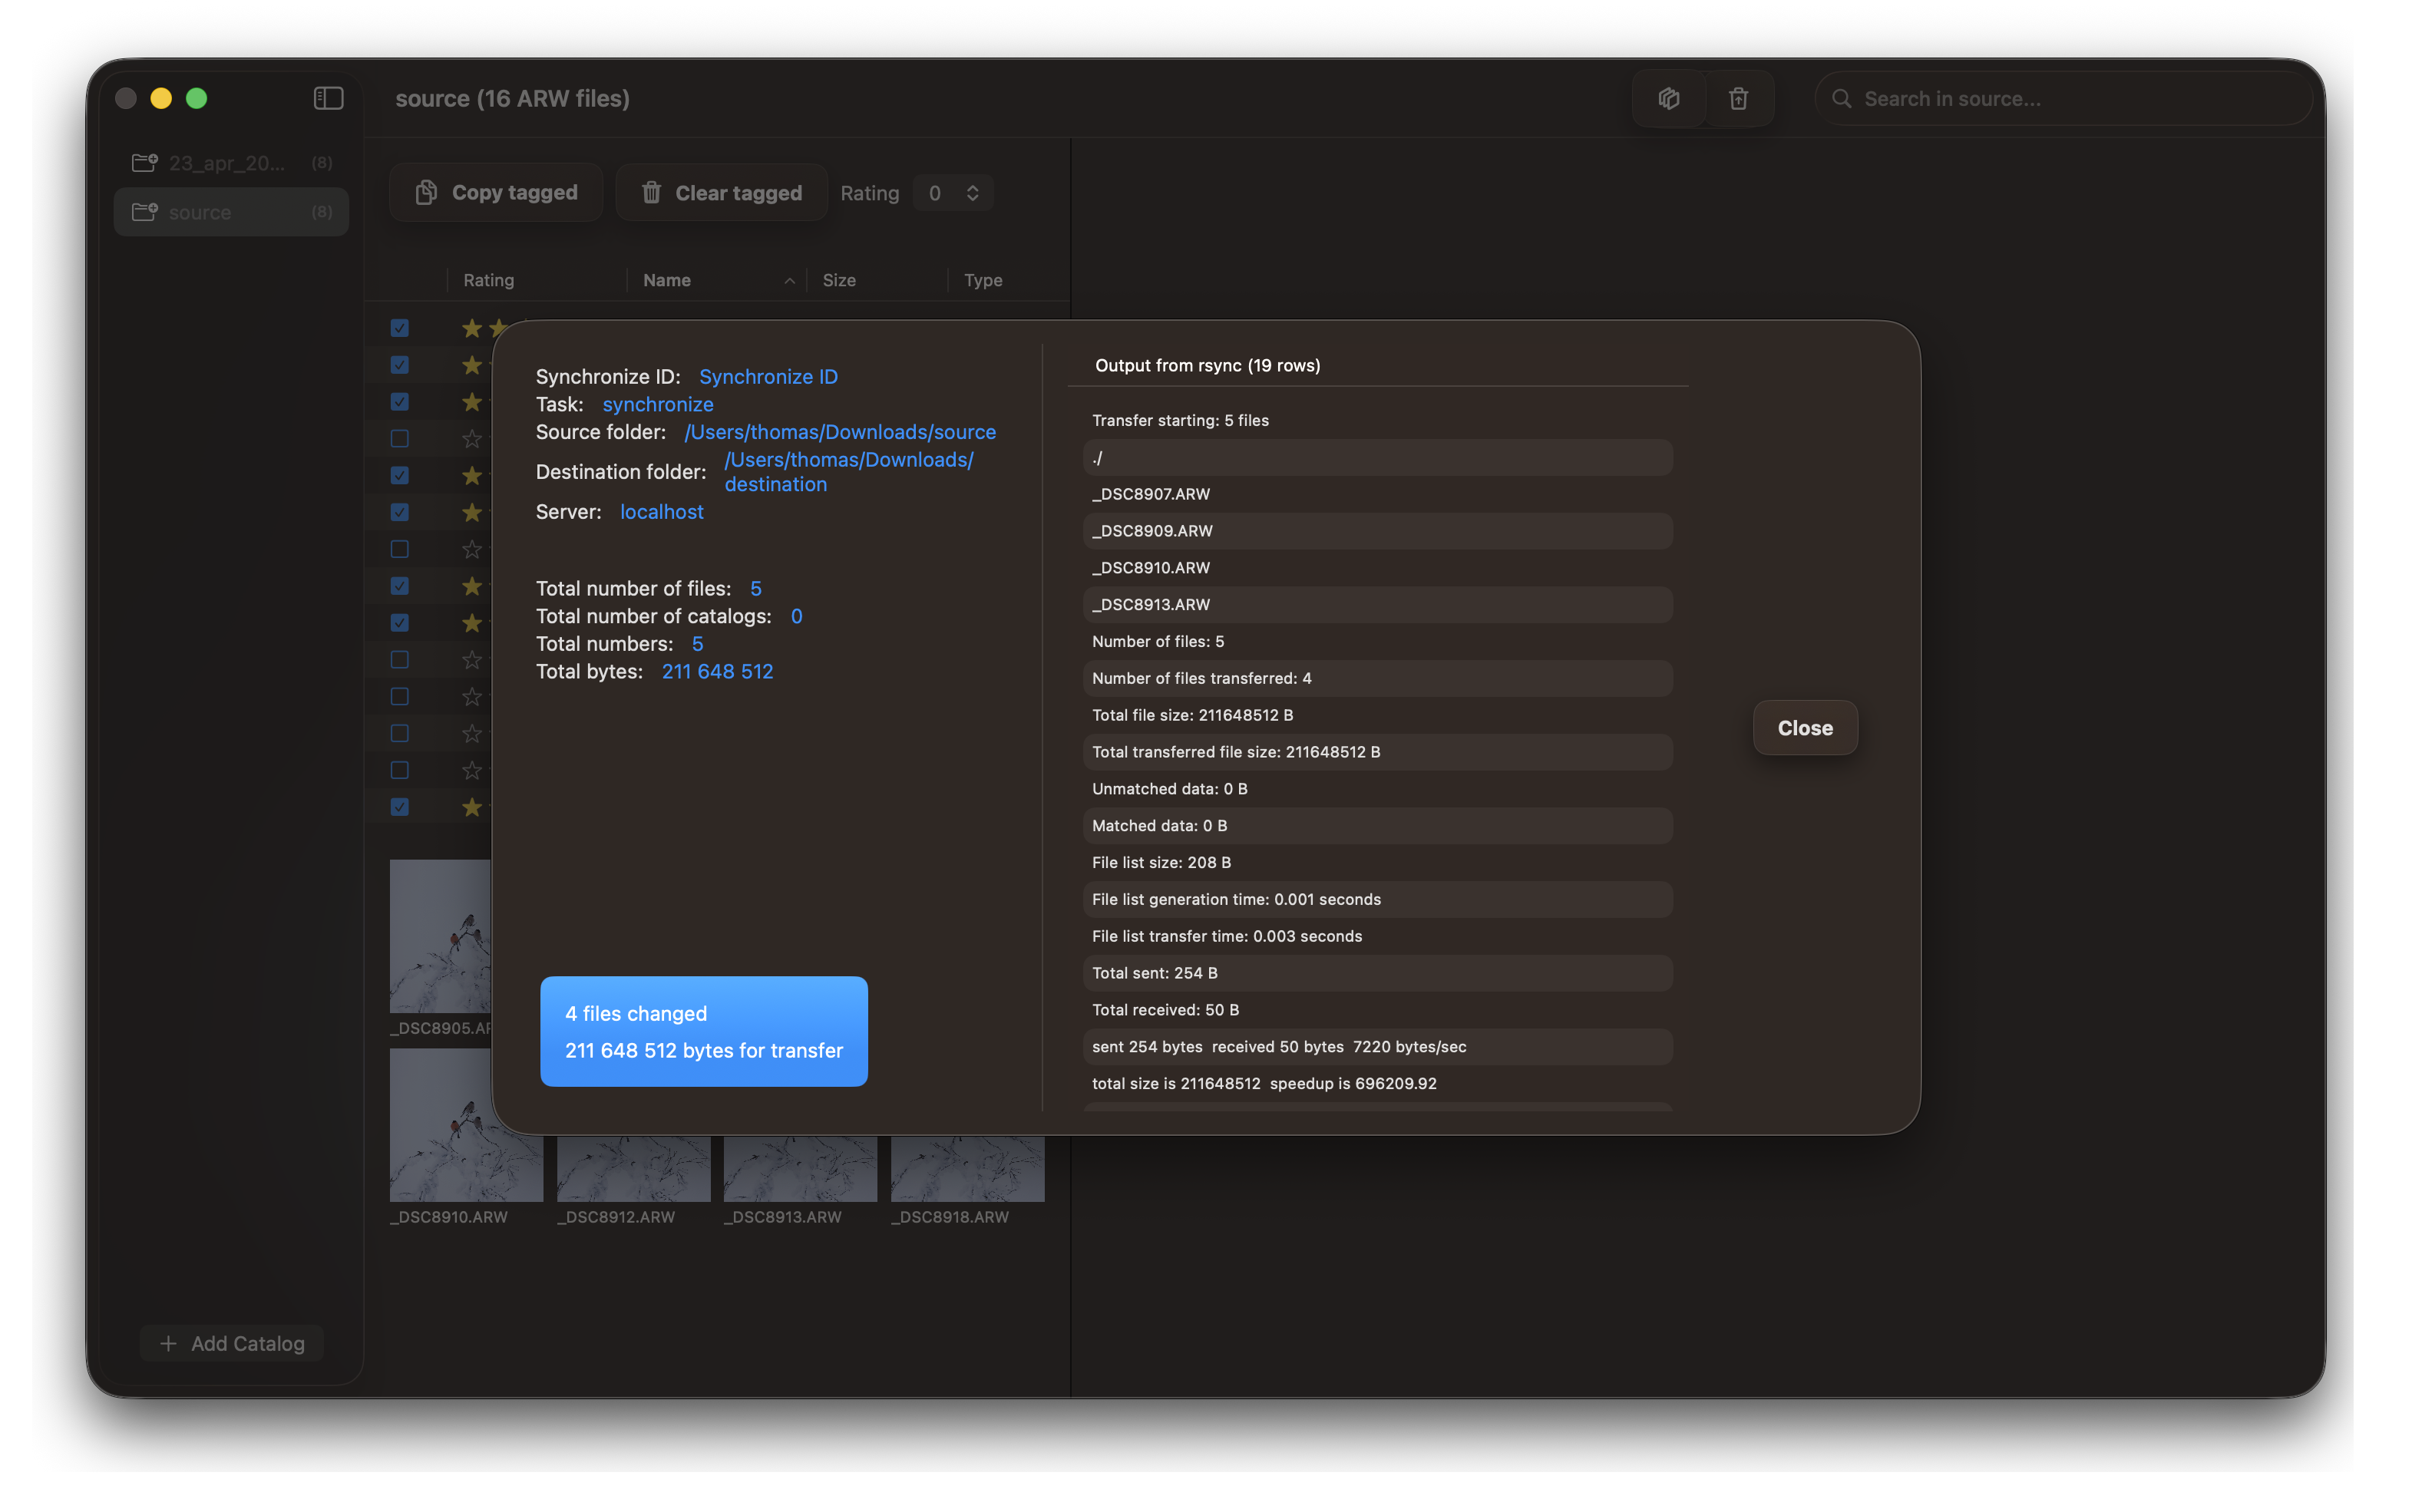
The actual copy of ARW files from source to destination is non-destructive. It utilizes the default /usr/bin/rsync as part of macOS. Prior to the actual copy of files, a --dry-run parameter can be employed to simulate the files that will be copied to the destination.
Installation
RawCull is available for download on the Apple App Store or from the GitHub Repository. The GitHub release may appear 1-2 days before the App Store version due to the different release processes employed by each platform.
For security, please verify the SHA-256 hash after downloading if installed from GitHub. Current updates and release notes are available in the changelog.
1 - Security & Privacy
Security & Privacy
RawCull prioritizes your privacy and security with the following measures:
Digitally Signed & Notarized: The application is signed and notarized by Apple, protecting against tampering and ensuring authenticity
Sandboxed Application: Runs in a secure sandbox environment, limiting access to only the files and folders you explicitly grant
Local-Only Processing: All photo processing happens entirely on your Mac—no cloud synchronization or data collection
No Telemetry: RawCull does not collect, transmit, or store any usage data or personal information
File System Security: Uses macOS security features to ensure safe access to your photo library with explicit user permissions
Default rsync: Uses the default /usr/bin/rsync for file copying and supports --dry-run (simulate) mode
Non-destructive: RawCull only copies files; it does not delete or overwrite
Your photos and culling decisions remain completely private and under your control at all times.
2 - Culling Photos
How to Cull Your Photos
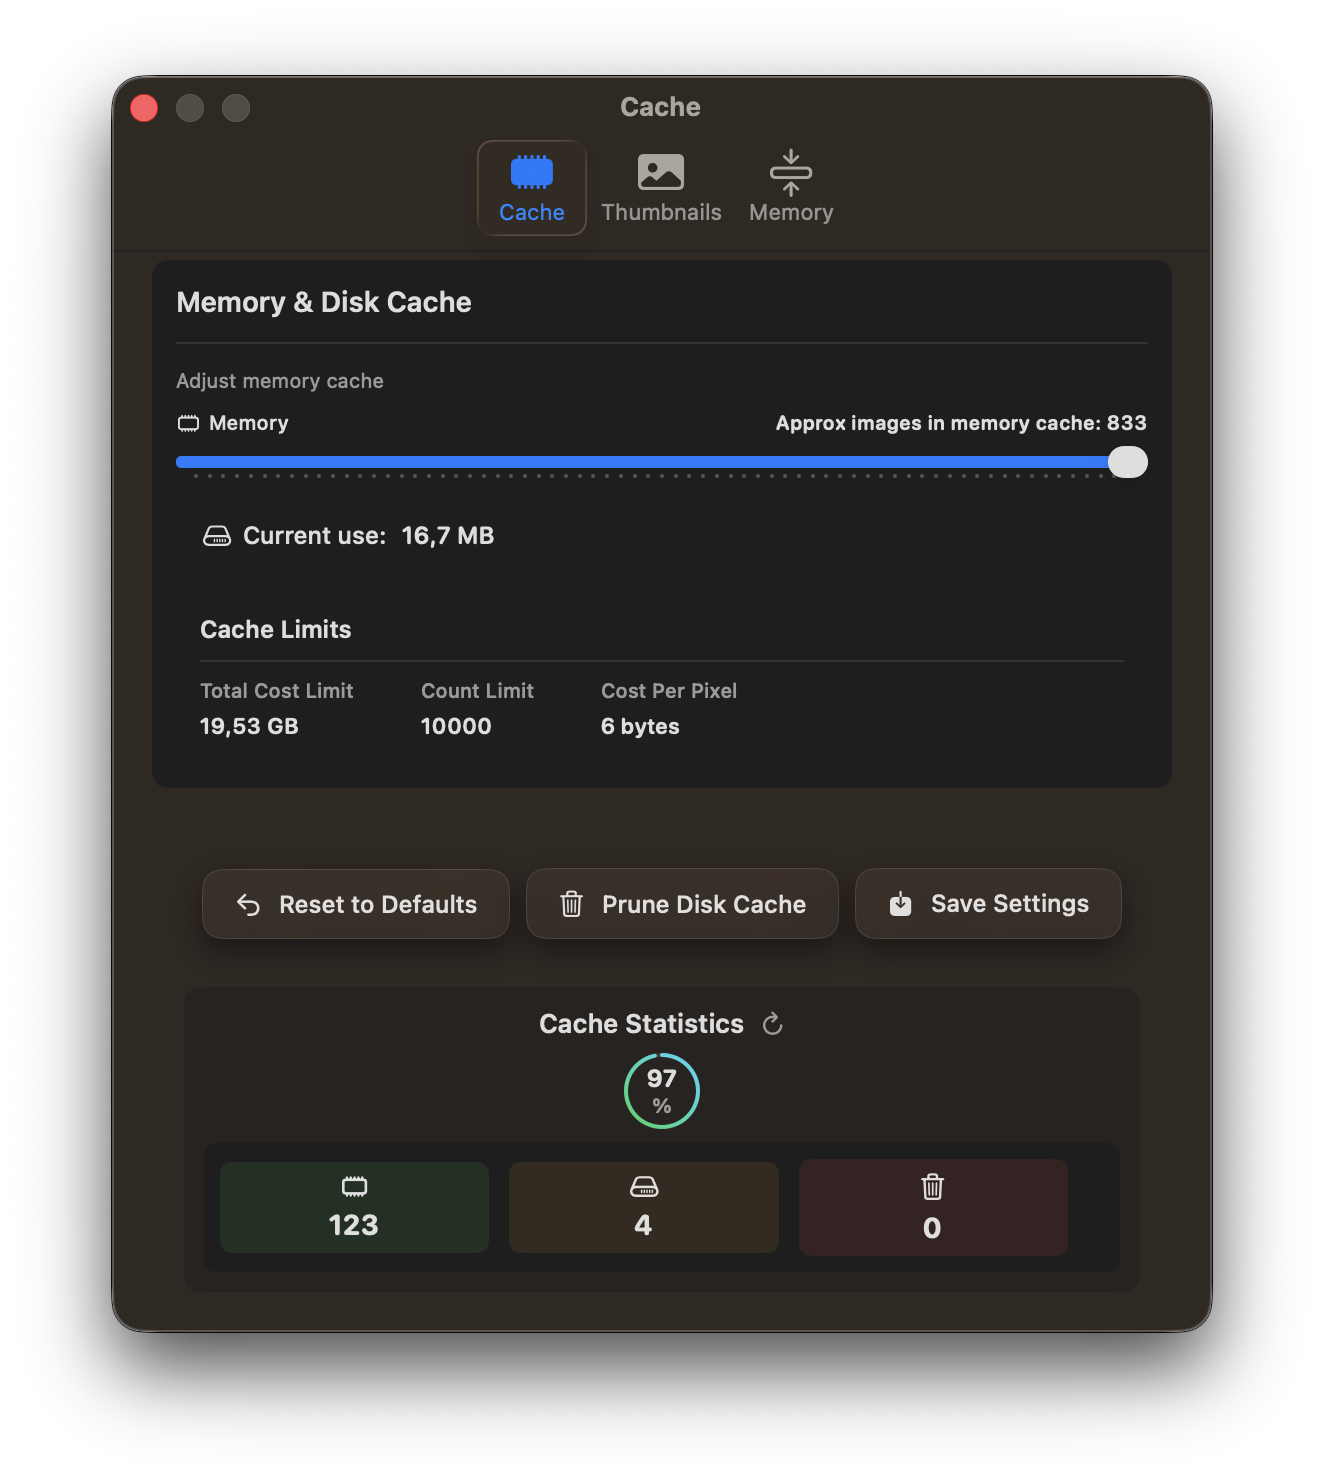
RawCull employs a sophisticated cache system comprising a three-tiered architecture: Memory Cache → Disk Cache → Source (RAW file).
This system maintains a predetermined number of thumbnails in memory, ensuring rapid access based on the allocated memory settings. All newly created thumbnails are stored in the disk cache, where the cache system autonomously removes outdated images and retrieves fresh ones from the disk cache.
Users can monitor cache hits, memory usage, disk cache, and evictions through the Settings menu. The cache data is automatically refreshed during the culling process.
A photo culling application is specialized software designed to assist photographers in efficiently reviewing, organizing, and selecting the most suitable images from a photo shoot.
RawCull is not a tool for image editing; it is solely intended for selecting and copying selected images for editing by dedicated software such as DxO PL, Lightroom, and others.
The typical workflow is:
Copy from Camera: Images are copied from your camera to a temporary catalog on your Mac
Review & Mark: You review each image and mark the keepers you want to keep
Rate: Assign ratings to your keepers to prioritize your best images
Copy Keepers: Only the marked and rated photos are copied to a final catalog for editing
Edit: Use a dedicated photo editing application to edit the selected images
Step 1: Select Your Temporary Catalog
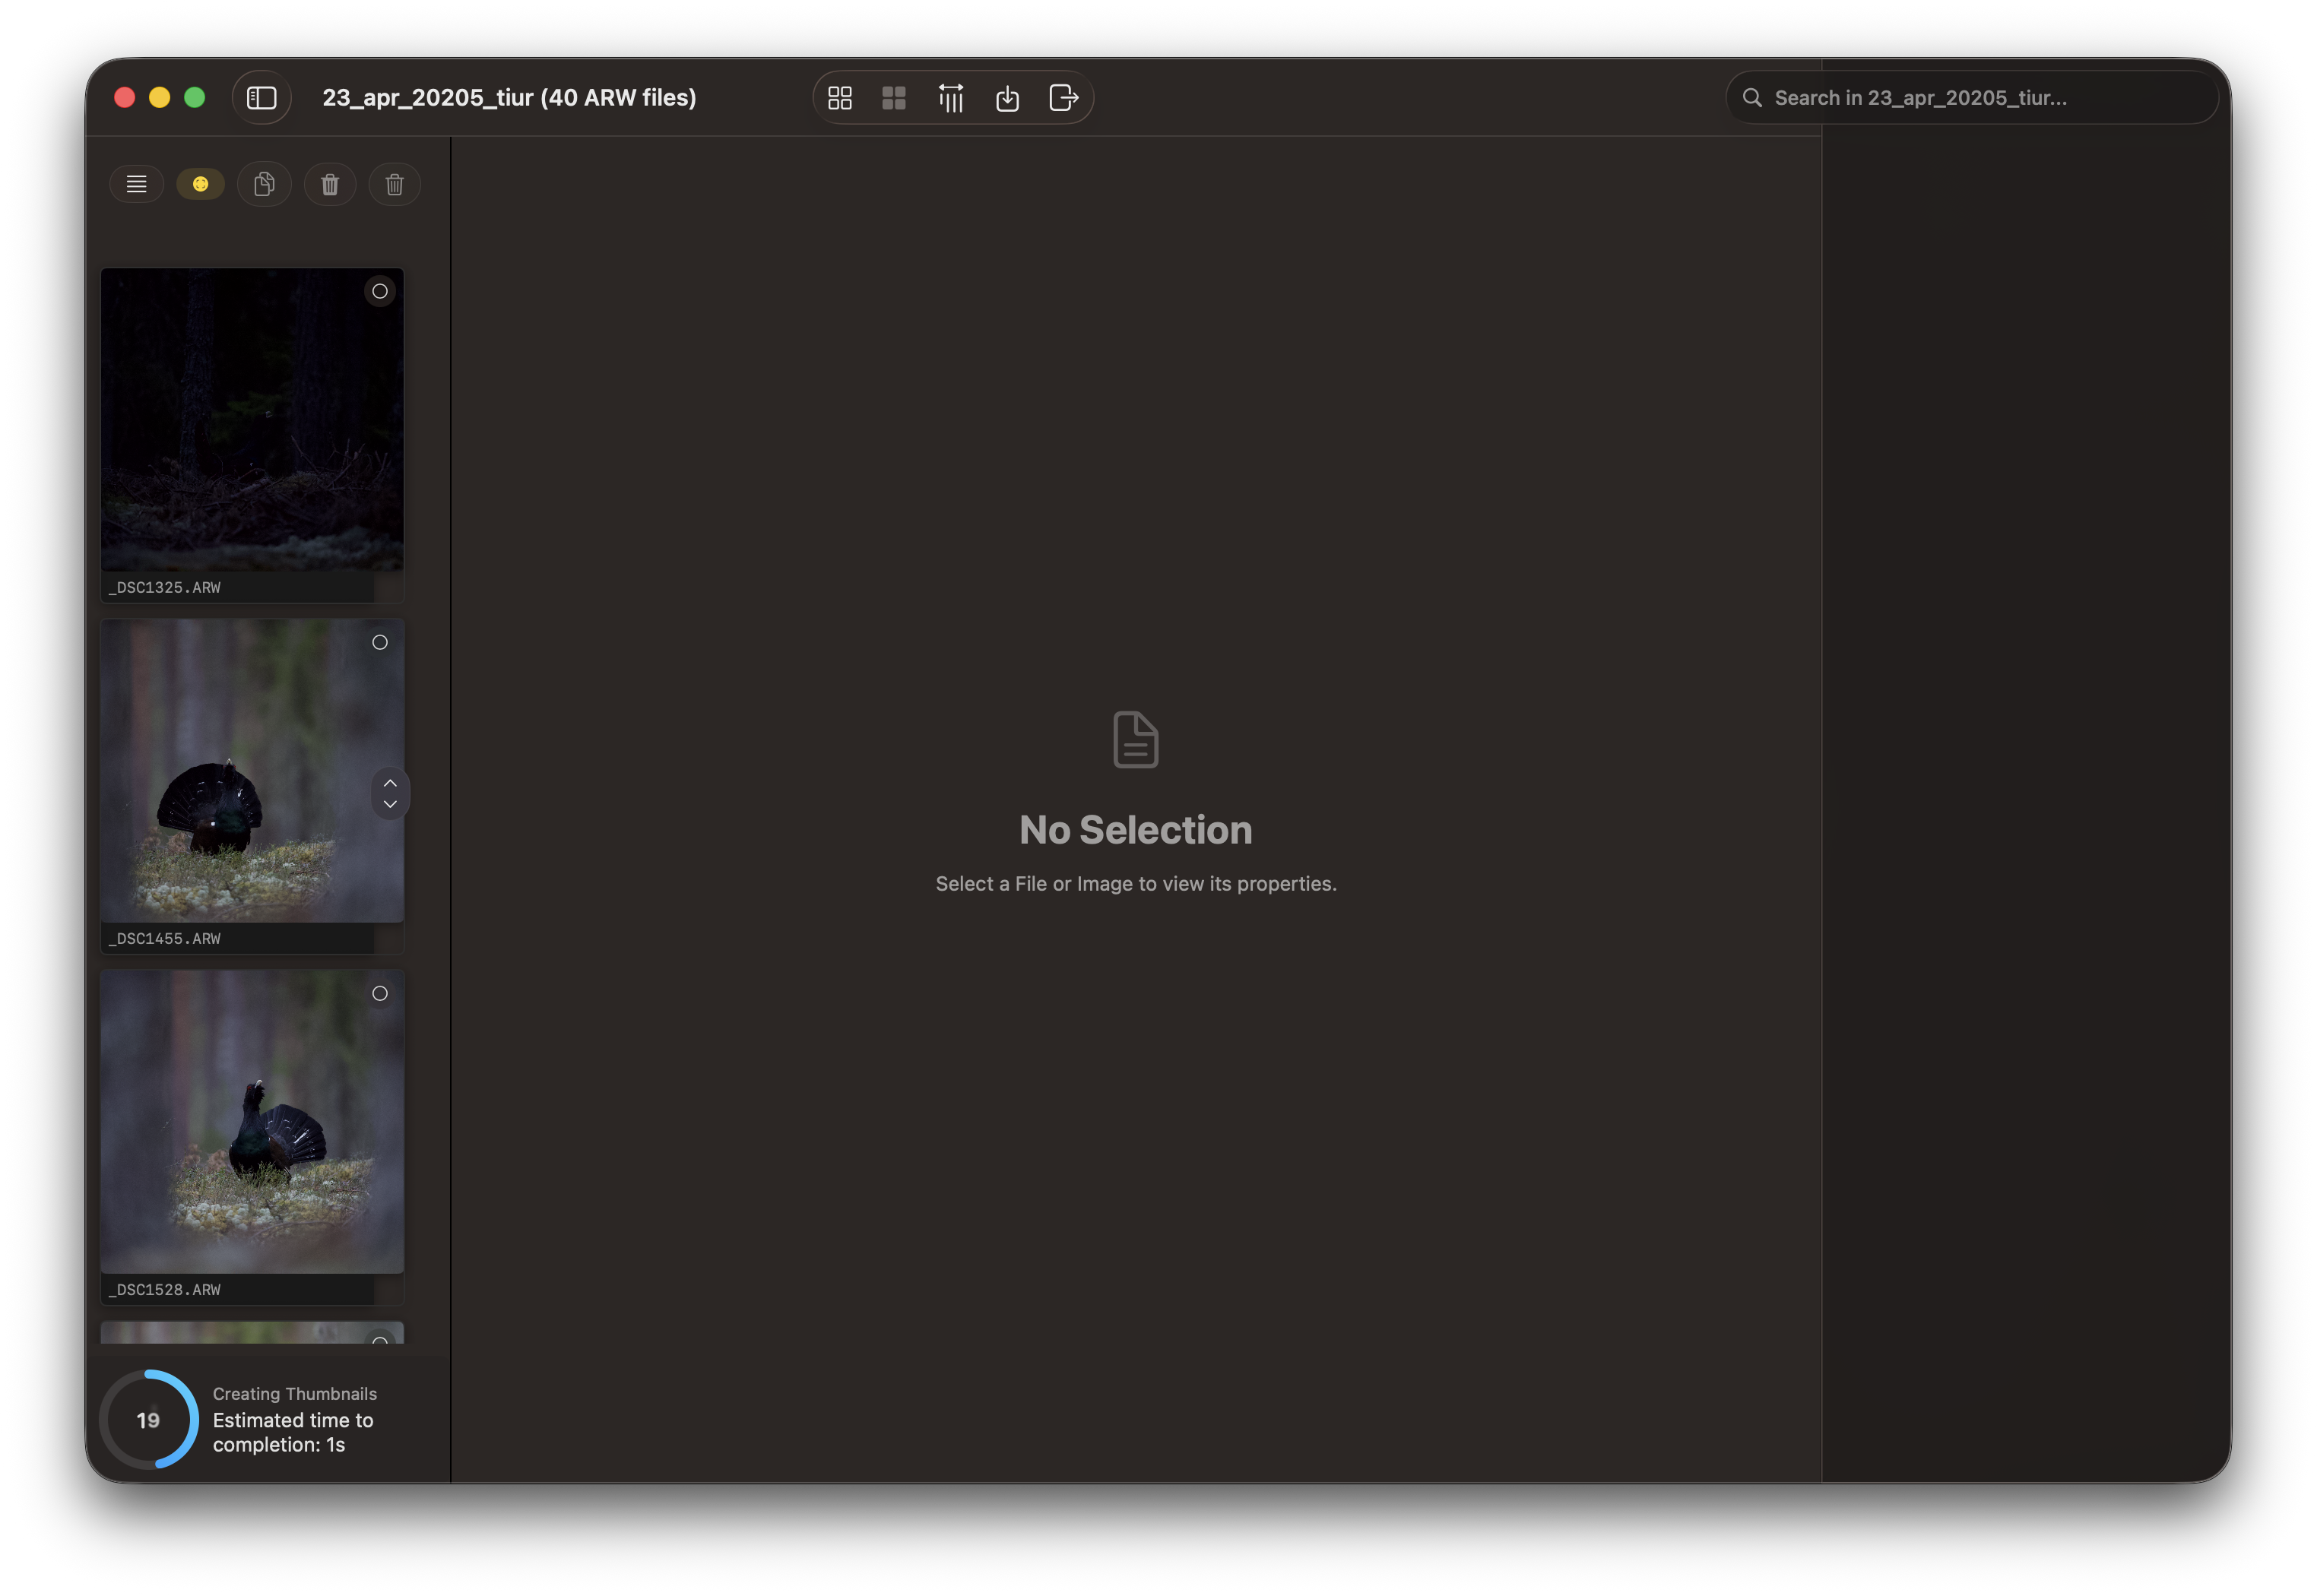
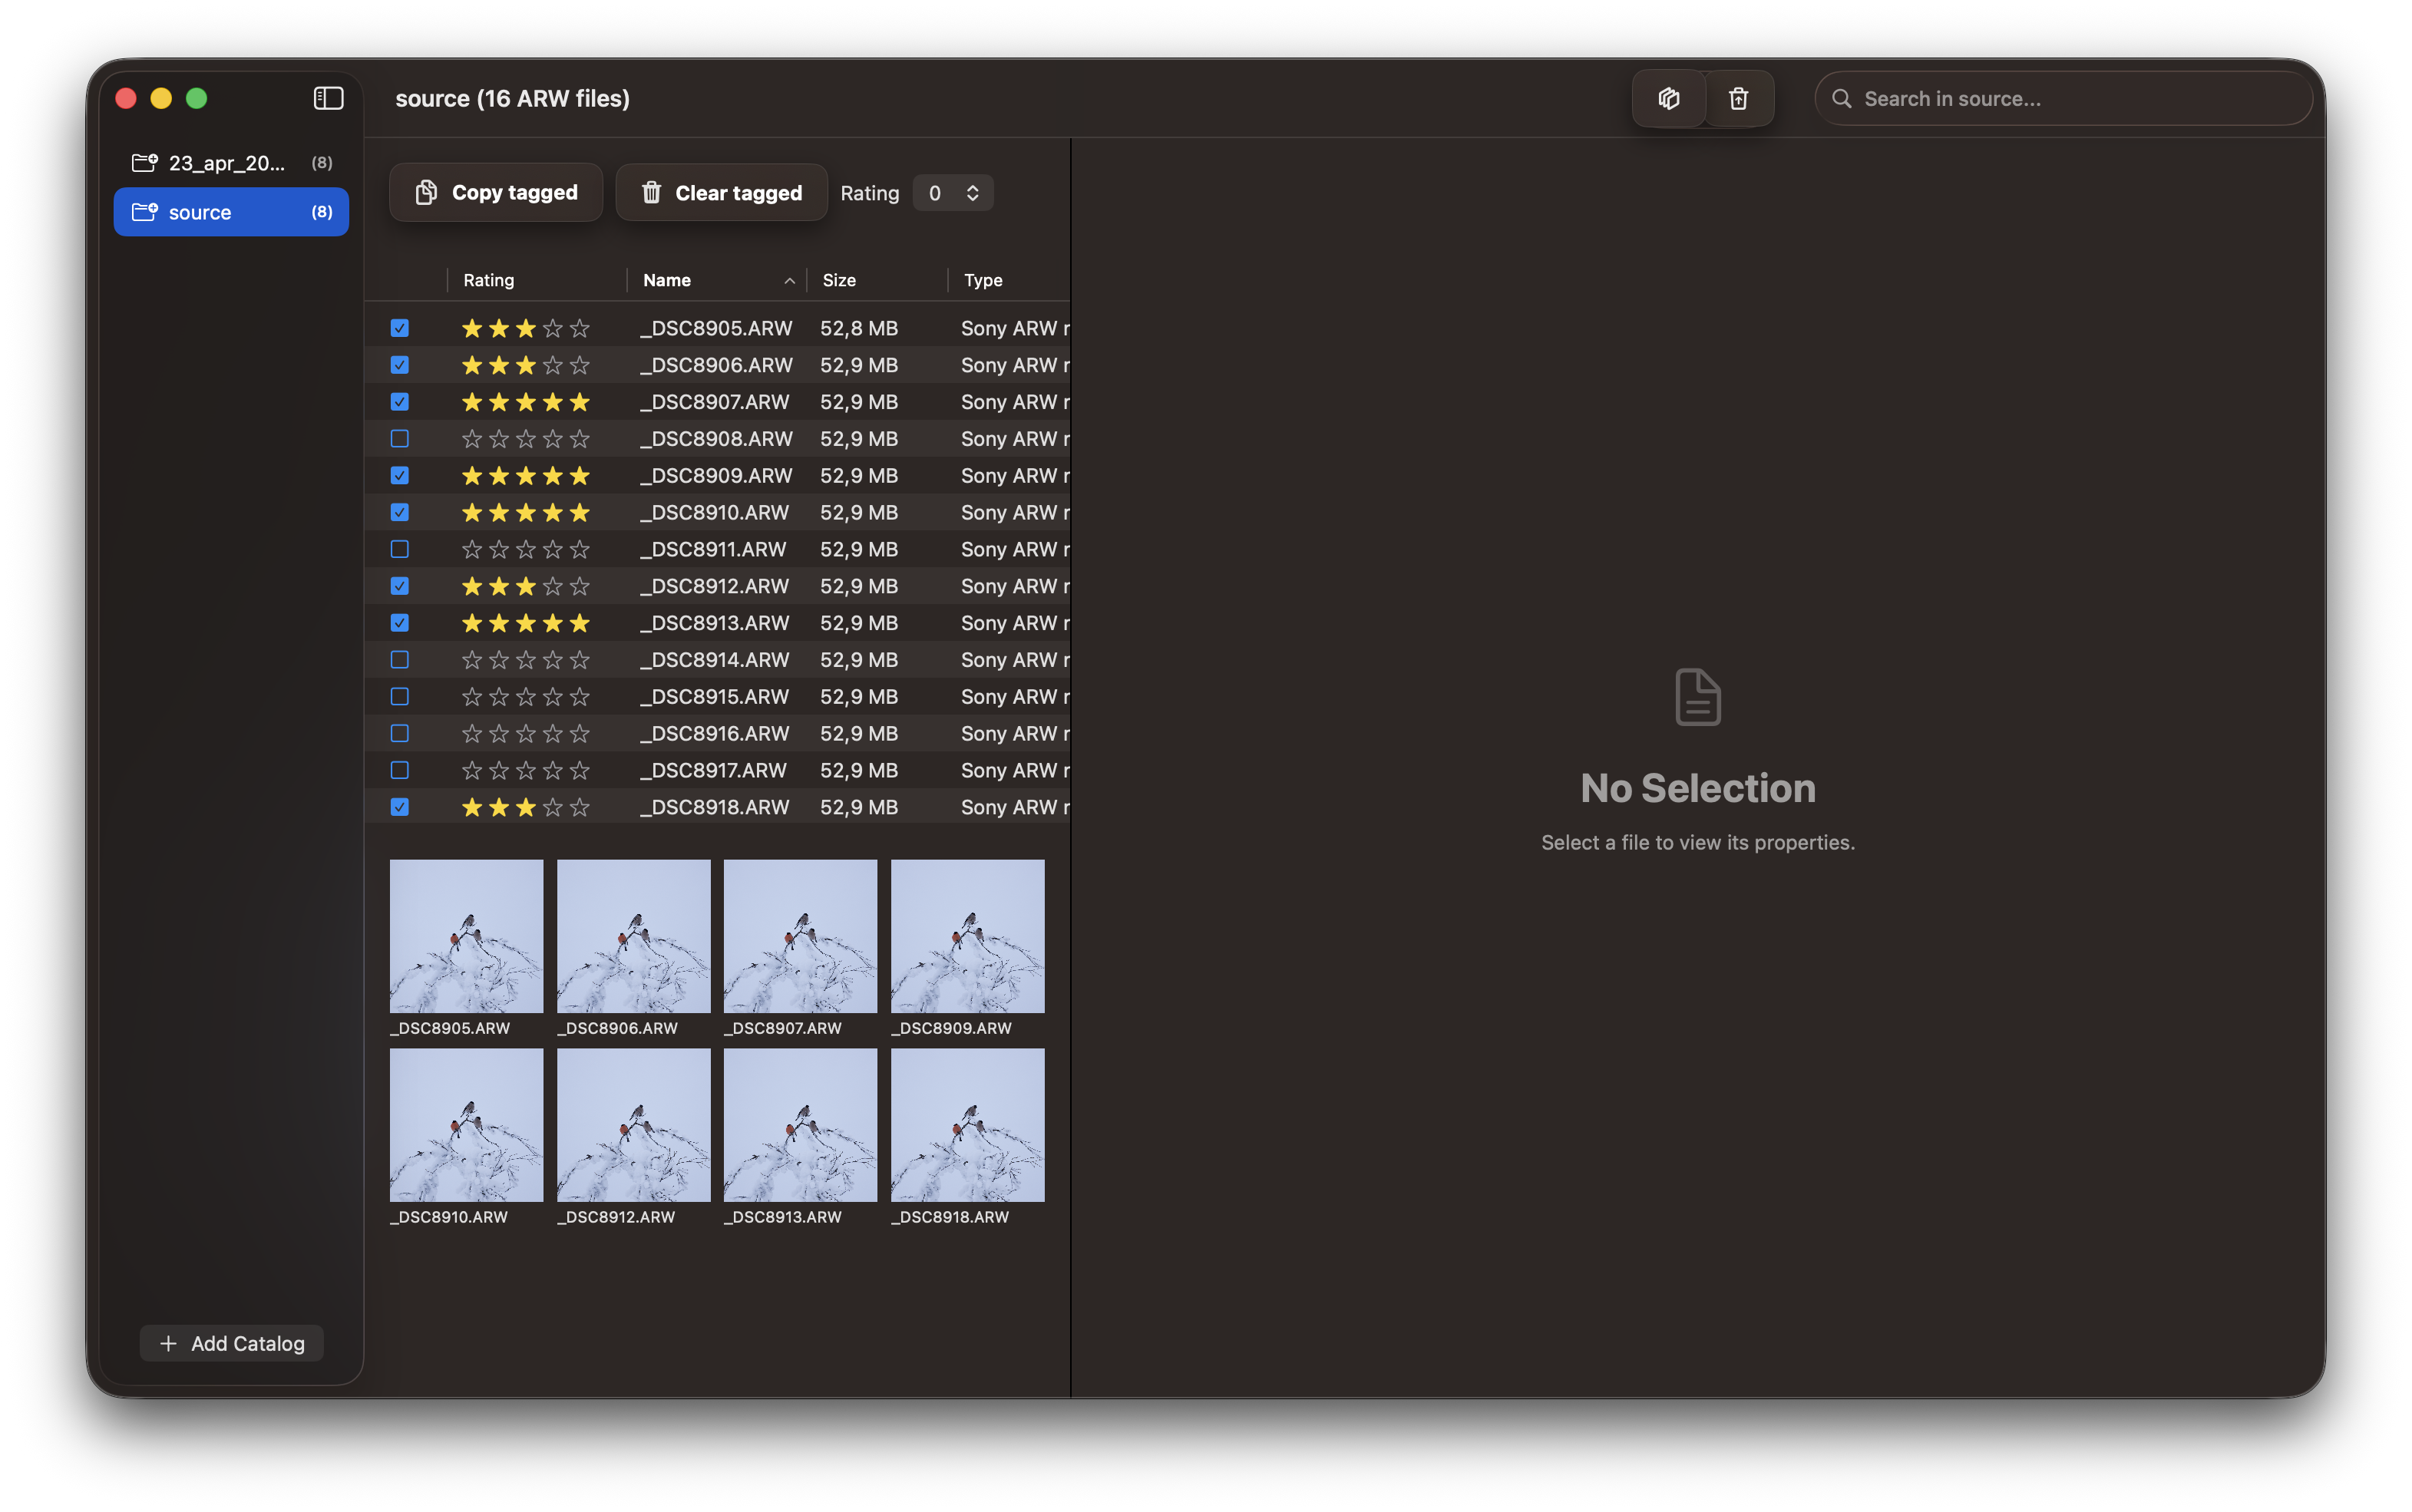
By default, the Sidebar is concealed. To access NEW catalogs, you must toggle the view sidebar by selecting the menu option. The Sidebar offers only one option: selecting new catalogs for scanning.
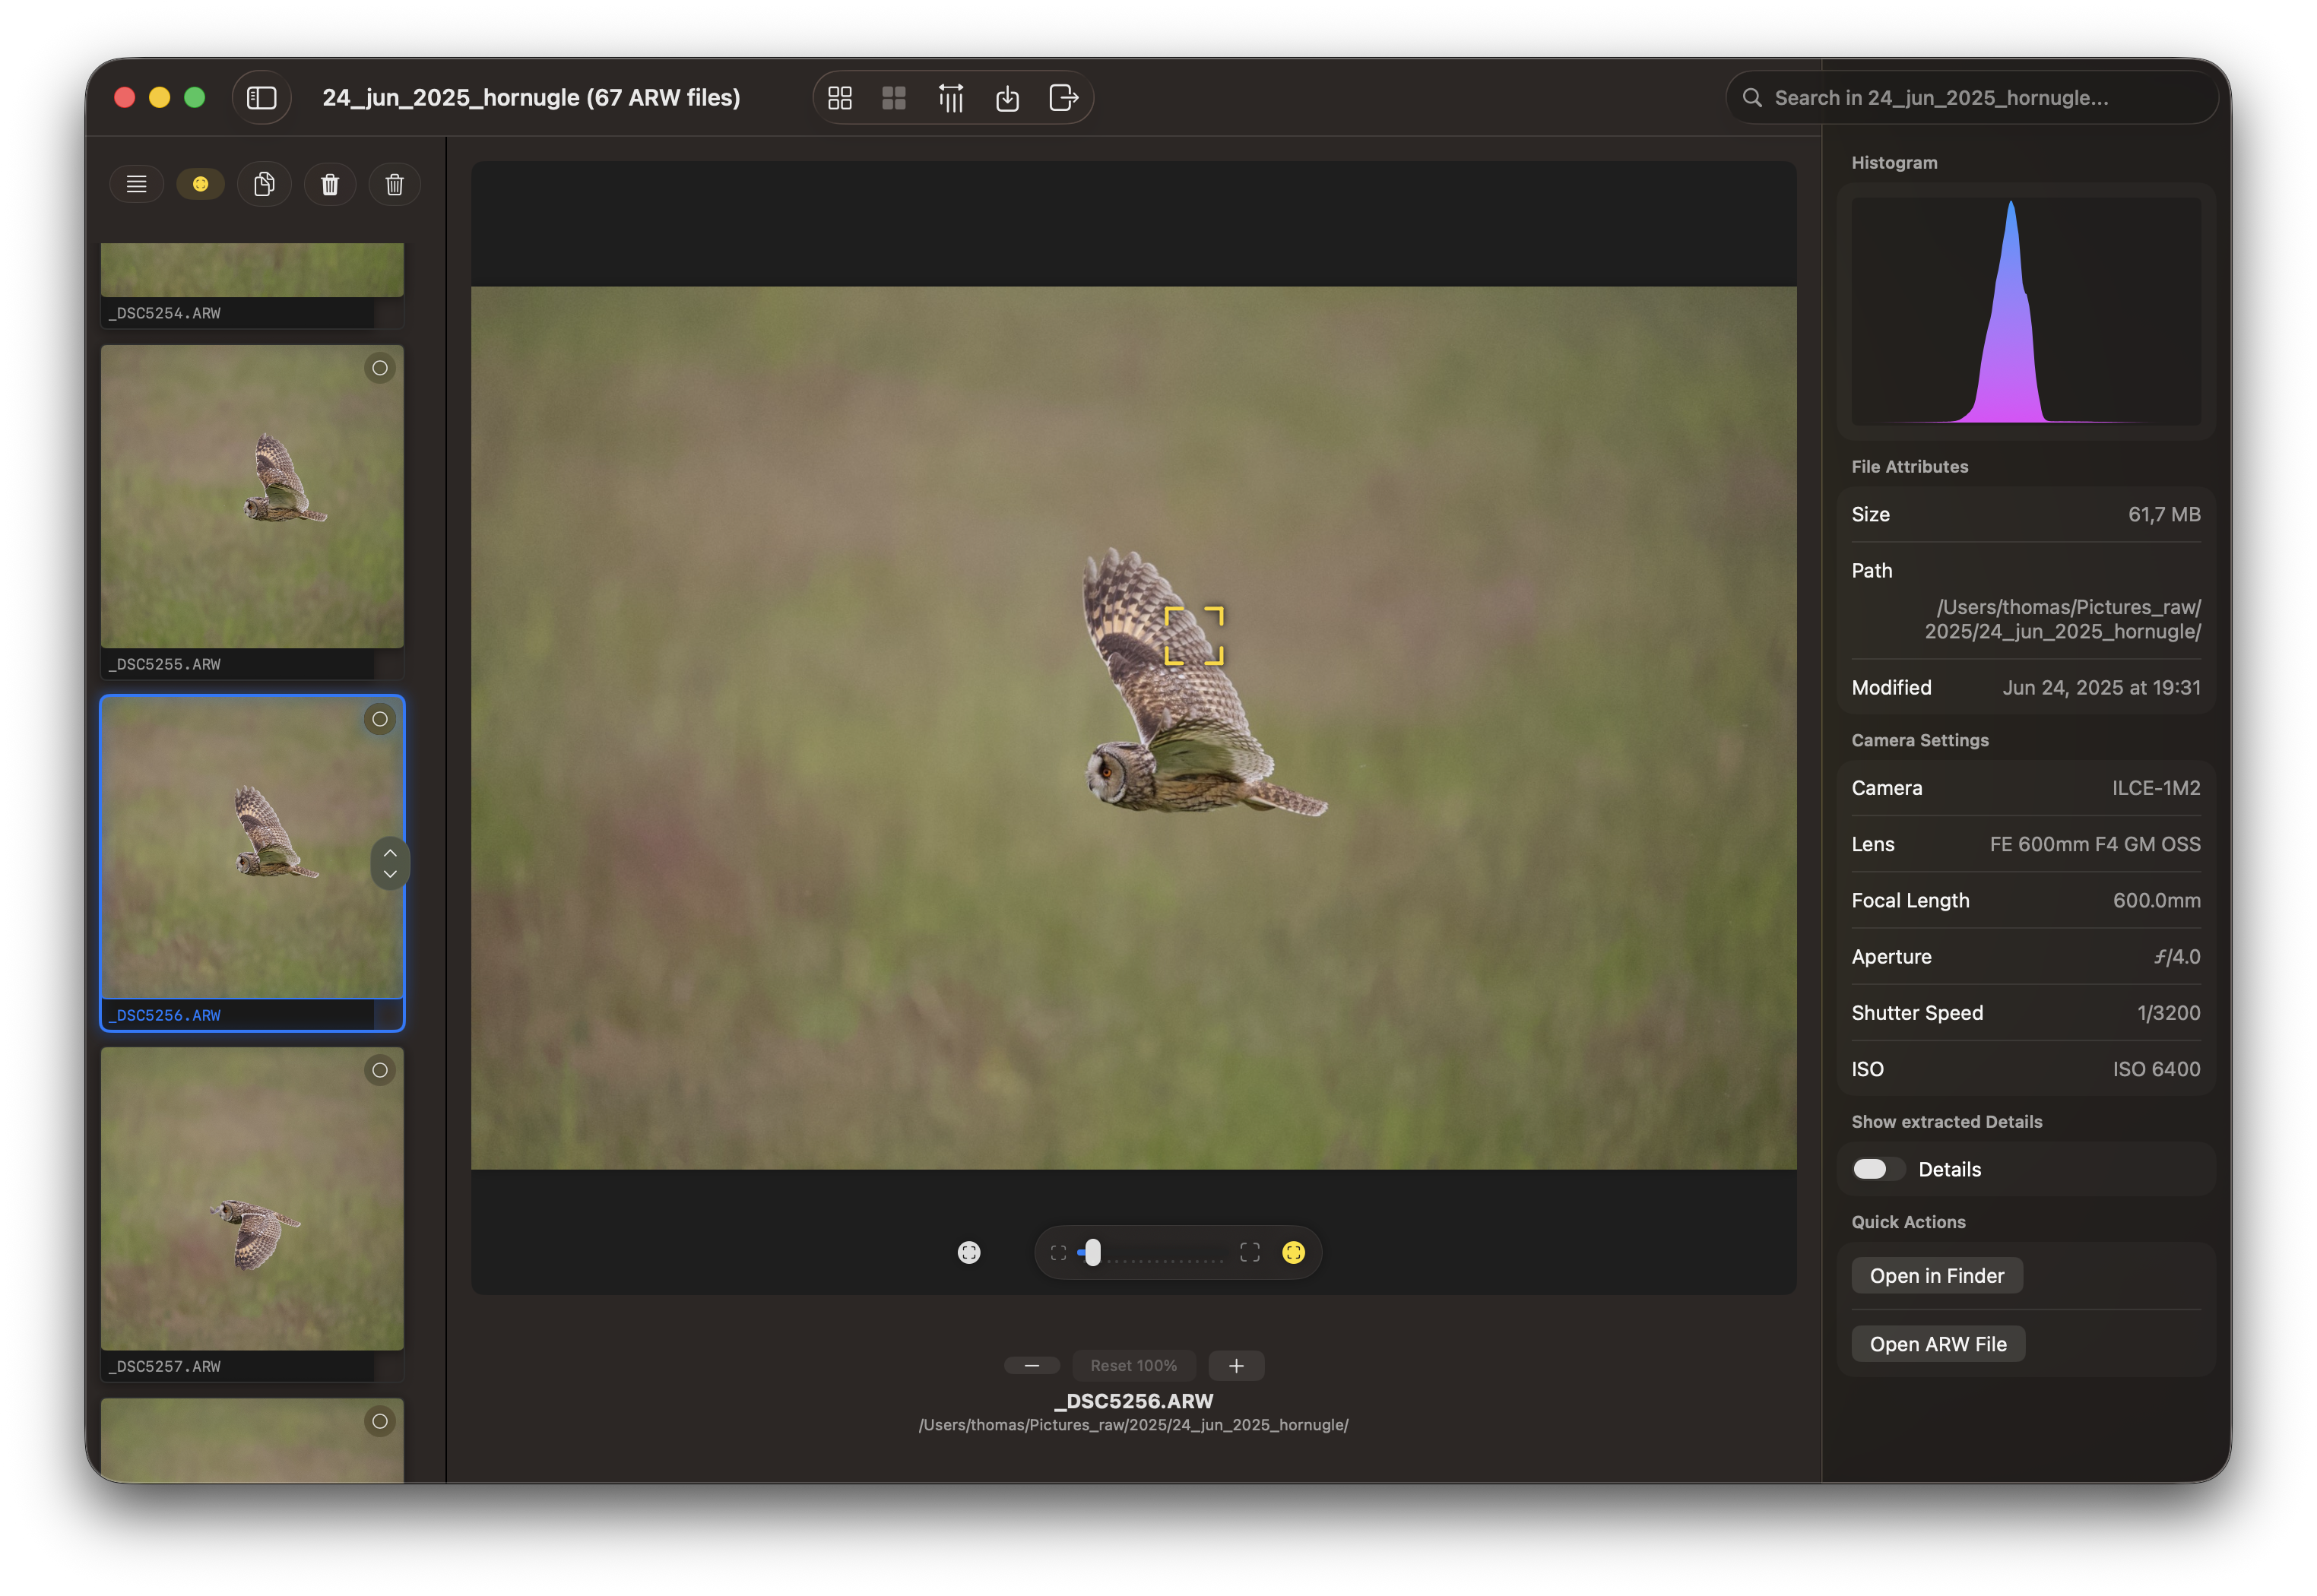
After copying images from your camera to a temporary catalog on your Mac, select that folder in RawCull. The application scans all images and generates previews for quick review. This process reads your photo metadata and creates a visual index of all images in the selected directory.
During scanning, you can monitor progress as the application indexes your images. Depending on the size of your library, this may take a few moments.
Step 2: Post-Scan Display
Once scanning completes, RawCull displays your full photo library with a thumbnail grid and preview controls ready for culling.
At this point, you can:
Navigate through images using arrow keys or click navigation
View the current image in the main preview area
Mark images with your culling decisions
Use filters to organize your view
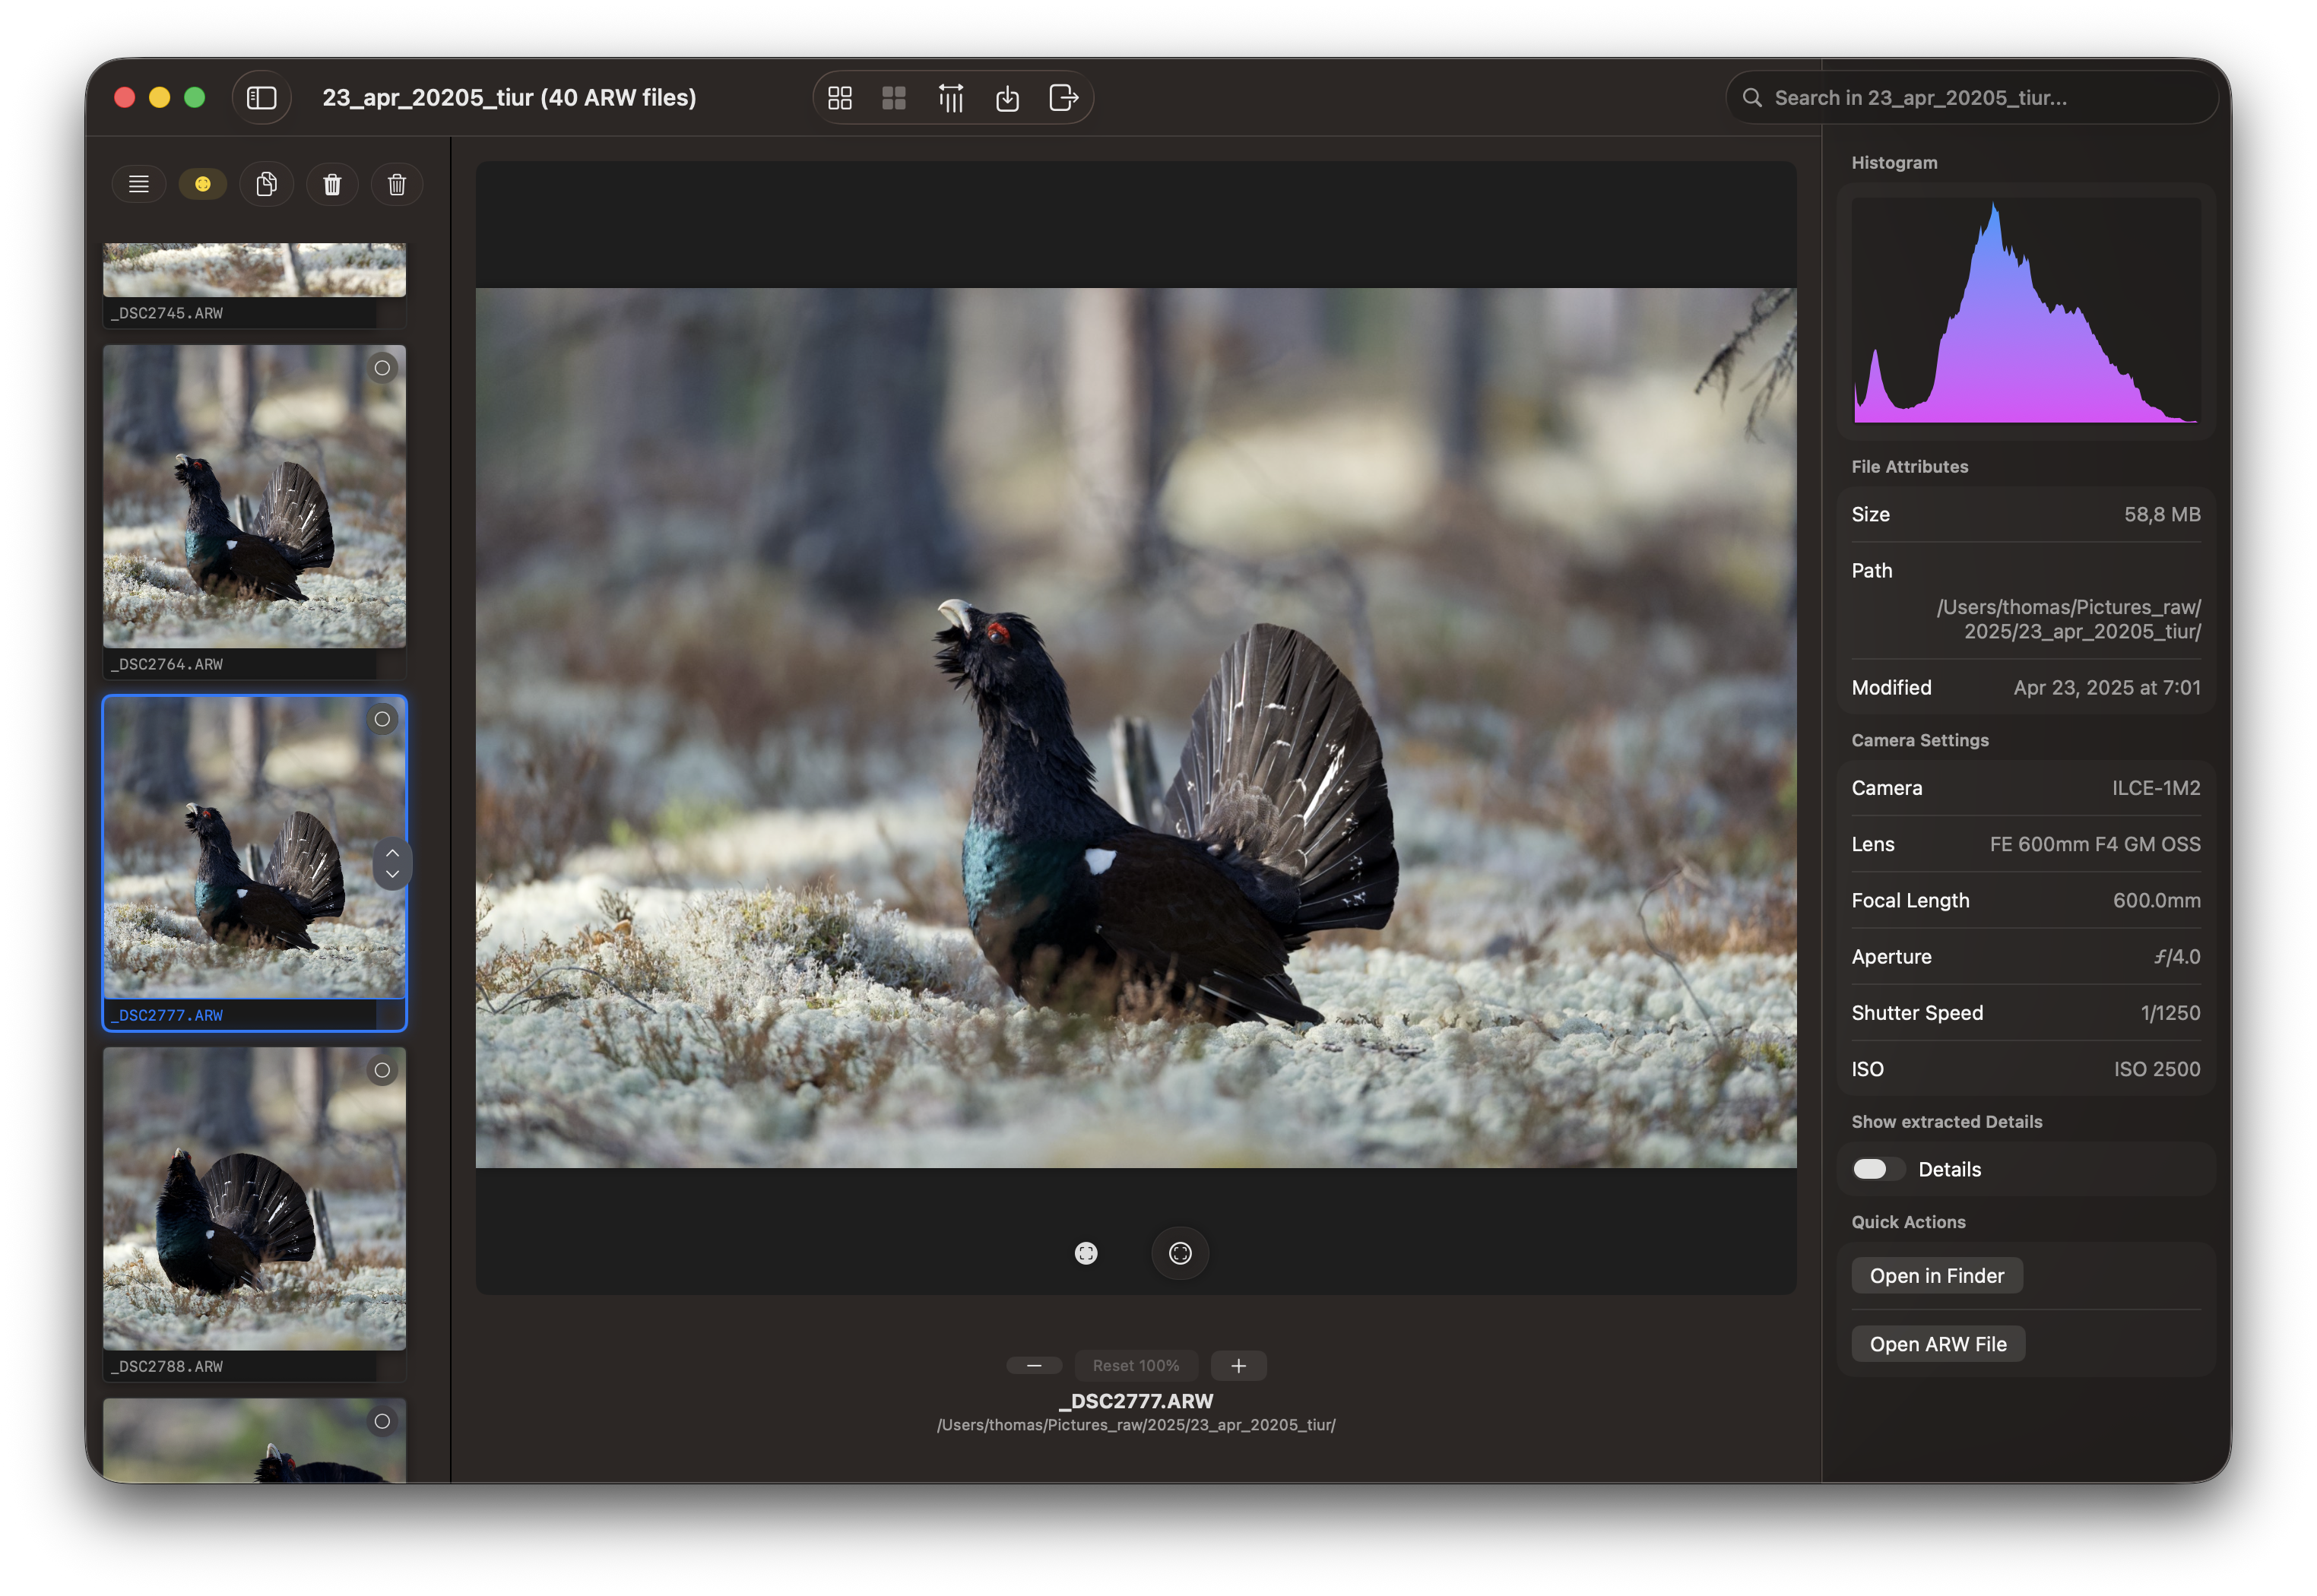
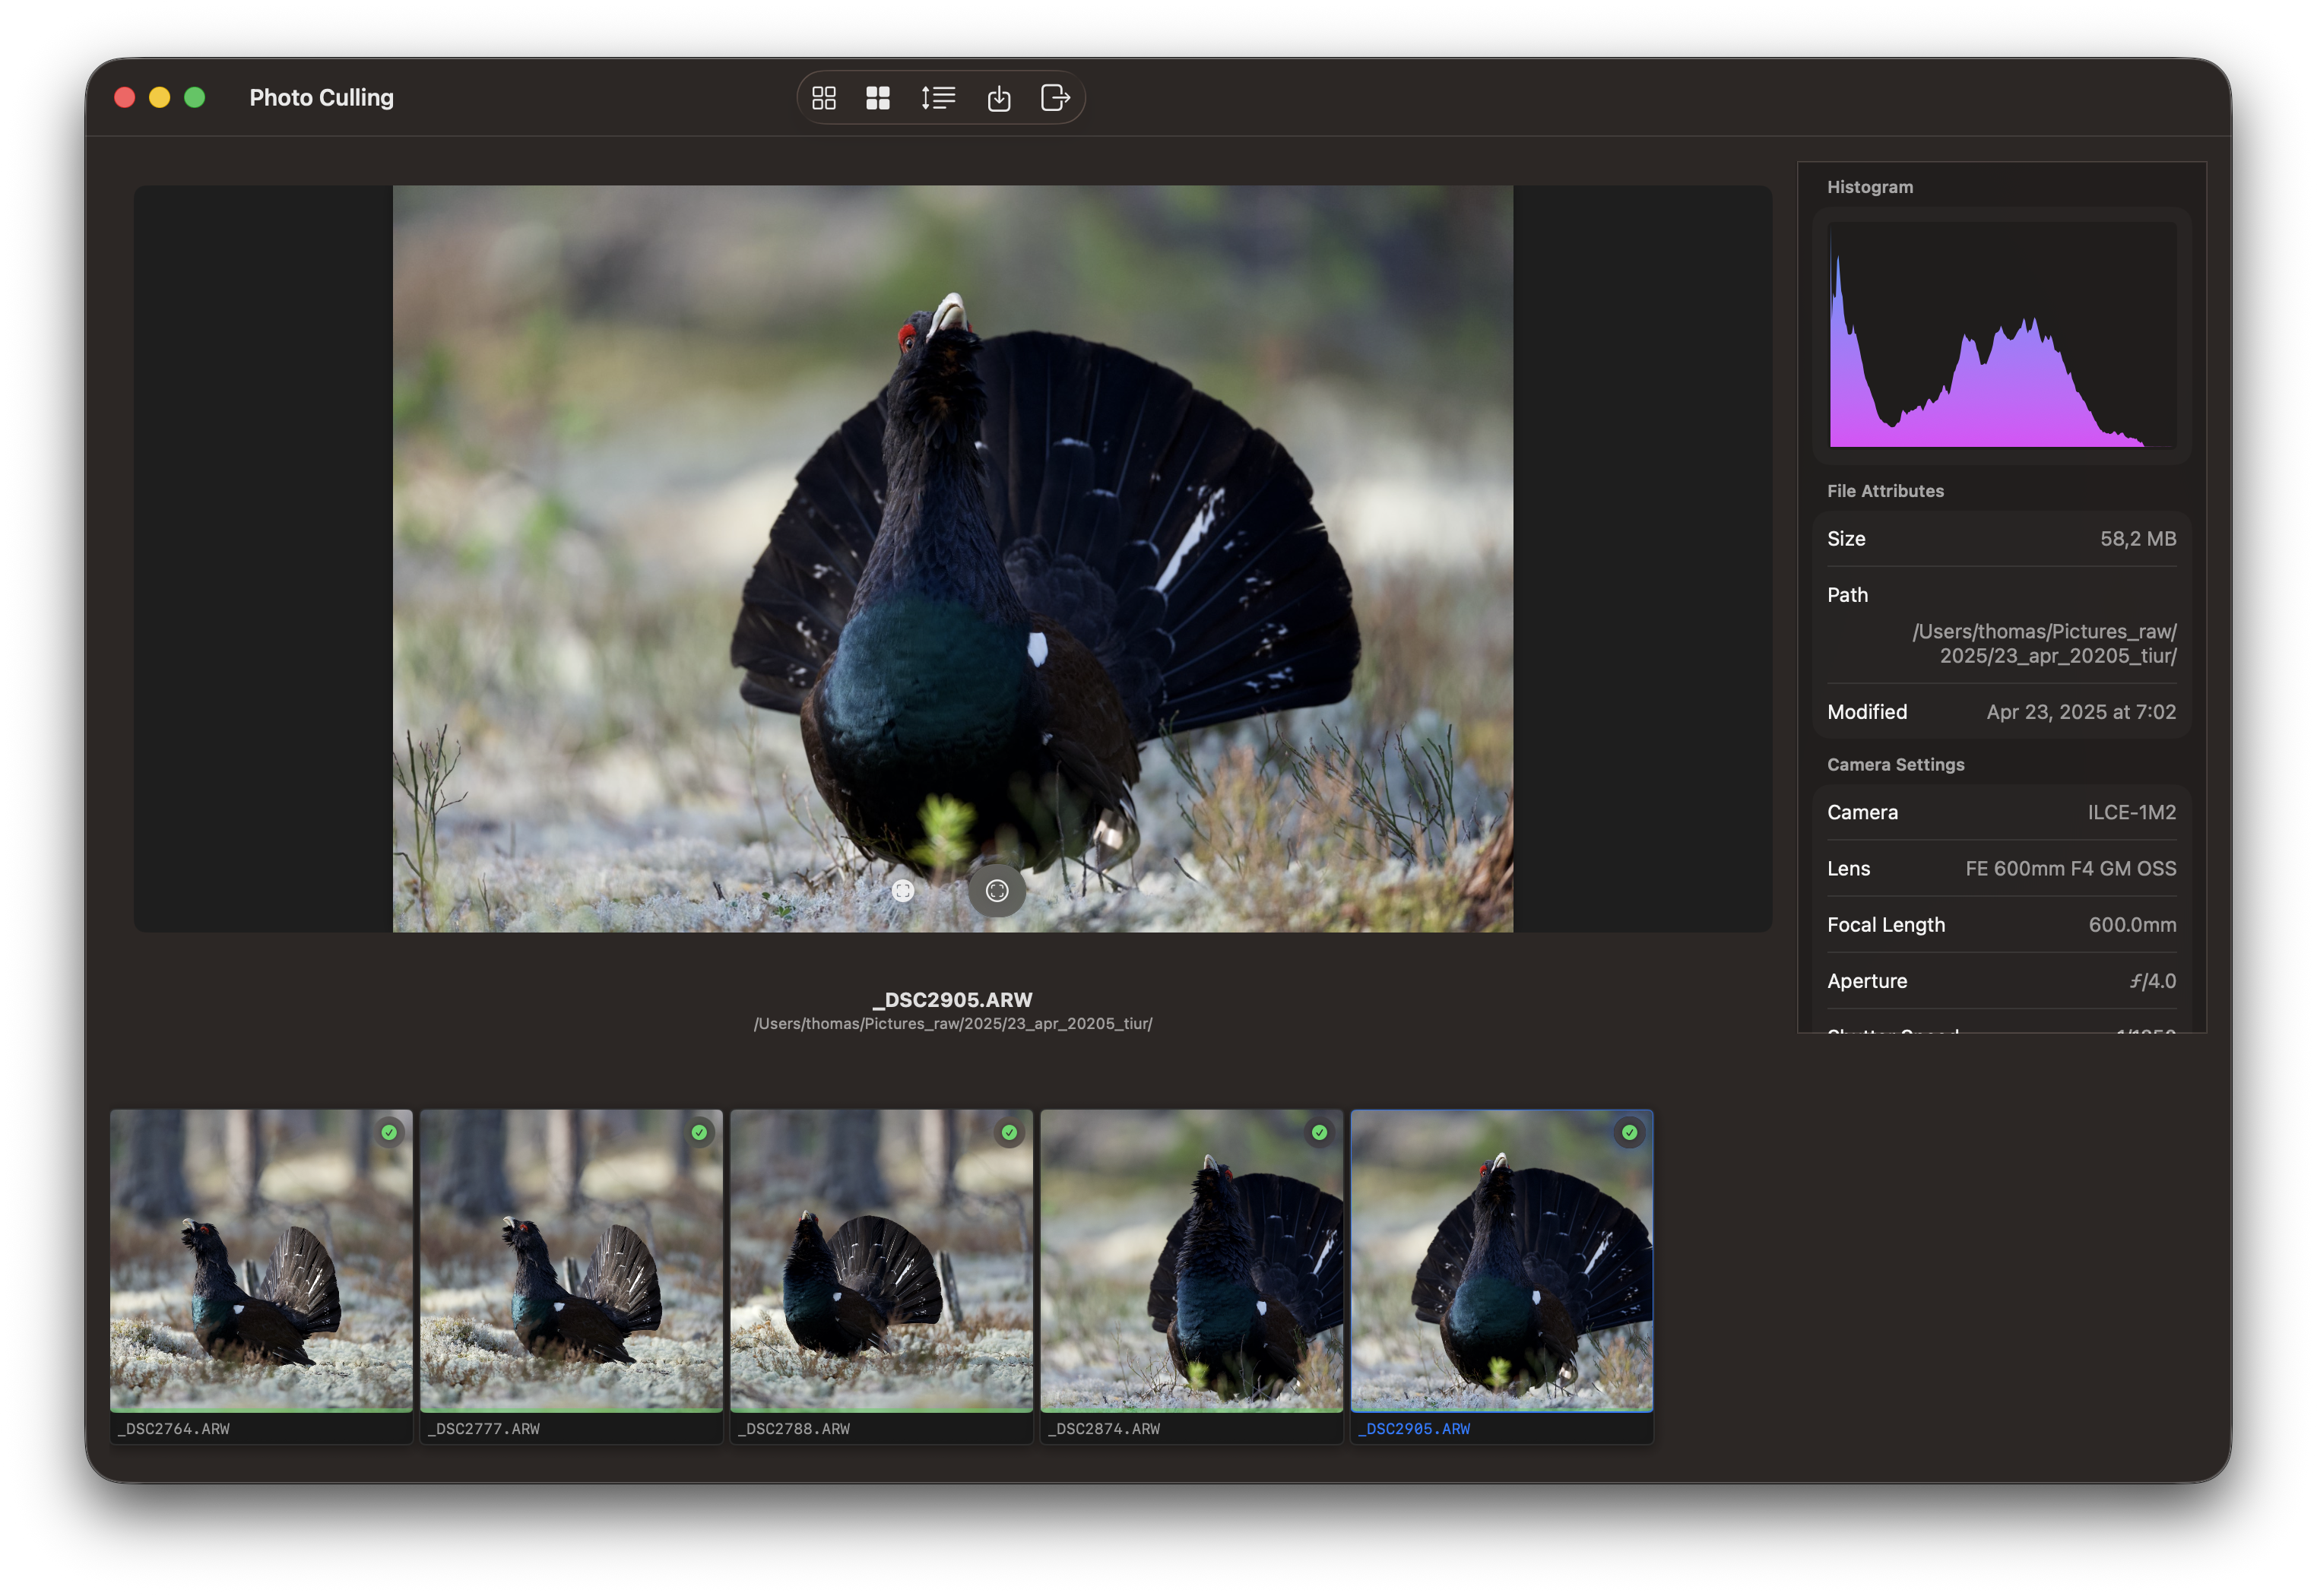
The inspector can be hidden by toggling the hide/show icon on the toolbar.
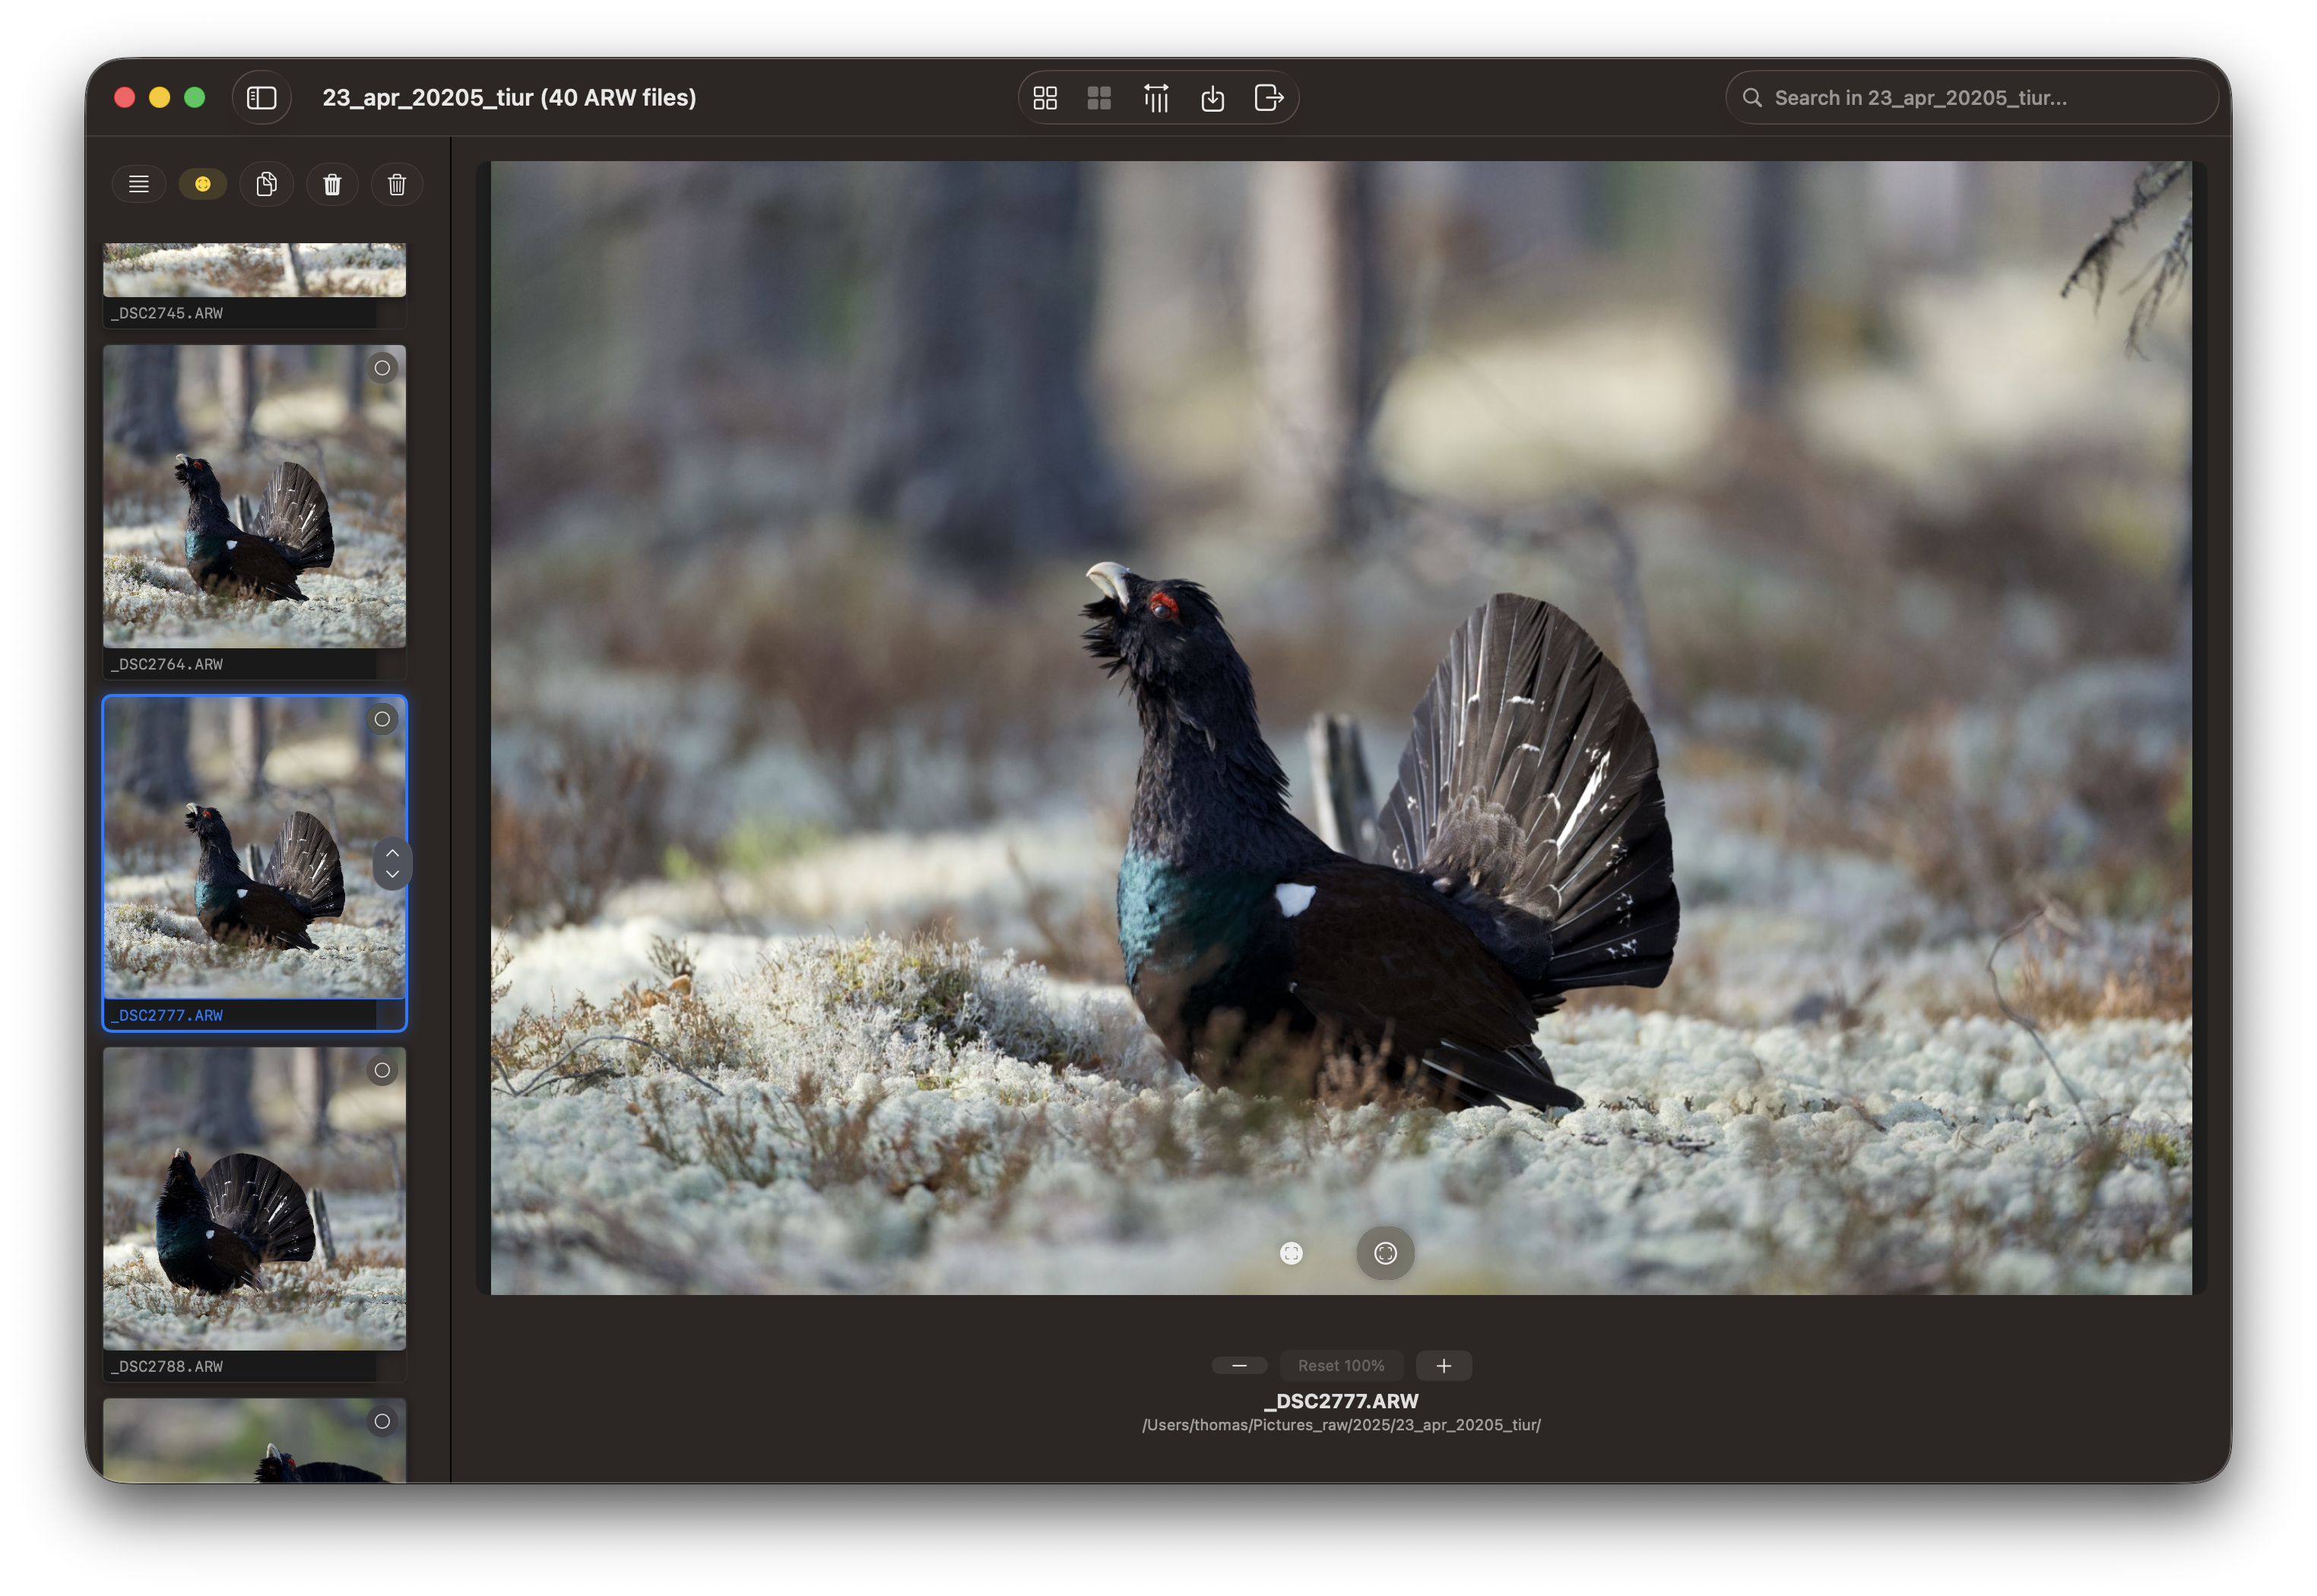
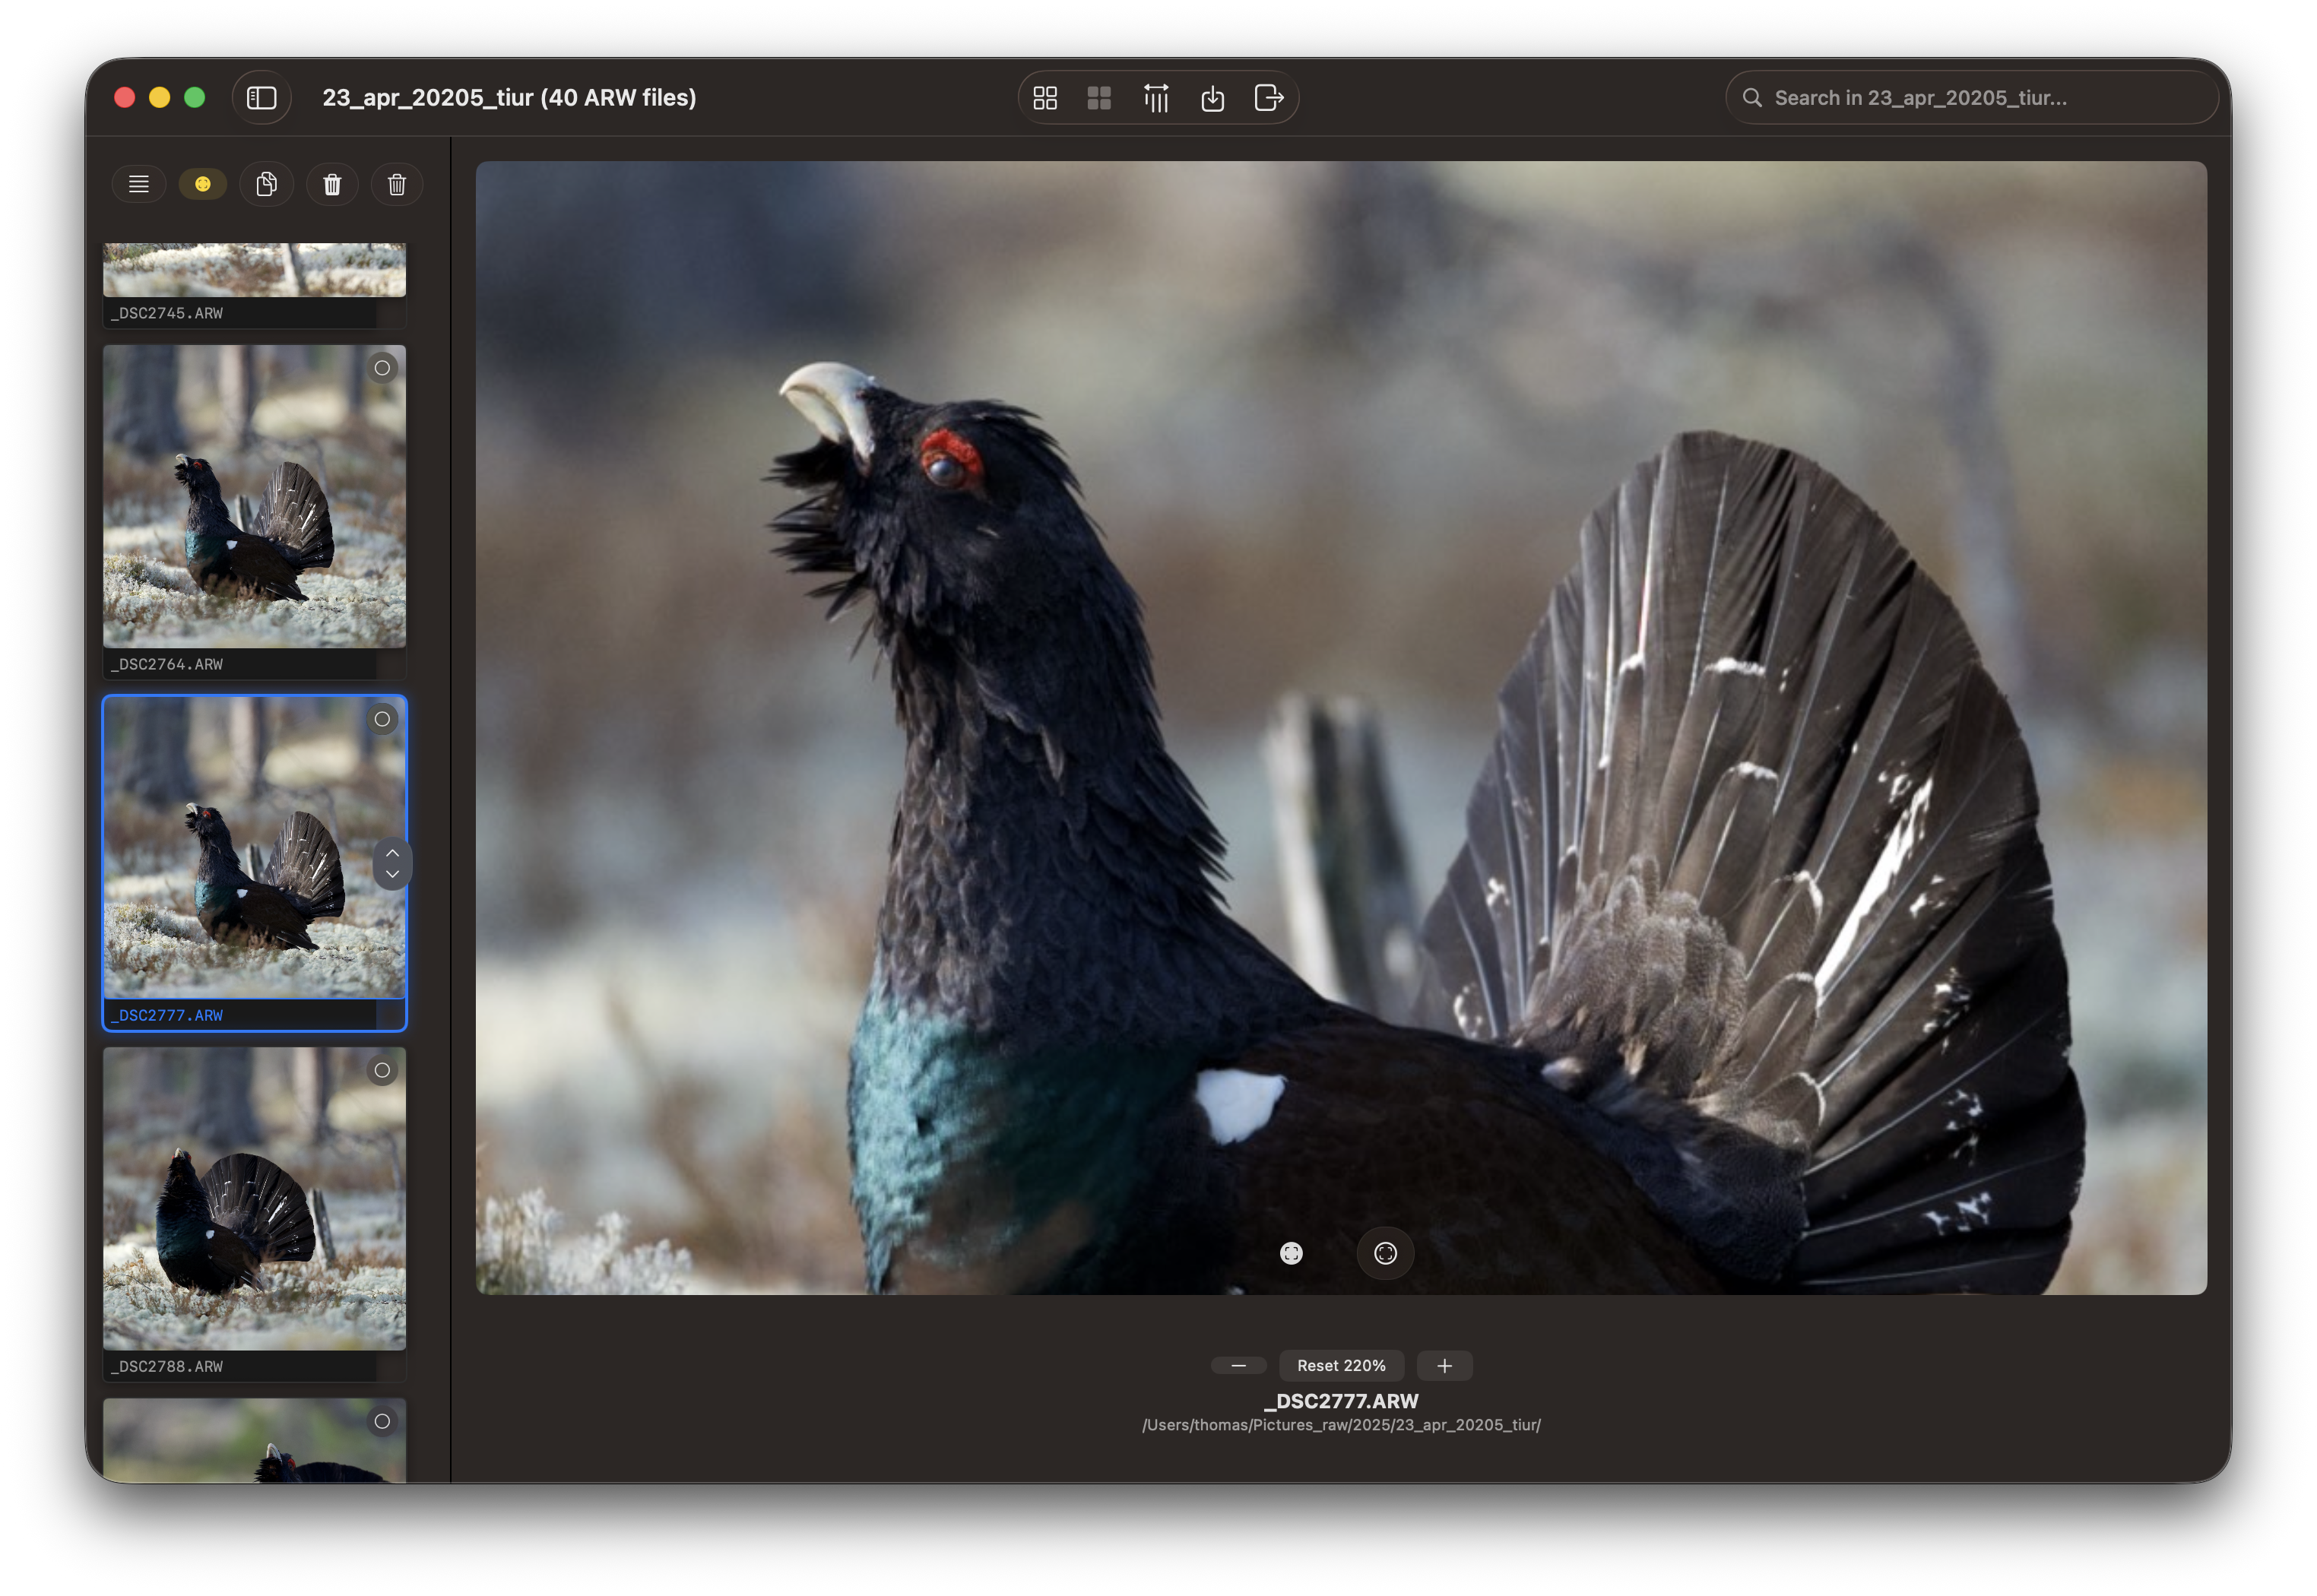
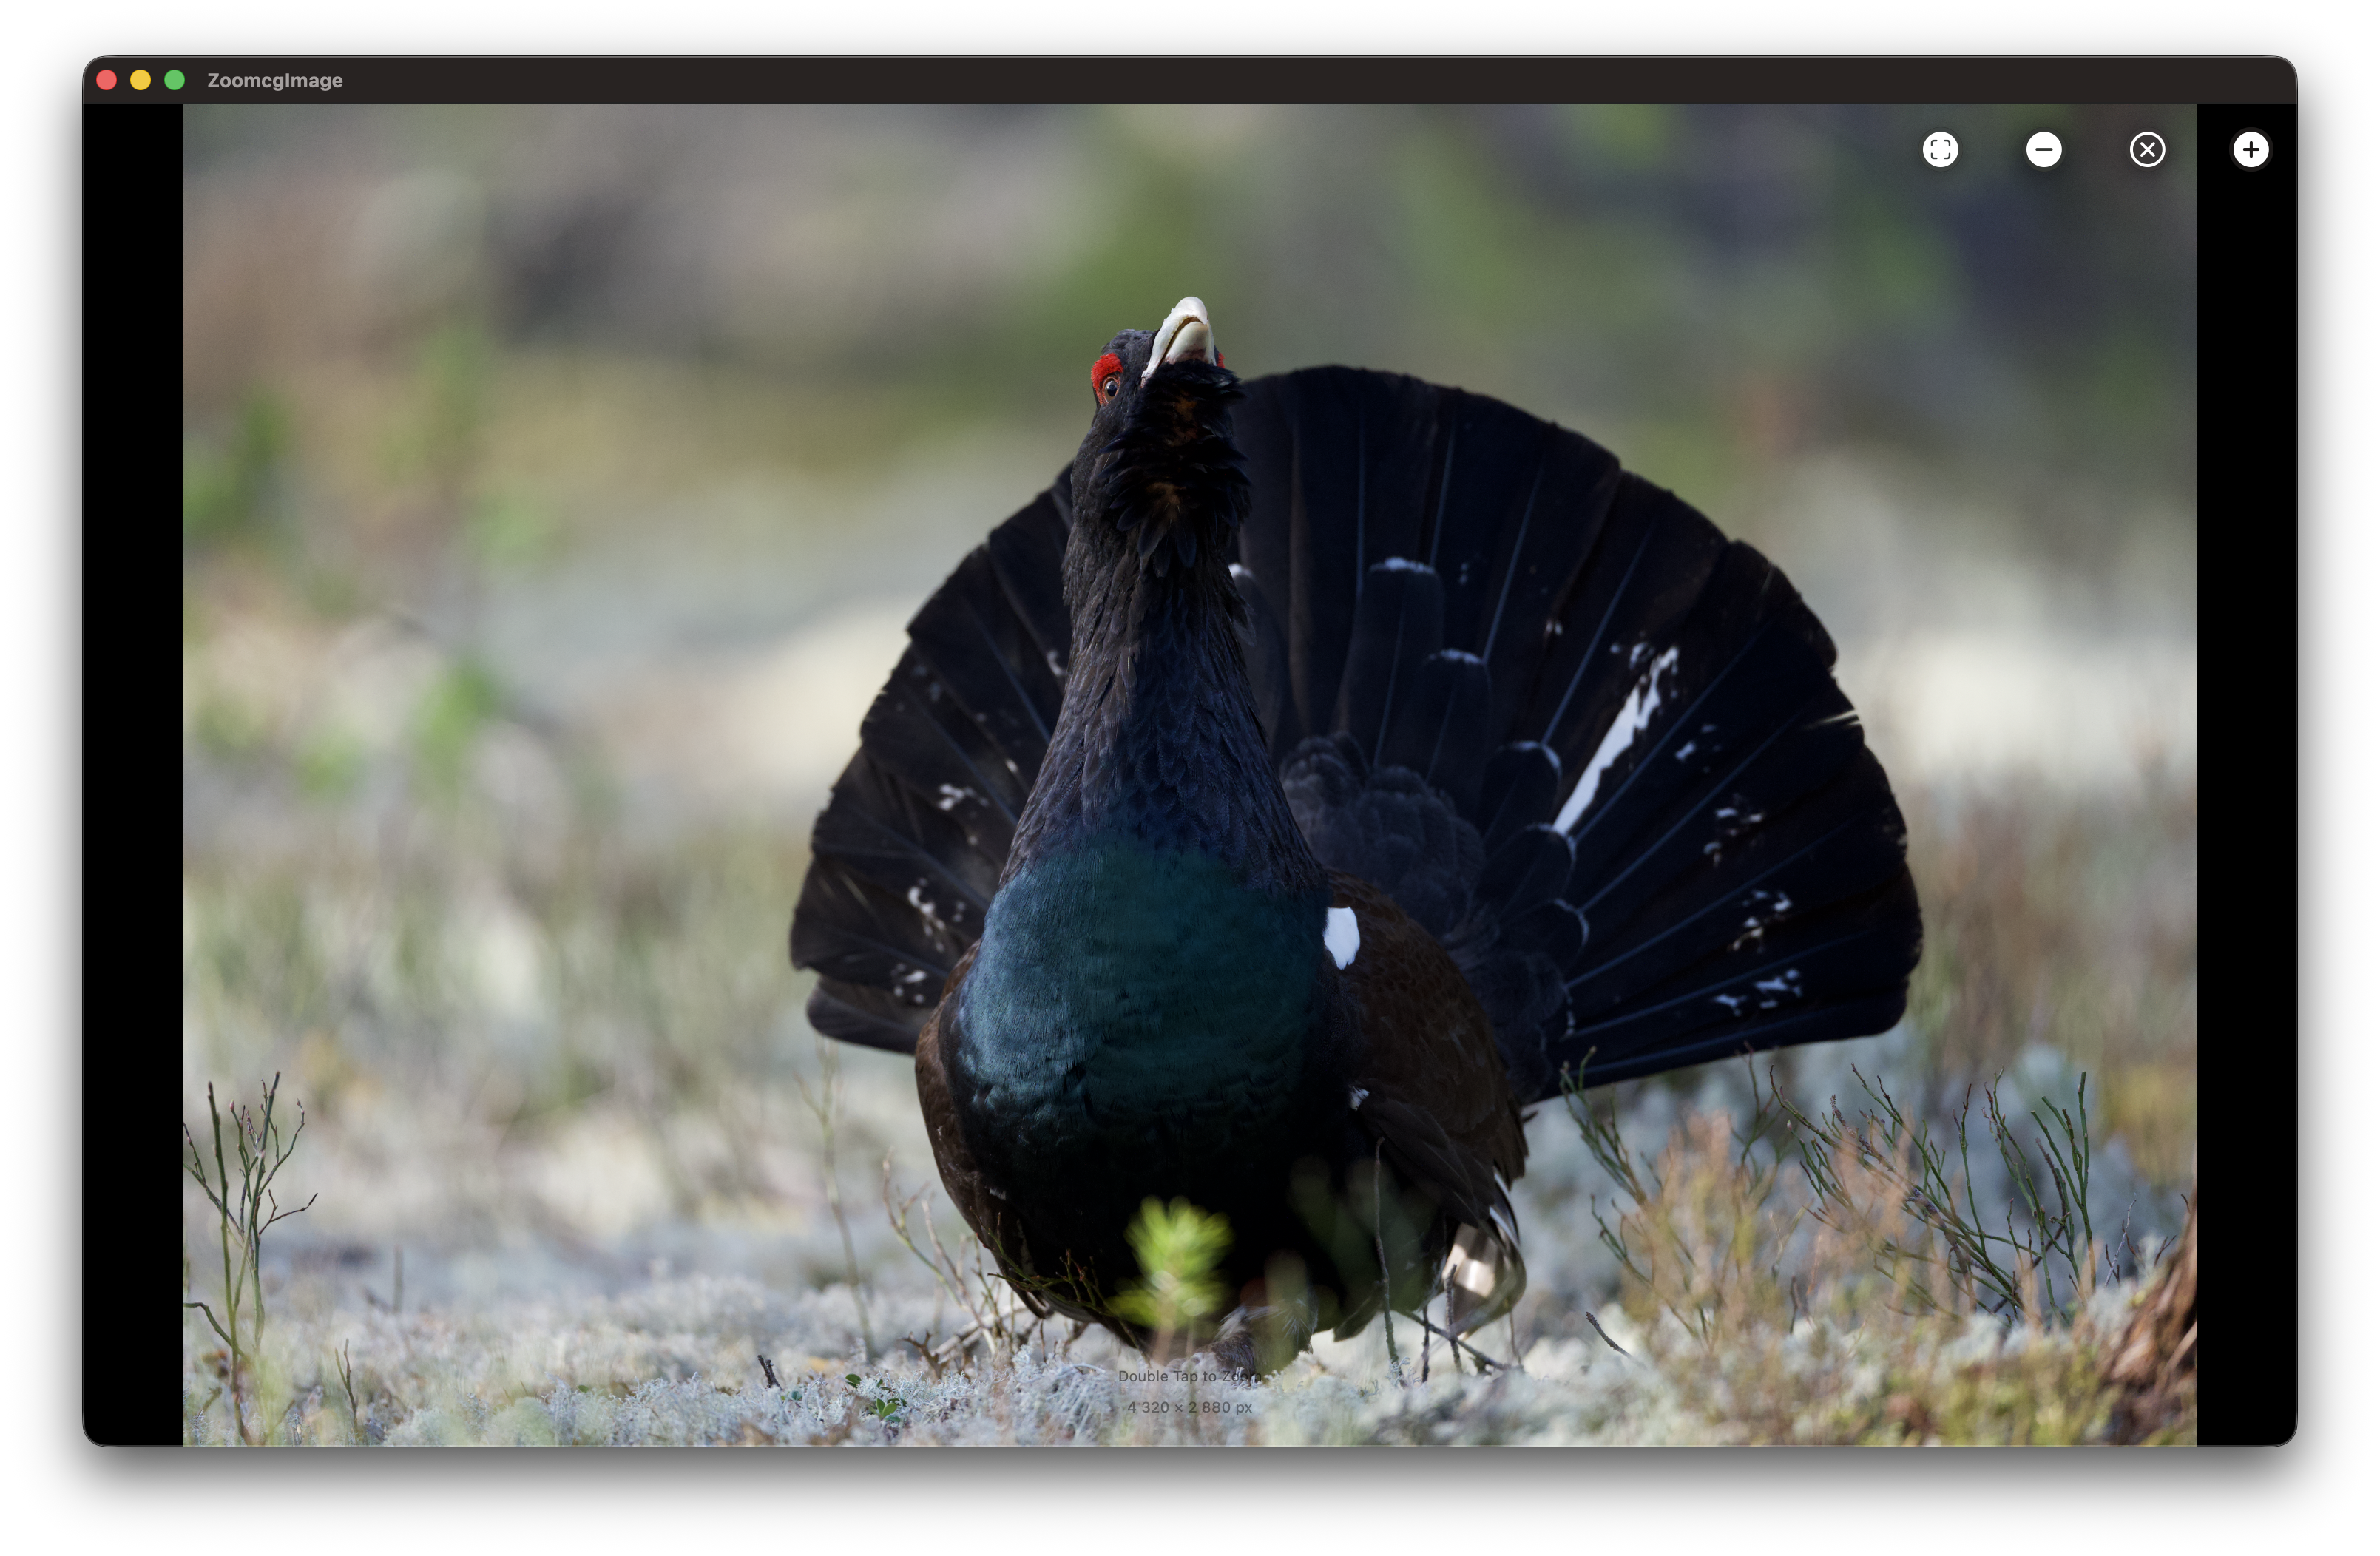
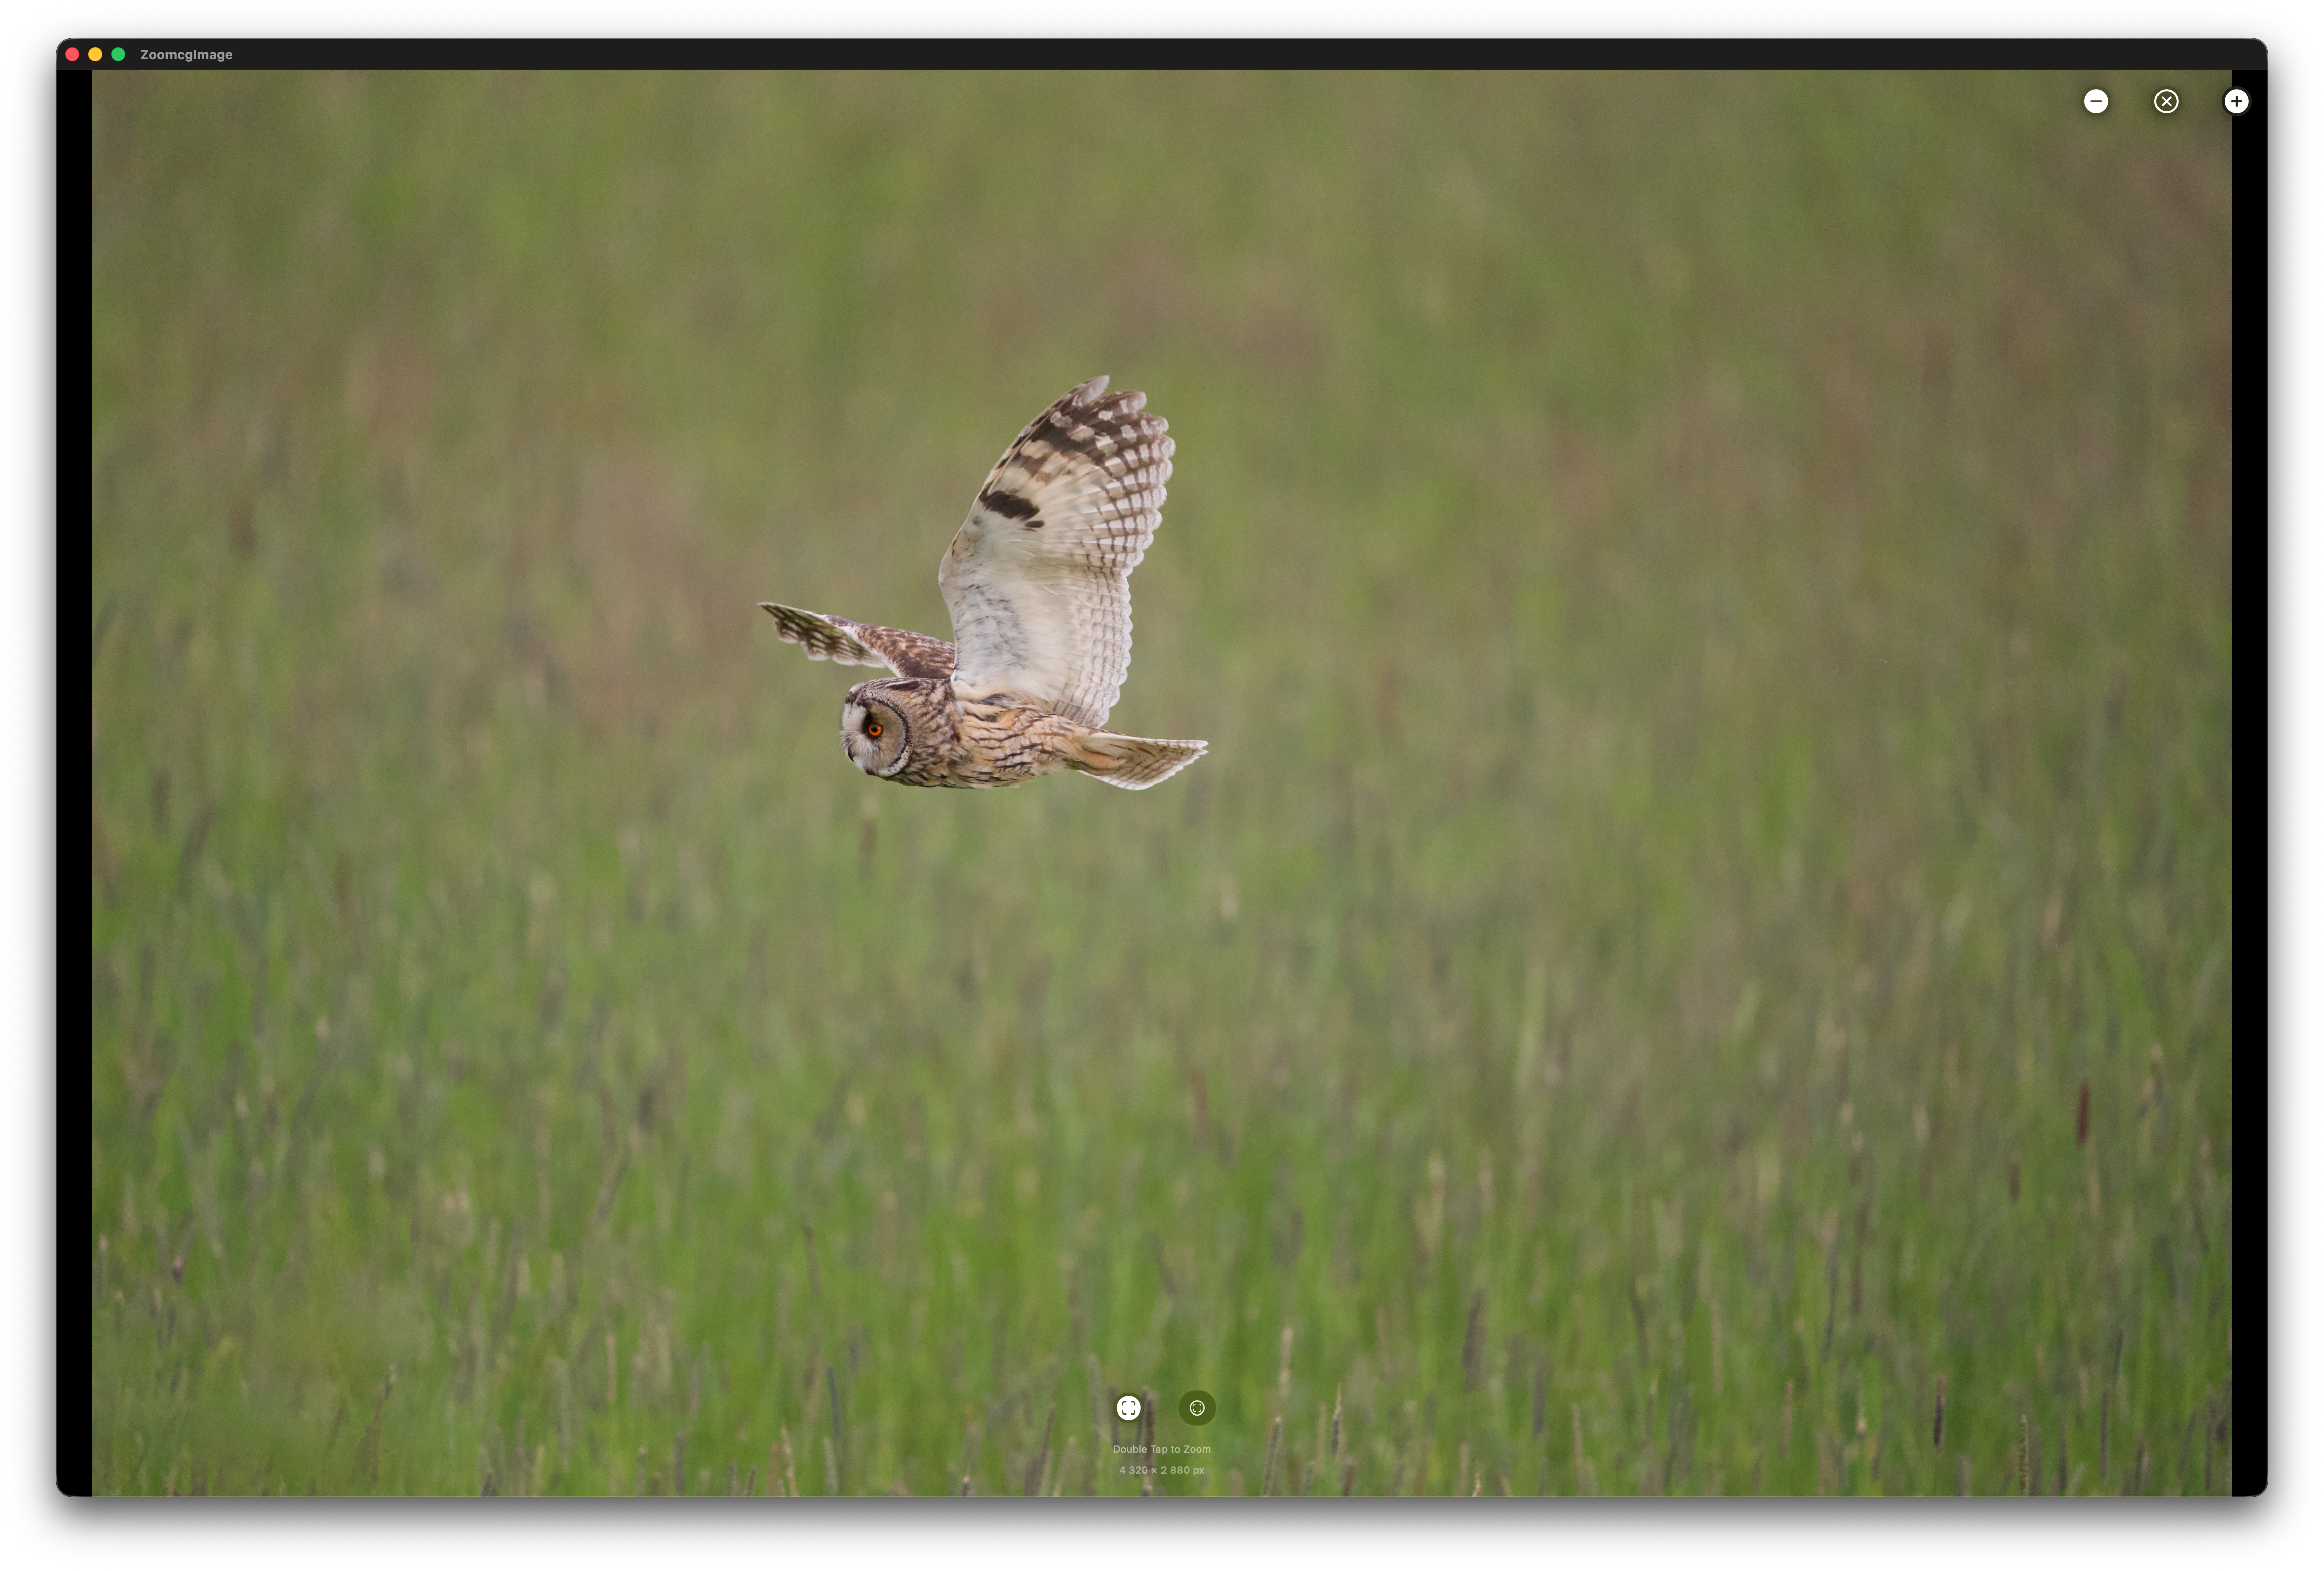
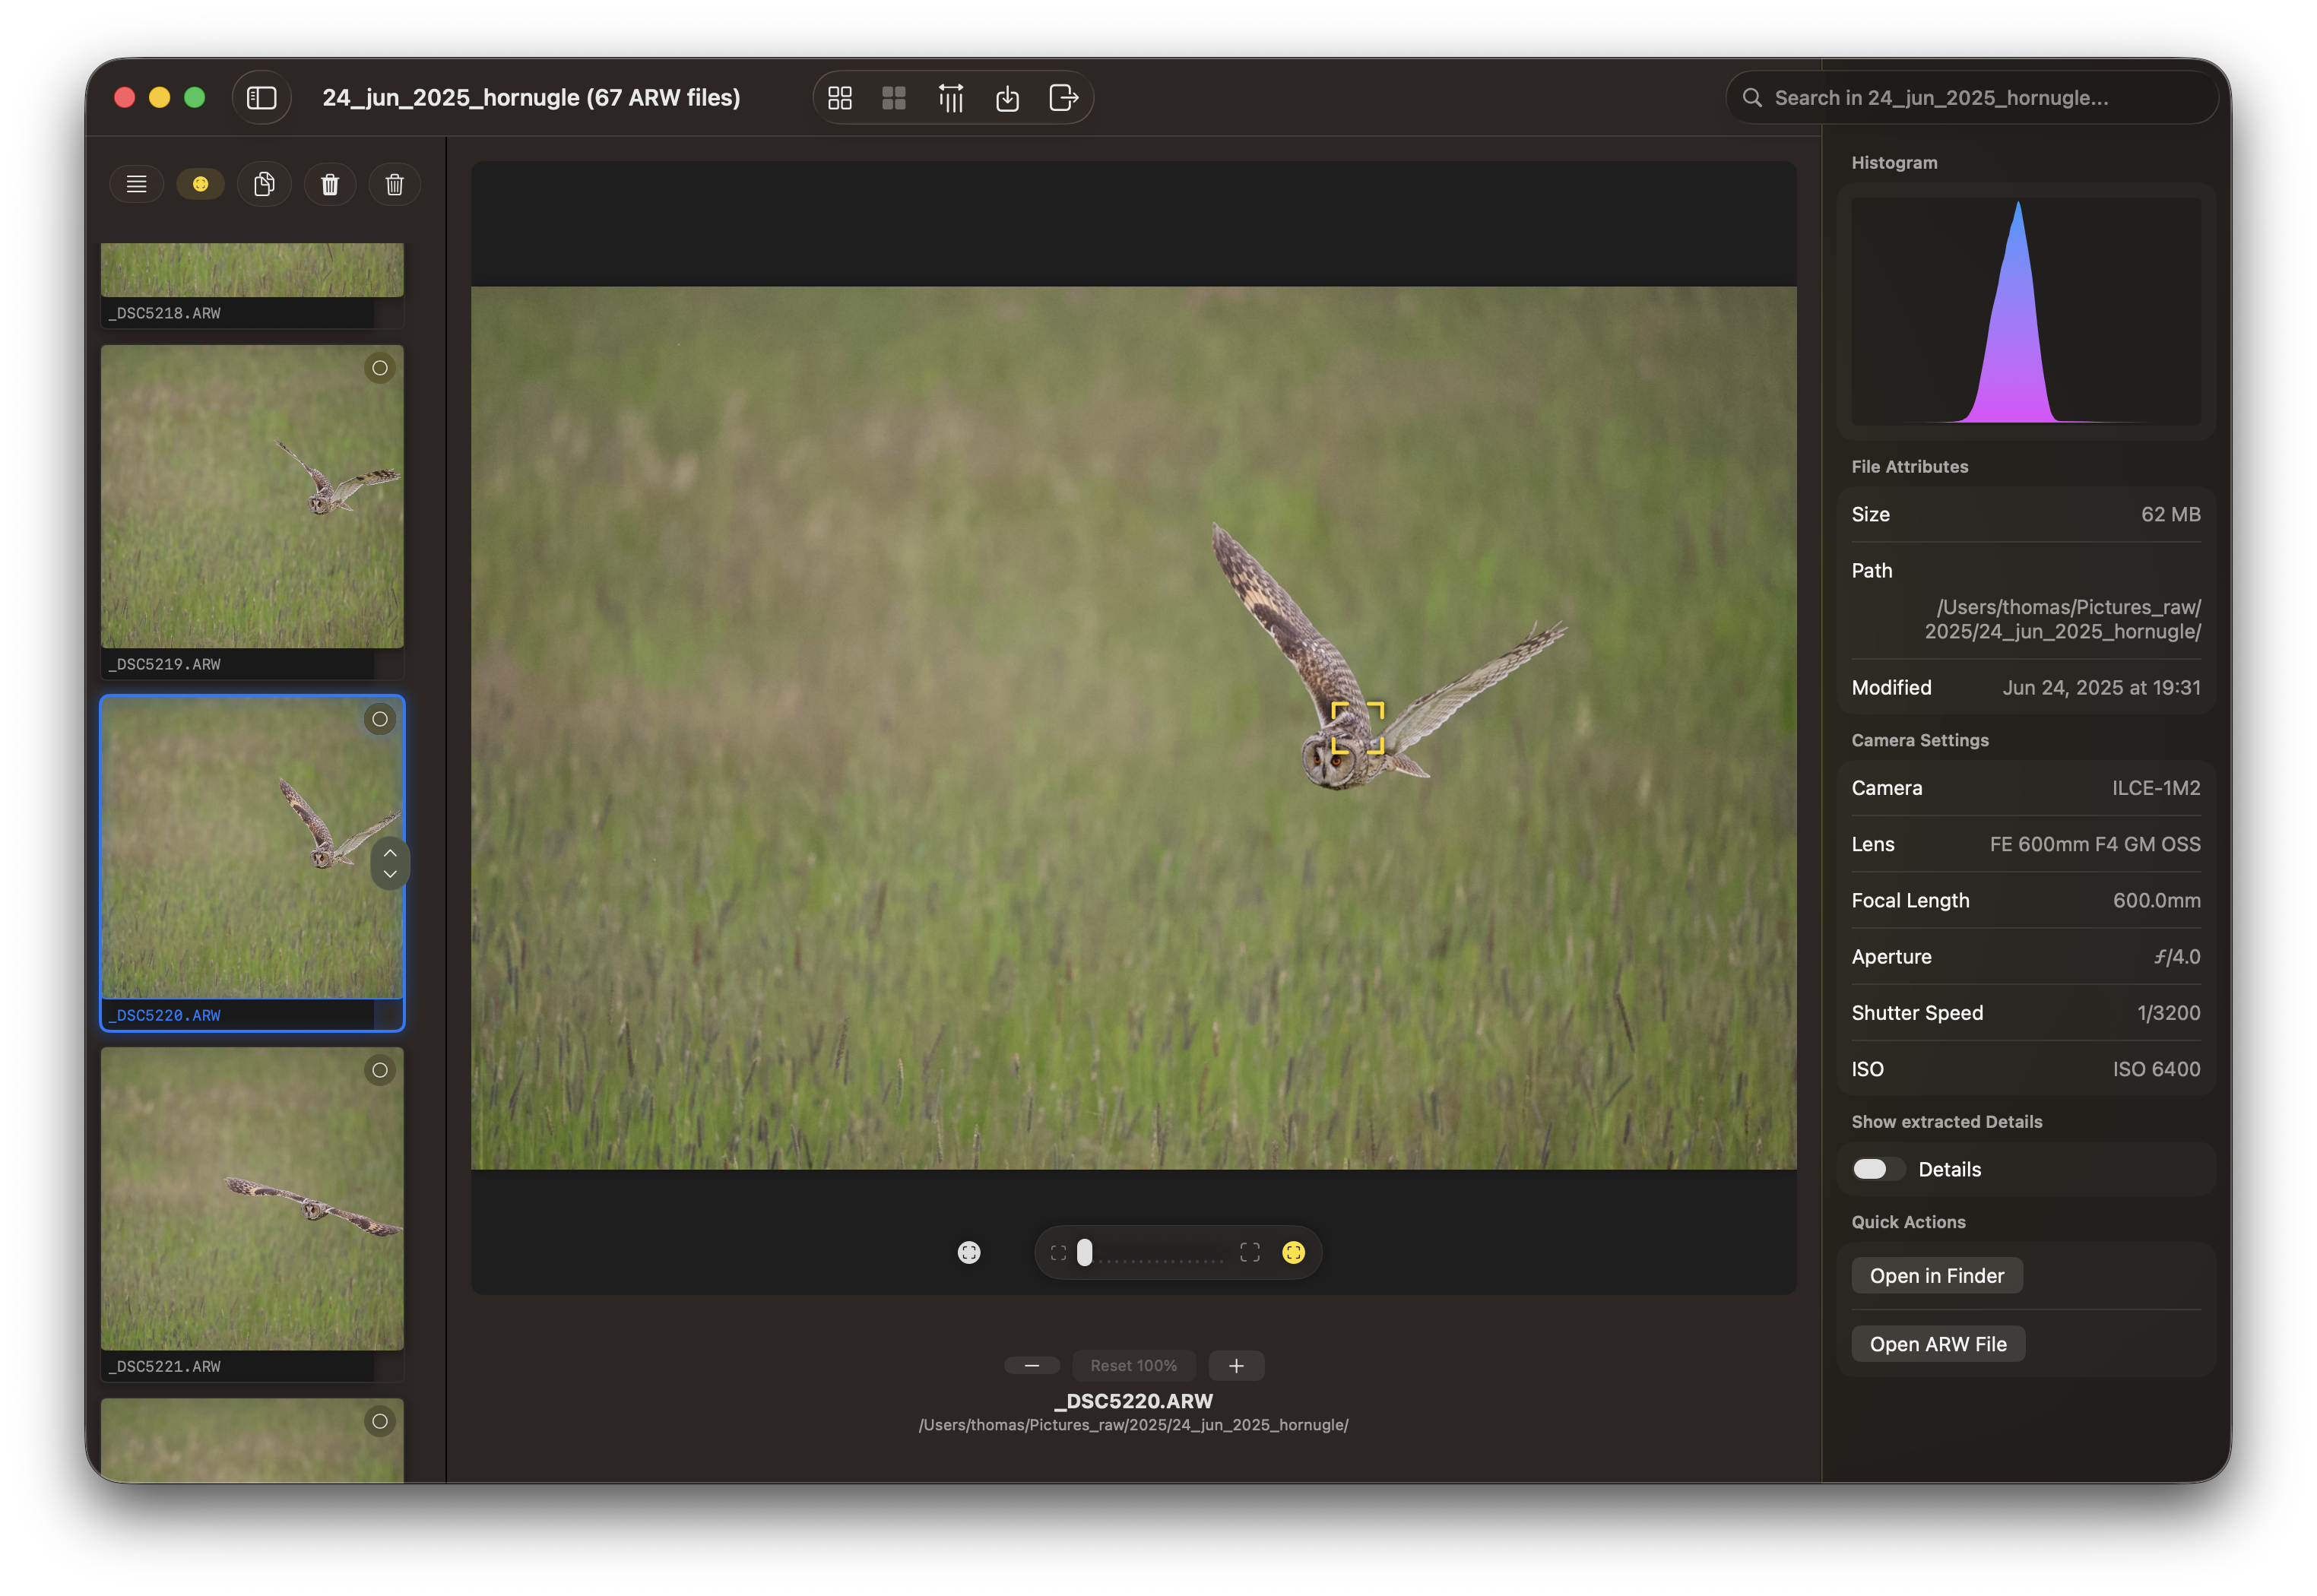
You may also zoom in on details by utilizing the + and - buttons located below the image. The image is either a 1024 px or 2048 px thumbnail, and for optimal results, a double-click on the image will extract the JPG file from the ARW format. This is particularly useful for viewing and focusing on specific areas. See Zoom and Focus Peek below.
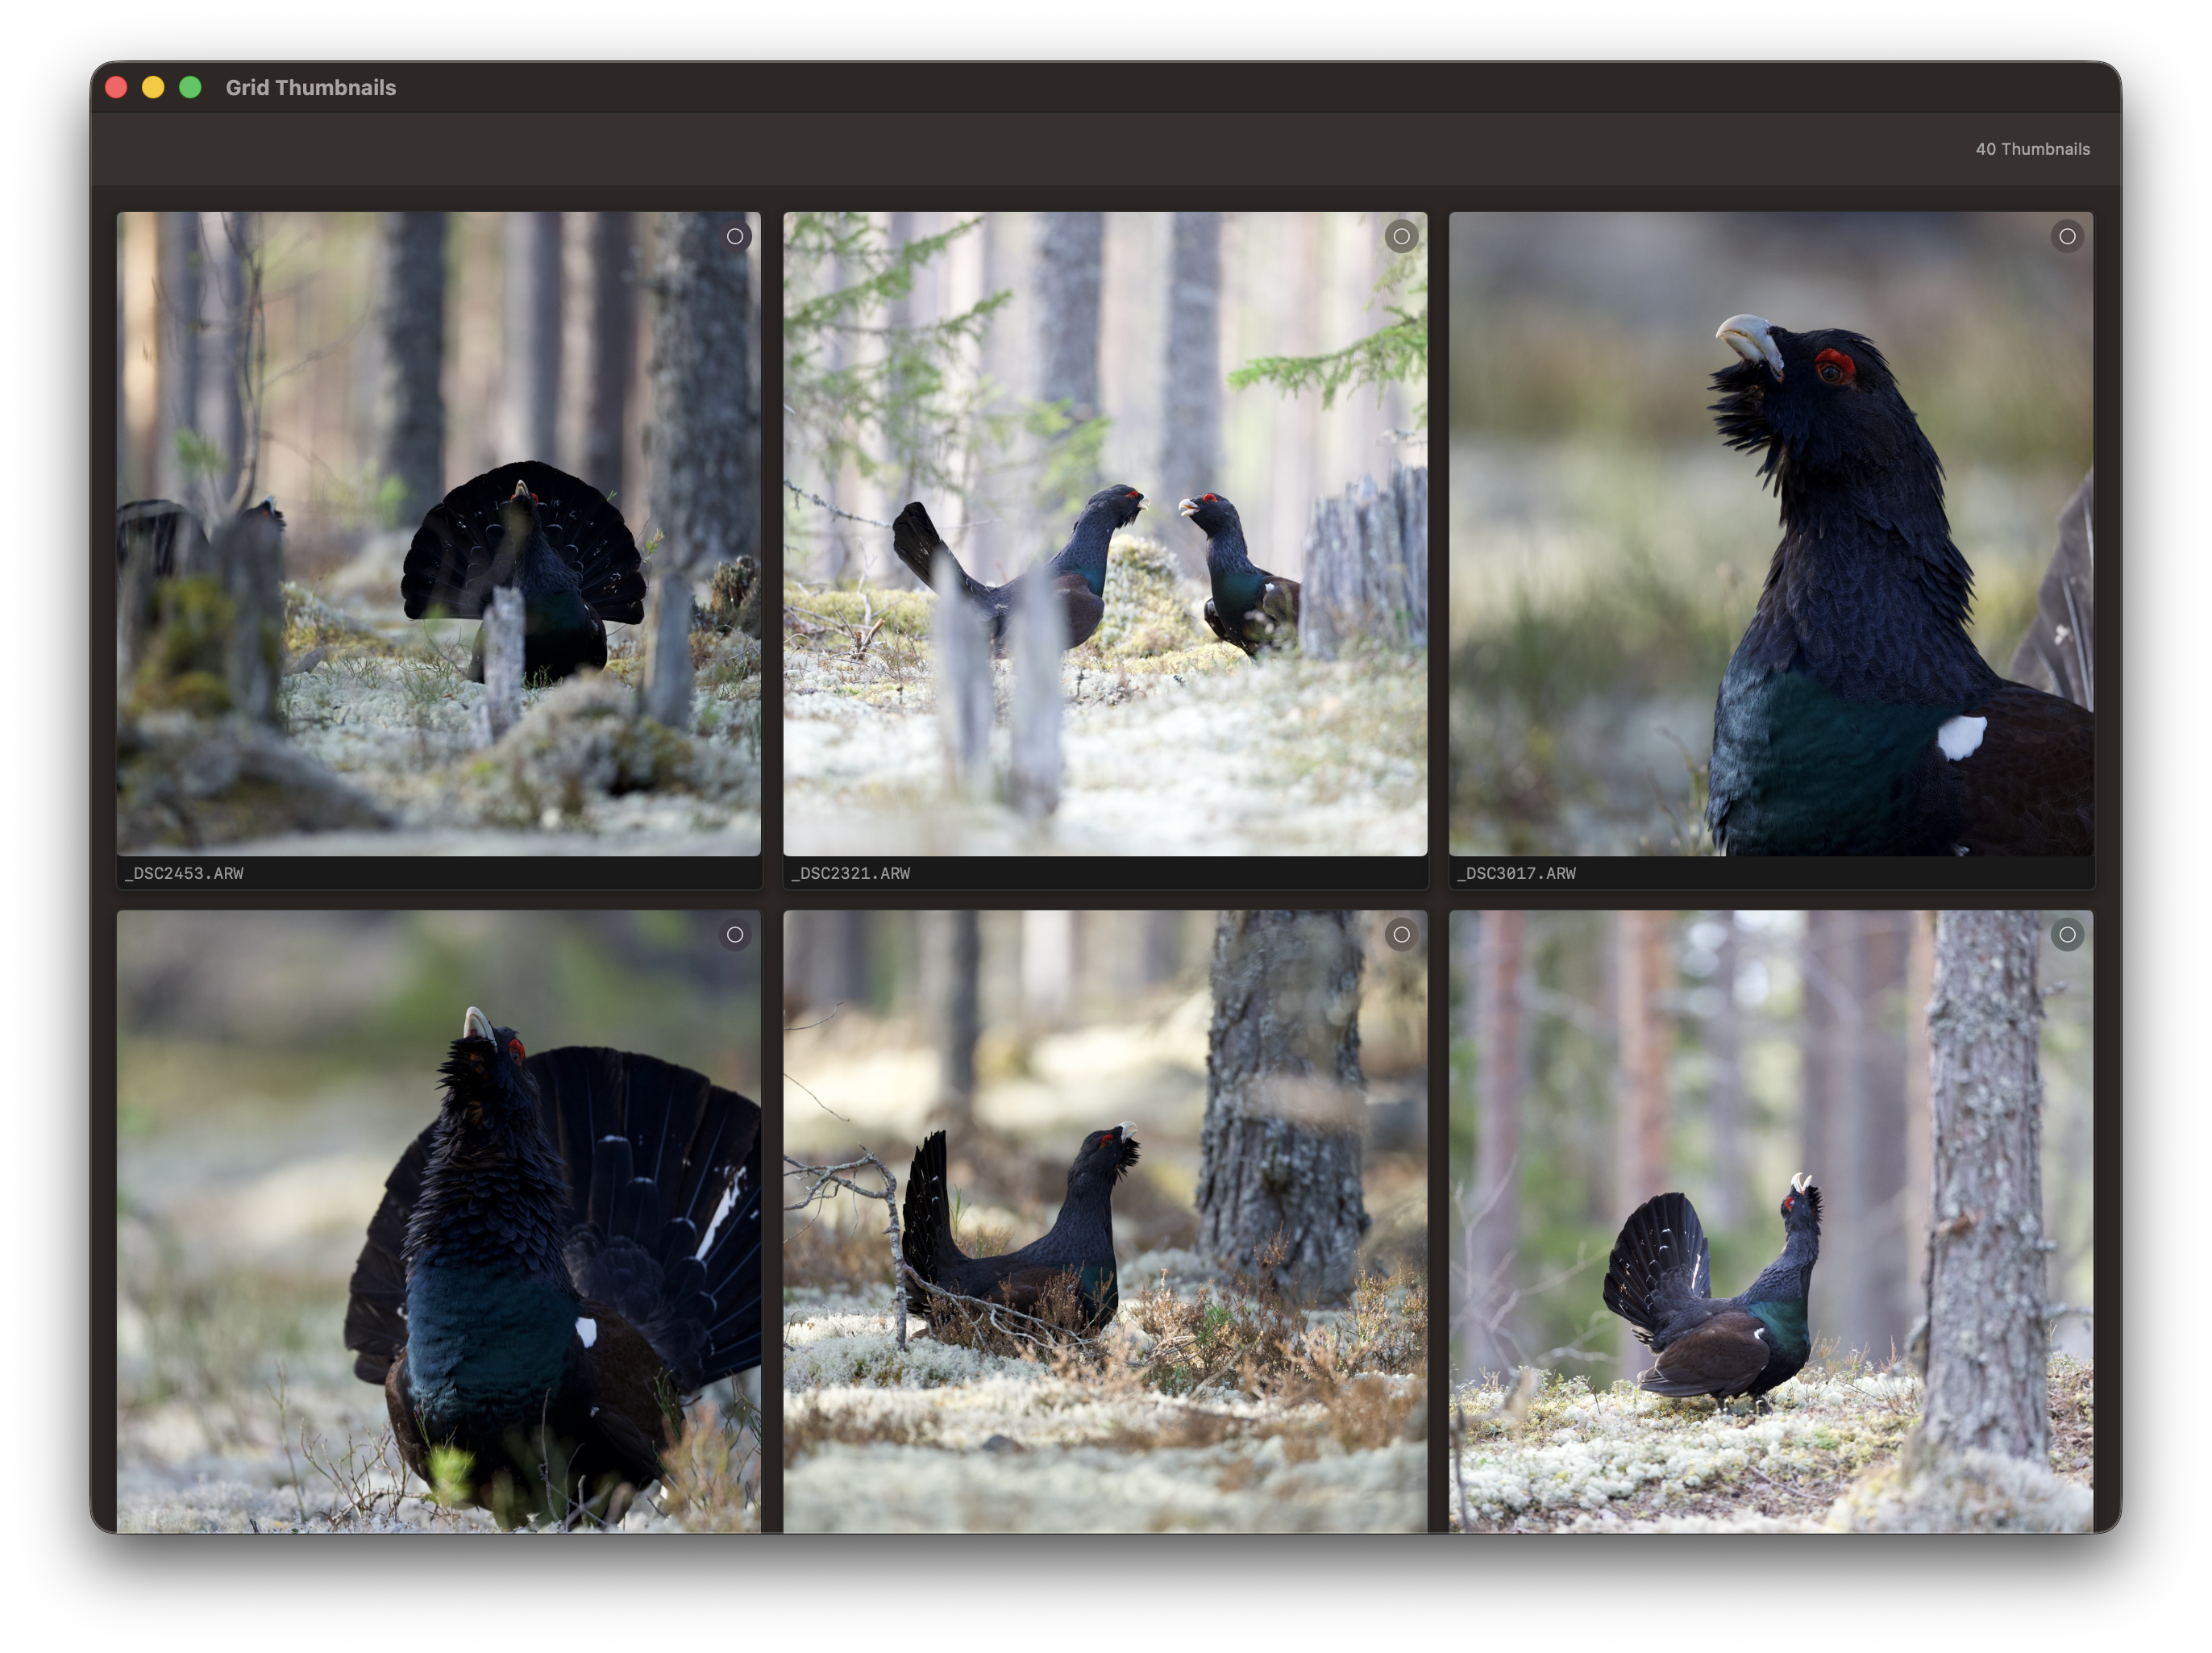
The Grid View presents all created thumbnails. You may also select keepers from the Grid View.
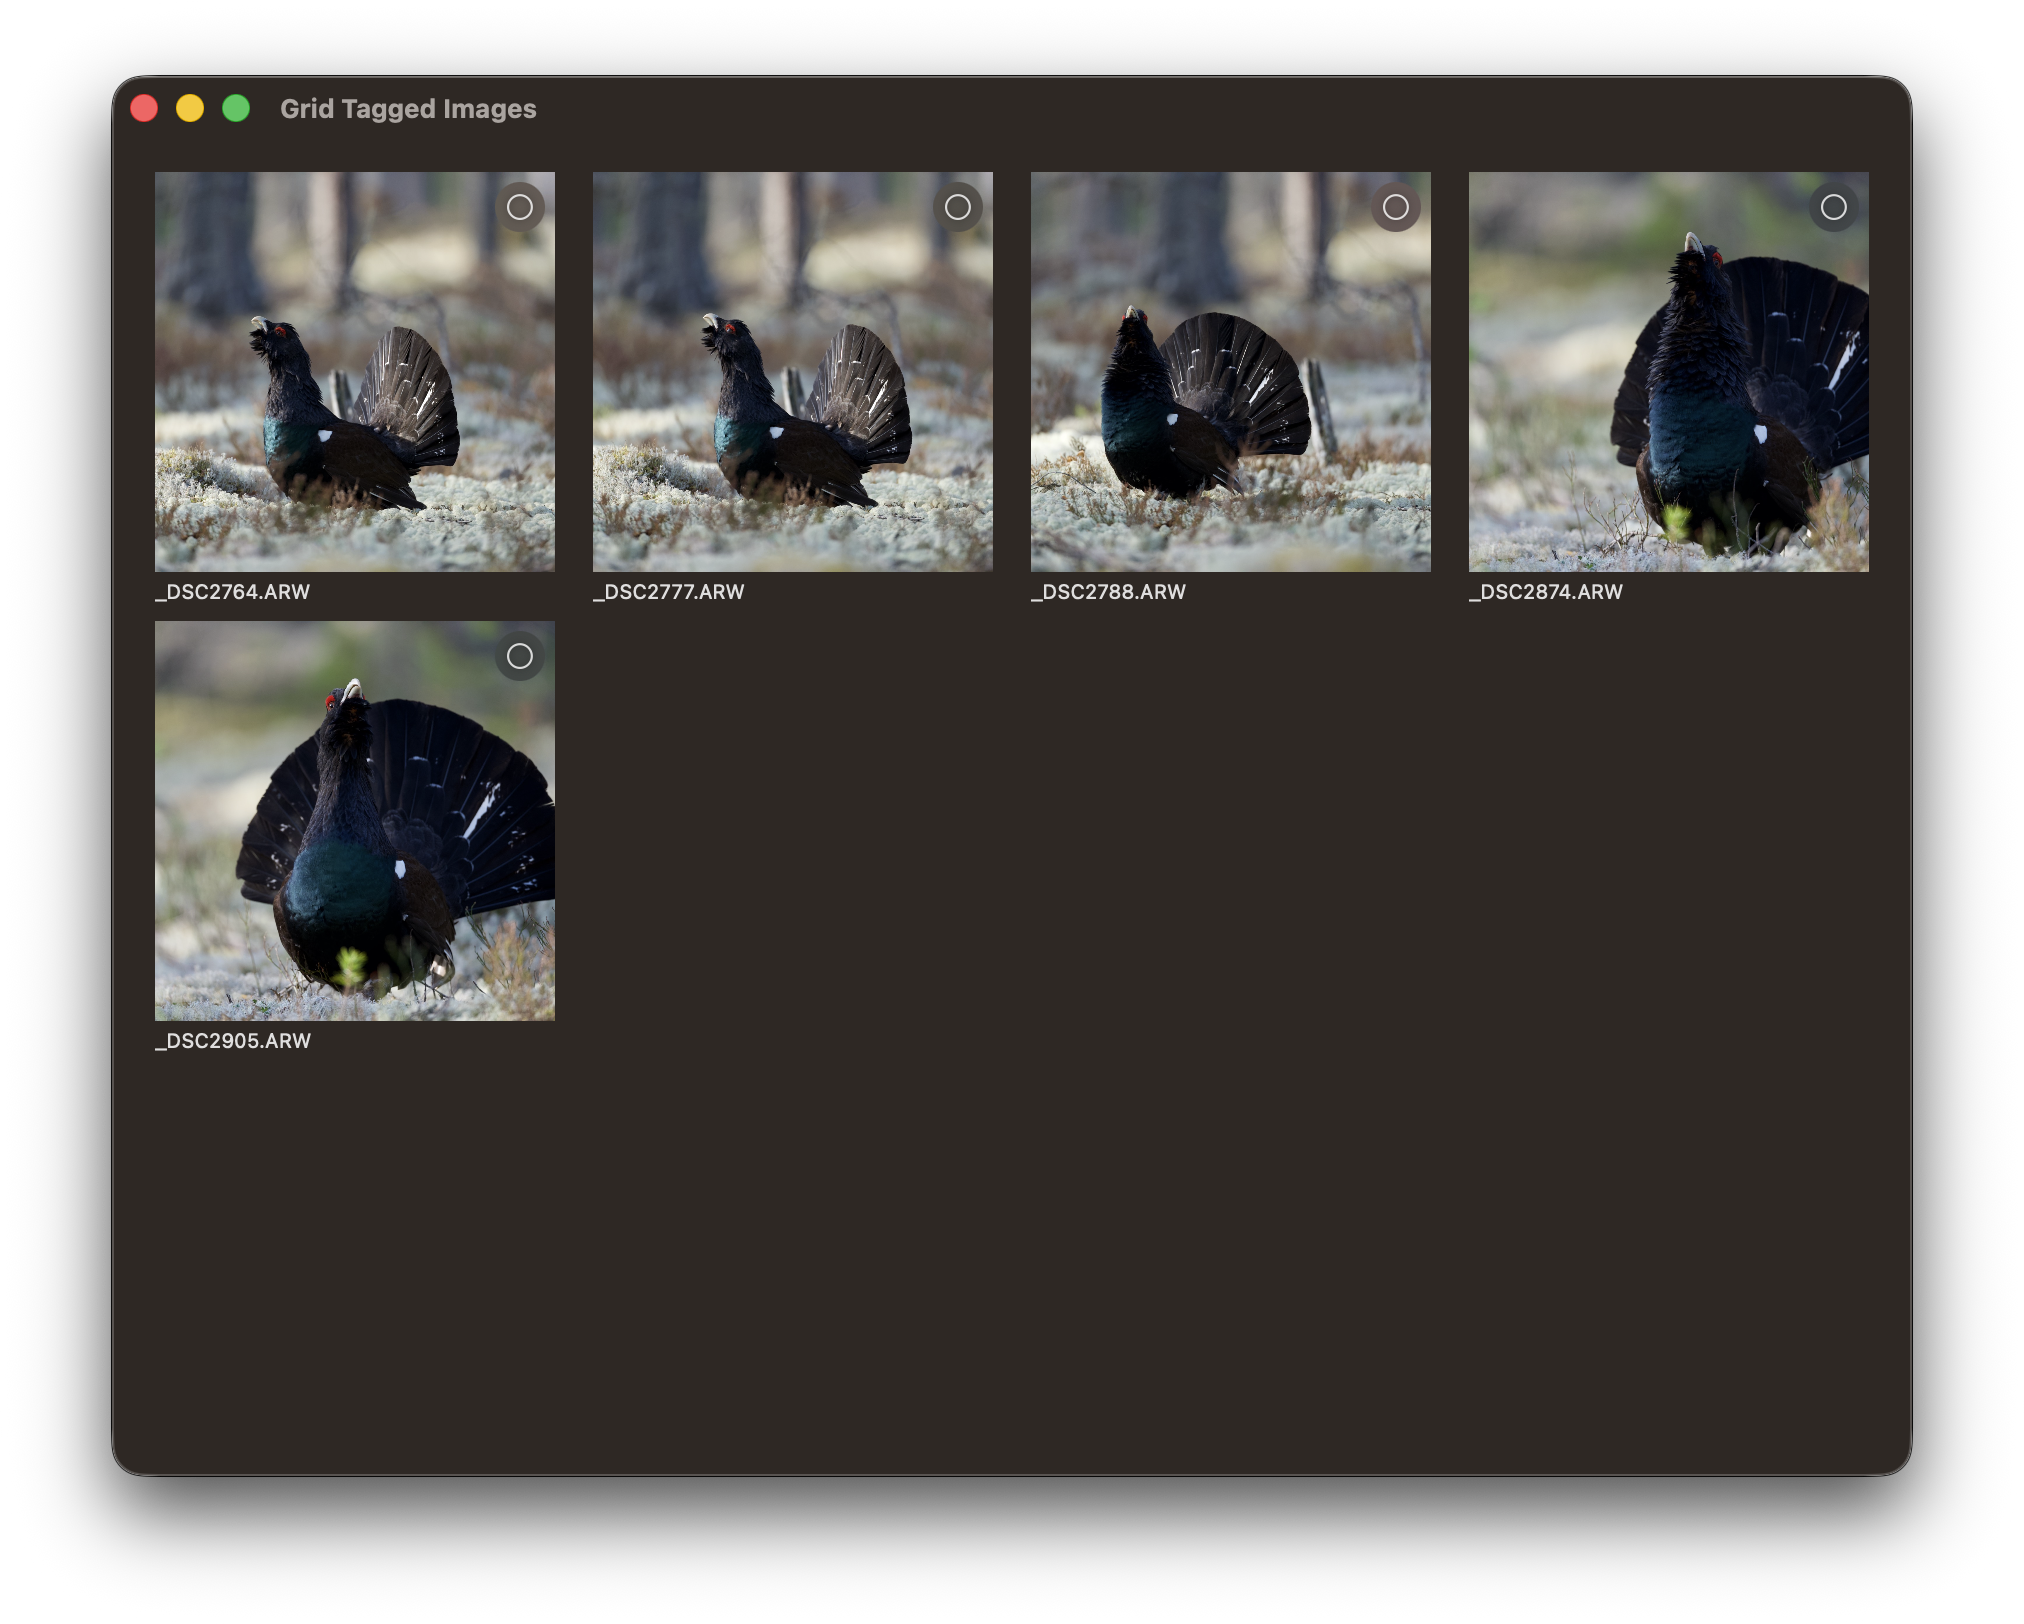
Other views
Show only tagged images.
Show images horizontally with only tagged images selected.
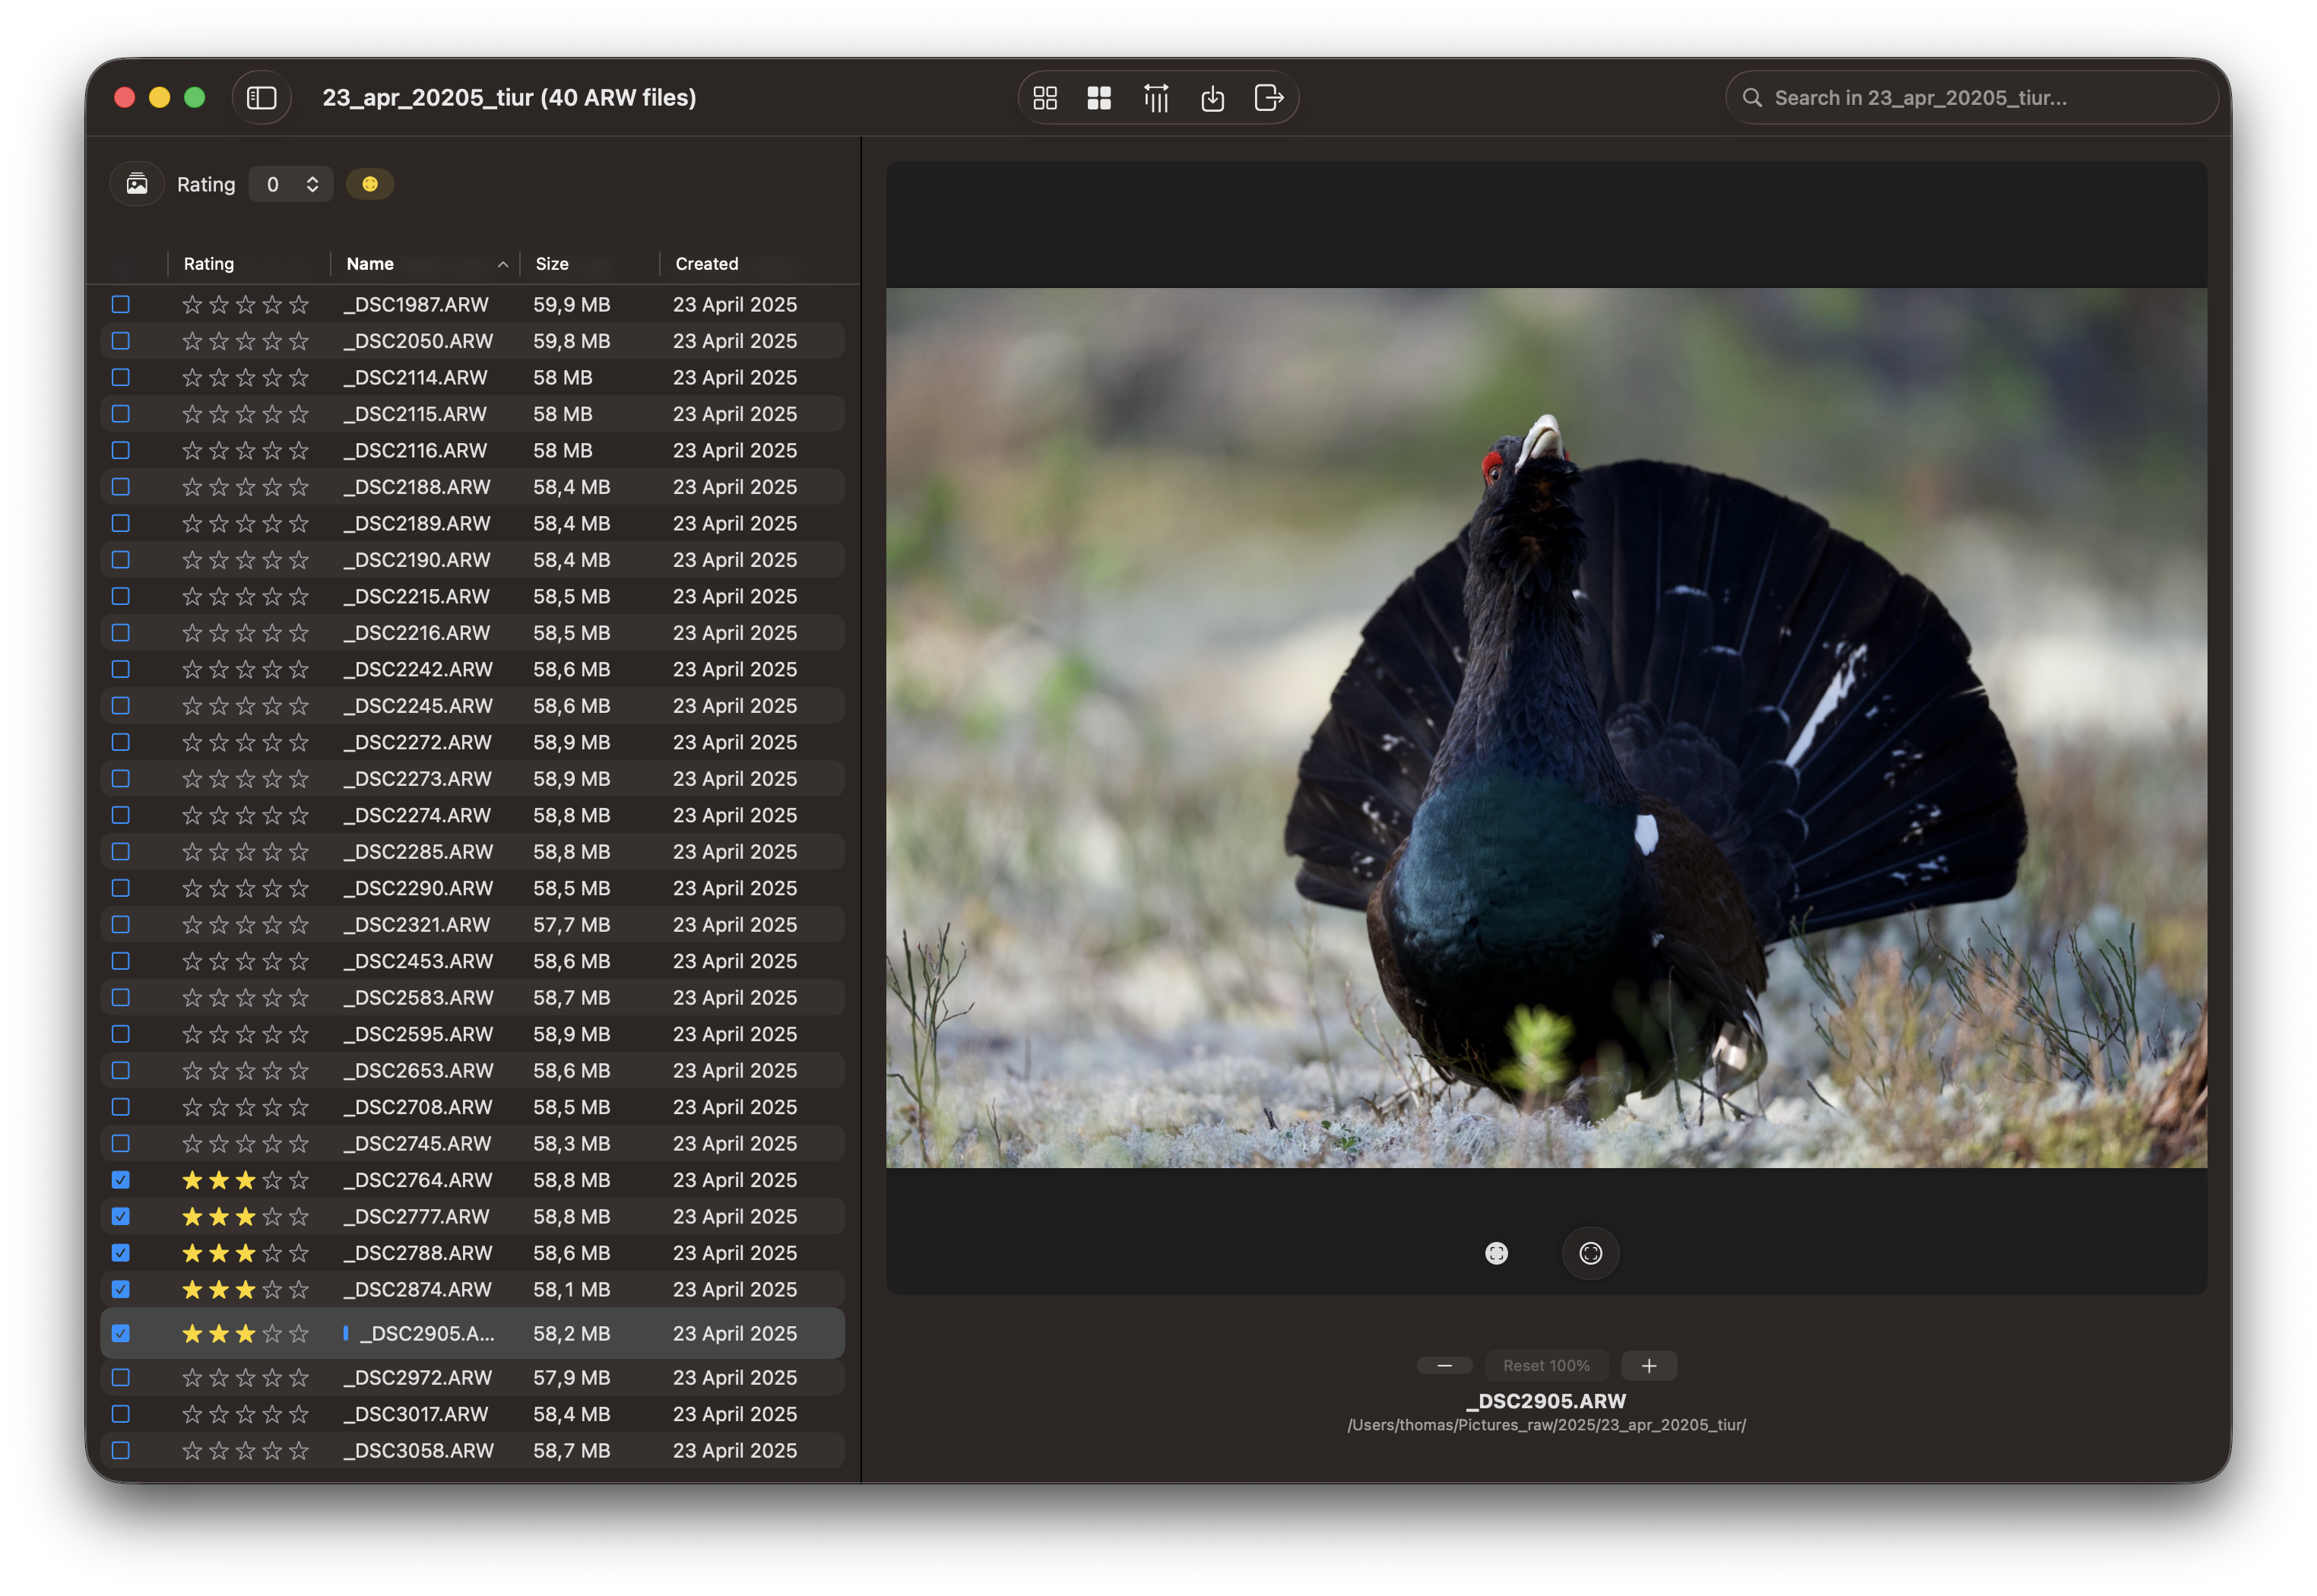
Table view.
Zoom and Focus Peek
To obtain the most optimal results in Focus Peek view (extract), it is recommended to extract the JPG file from the ARW file. While it is possible to view Focus Peek by creating thumbnails, the mask is more effective when applied to JPGs. To access Focus Peek, double-click on the file table row. In the Settings menu, Thumbnails tab, disable the “Use Thumbnail for Zoom” to use JPGs as base for Focus Peek.
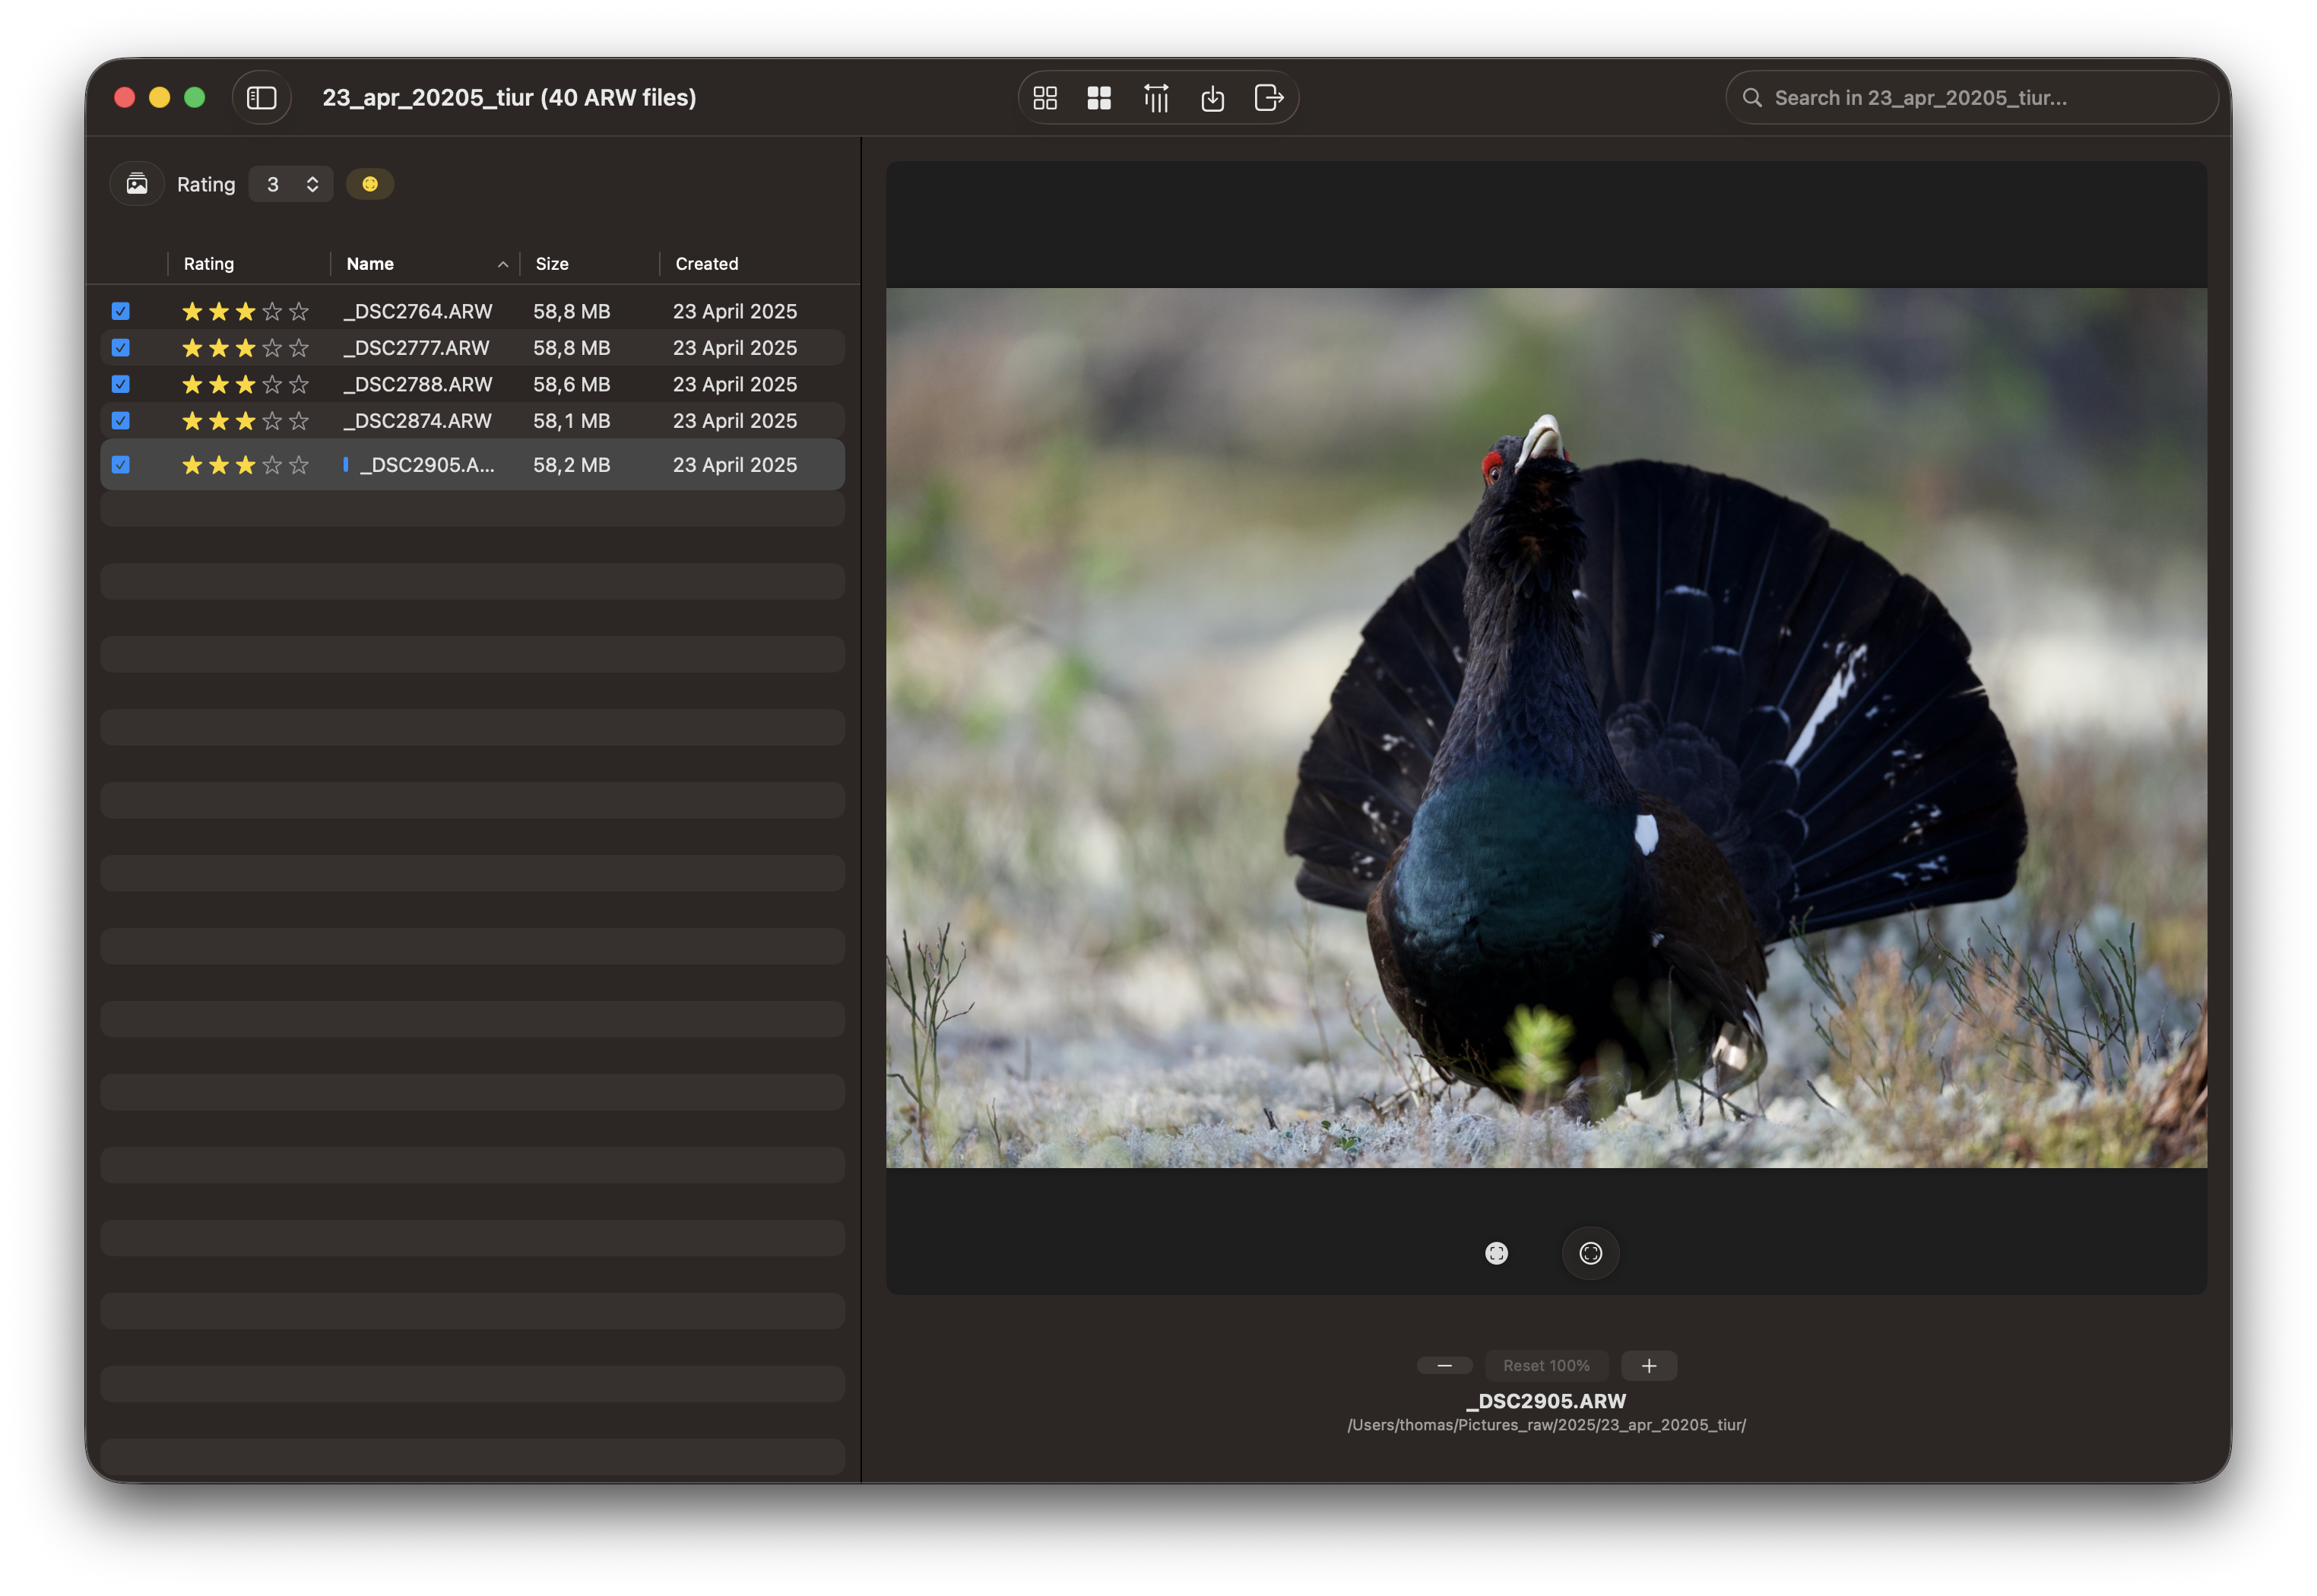
Step 3: Review and Mark Images
Examine each photo carefully. You can view images at normal size first to get a quick sense of quality. Selected photos will appear at the bottom.
Persistent Marking and Session Recovery
RawCull automatically saves your marking decisions as you work, allowing you to pause and resume your culling session at any time. Your marks, ratings, and review status are saved to disk, so if you need to continue later, simply reopen the same folder and your progress will be restored.
Thumbnail Performance
Thumbnails are generated and kept in memory during your session for fast navigation. RawCull also maintains a disk cache of thumbnails for previously reviewed catalogs, enabling instant loading when you return to the same folder in the future.
Marking and Rating Photos
For each image, decide whether it’s worth keeping:
Mark as Keep: Select high-quality photos that you want to retain for editing
Leave Unmarked: Photos you don’t want to include in your final catalog
Rate Quality: Assign star ratings or priority levels to marked photos based on editing priority
Review Later: Mark questionable photos for later review
Keyboard Shortcuts
Use these keyboard shortcuts for efficient culling:
Action
Shortcut
Mark as Keep
T or By rating
Unmark
T if selected
Move to Next
↓
Move to Previous
↑
Extract a 2048 px thumbnail or 4320x2880 px JPG
double click on photo
Extract Thumbnail or JPG toggle in Settings
Upon selection of Thumbnail, RawCull presents the pre-created Thumbnail stored in memory or retrieves it from the disk cache if not found in memory. If JPG is selected, RawCull extracts the JPG file from the ARW file.
Step 4: Inspect Details
For critical decisions, zoom in to examine fine details like focus, expressions, or technical quality.
Zoomed view allows you to:
Check if eyes are sharp and in focus
Verify composition details
Look for artifacts or blemishes
Confirm technical quality before keeping
This is especially useful when deciding between very similar shots from burst mode.
Step 5: Review Your Selections
After marking and rating all photos, take time to review your decisions:
Filter by Status: View only photos marked as “Keep” or “Review Later”
Verify Ratings: Review the star ratings and priority levels you assigned
Double-Check: Re-examine borderline cases
Adjust Marks: Update any incorrectly marked or rated photos
Step 6: Copy Marked Photos to Final Catalog
Once satisfied with your selections:
Copy Marked Photos: RawCull copies only the marked and rated photos to your final catalog
Organize for Editing: The final catalog is now ready to import into your photo editing application
Keep Original: Your original temporary catalog remains untouched, preserving all images from your shoot
Note: Only marked and rated photos are copied to the final catalog. Unmarked photos remain in the temporary catalog but are not copied to your editing workflow.
3 - Focus Peeking
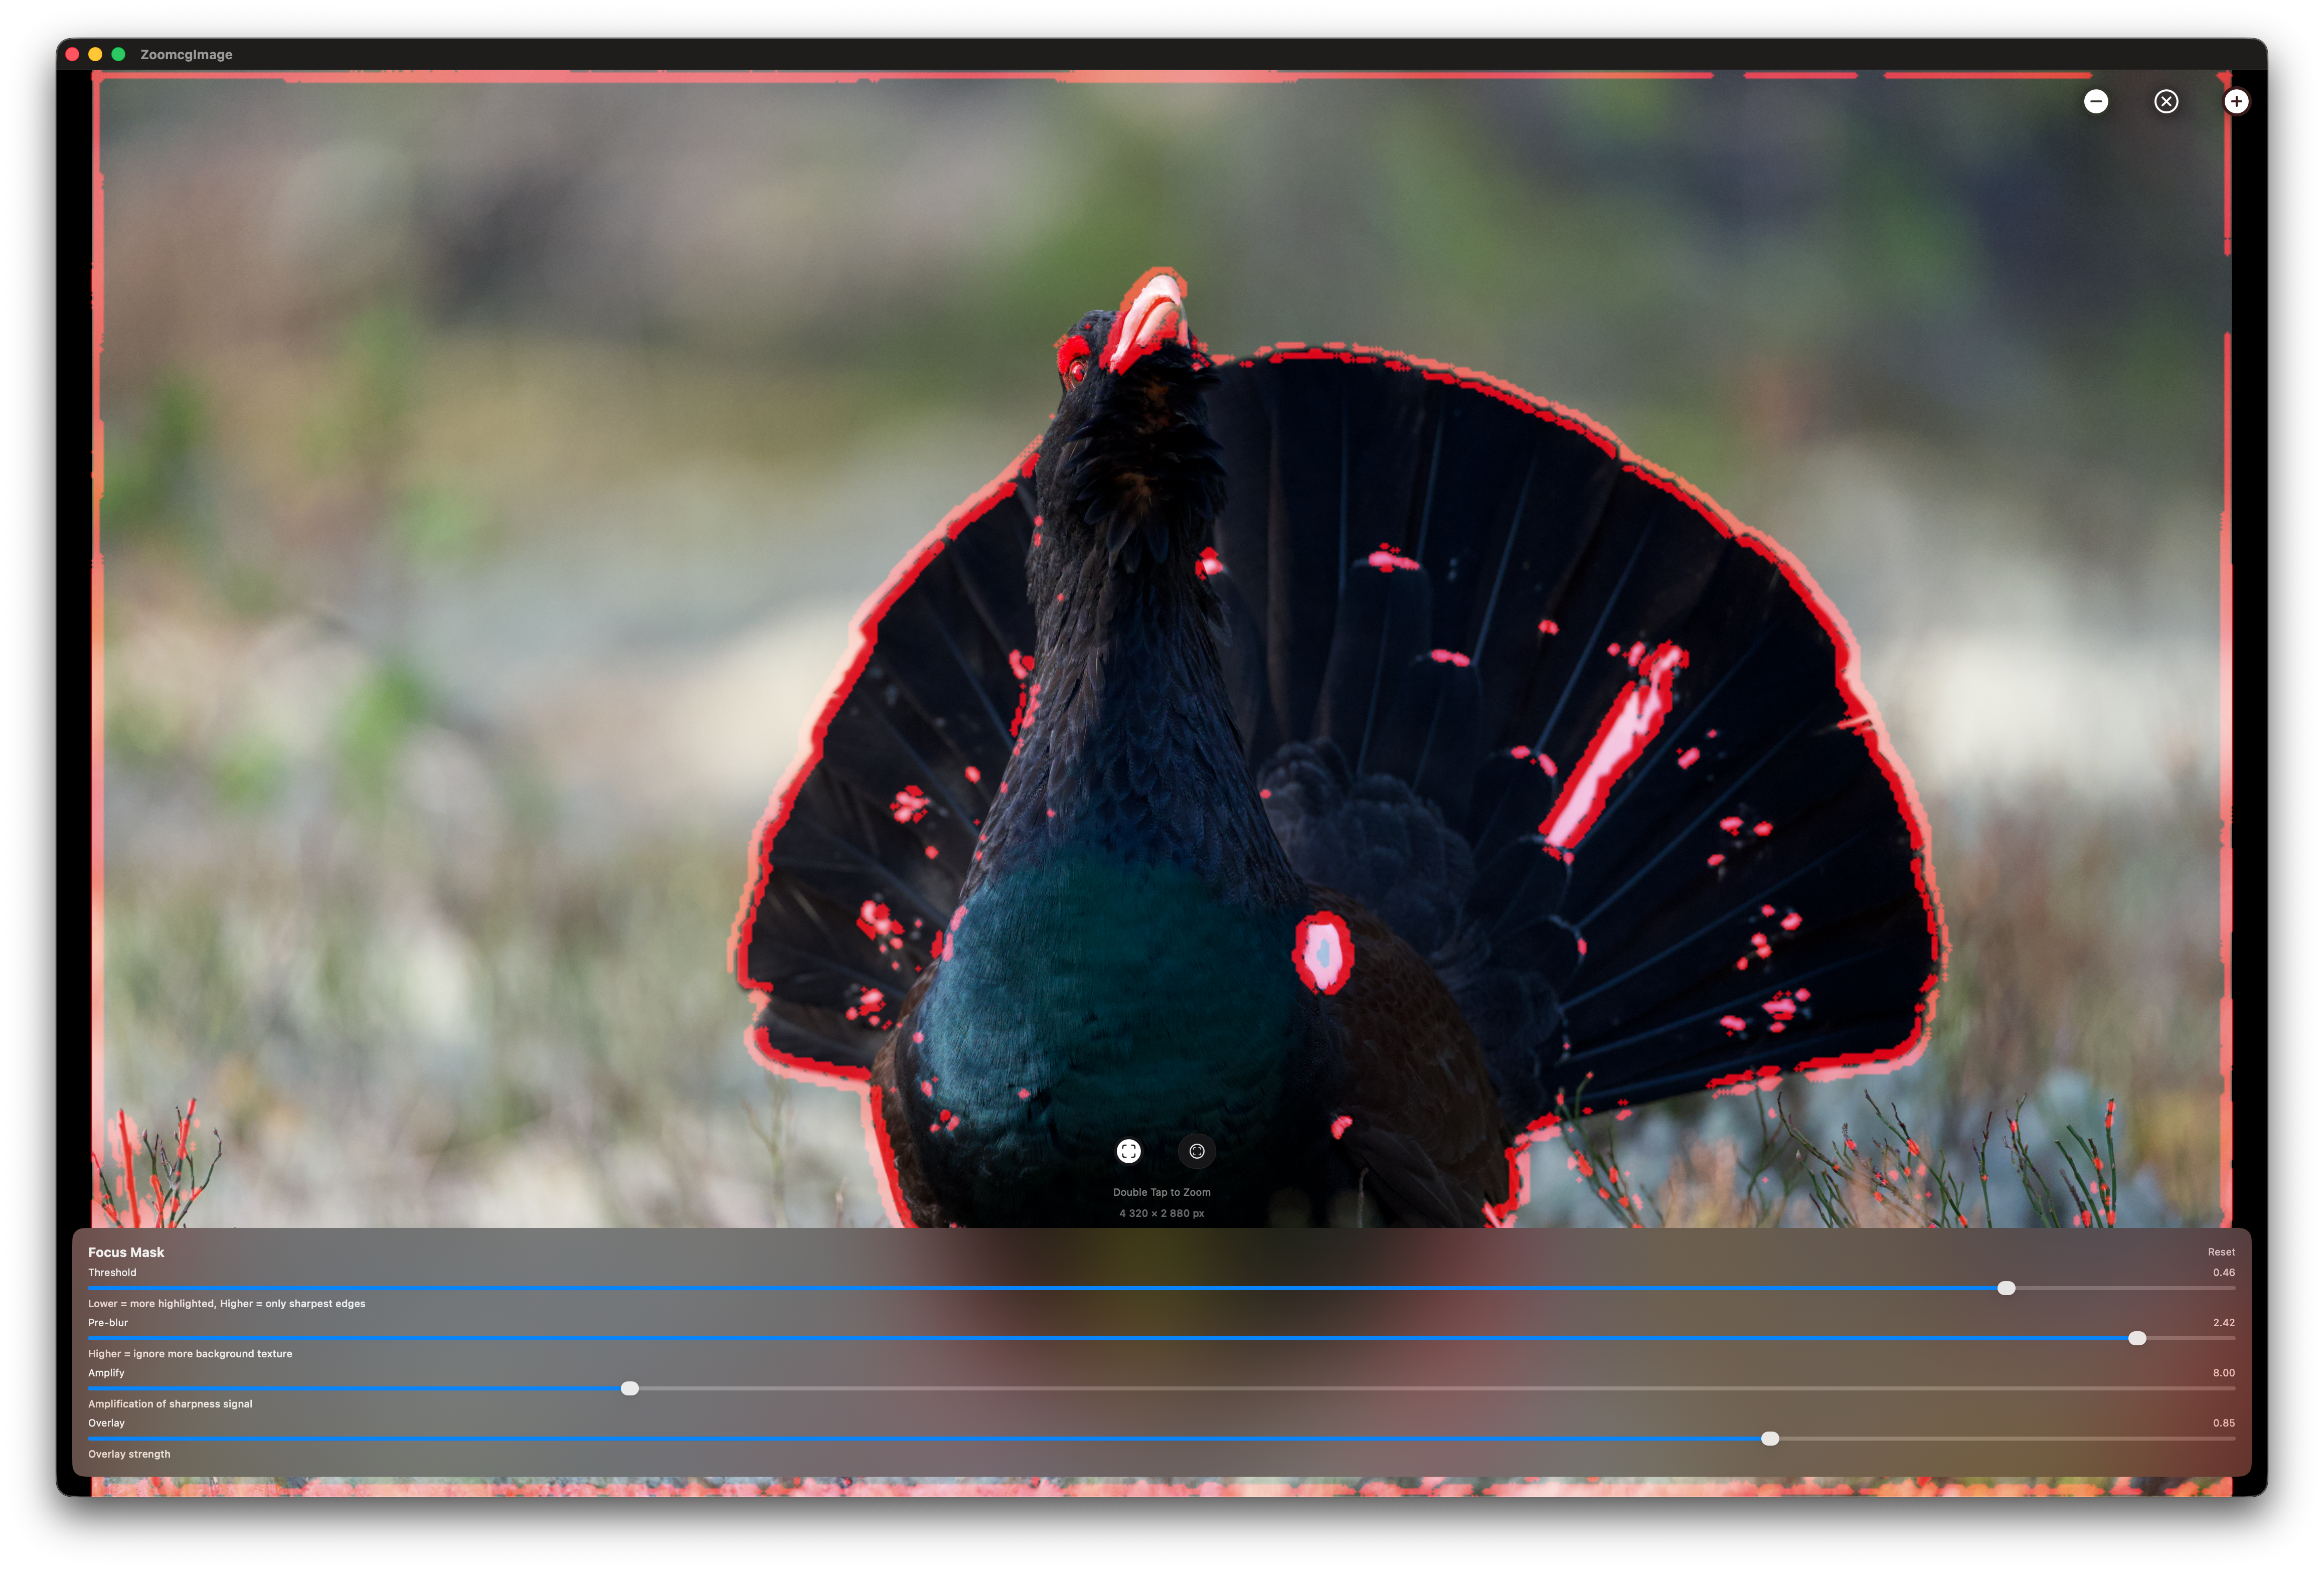
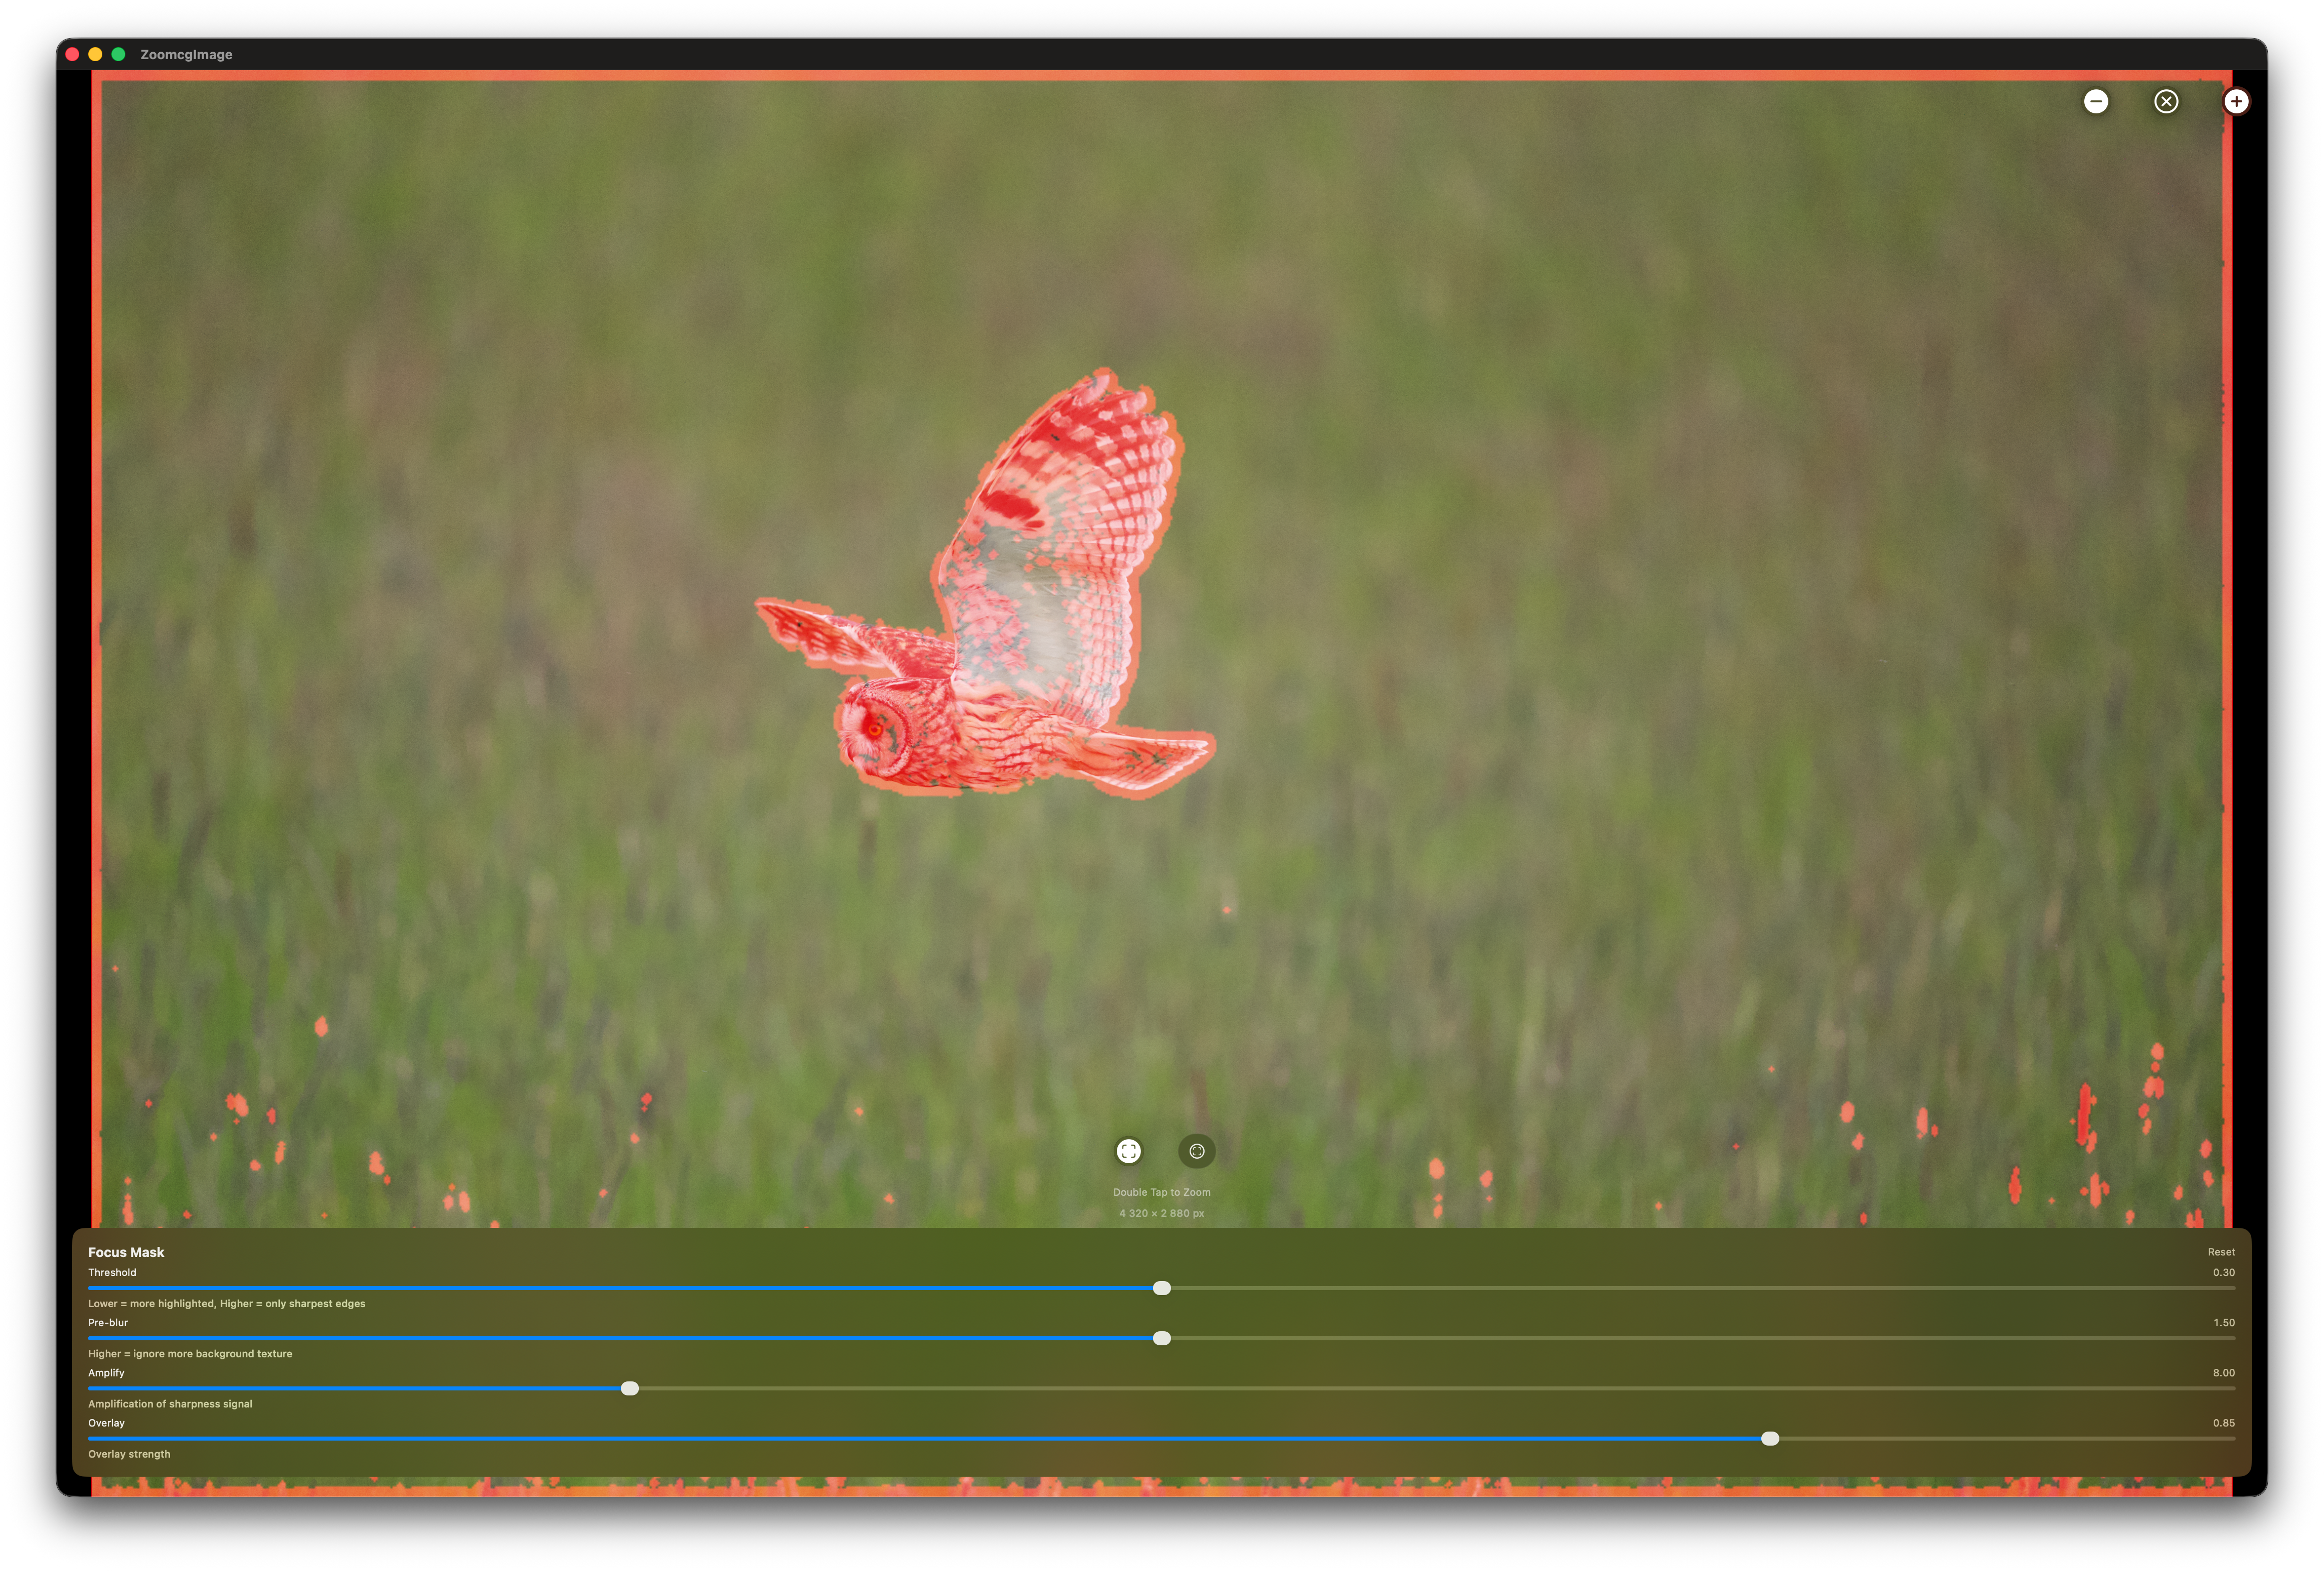
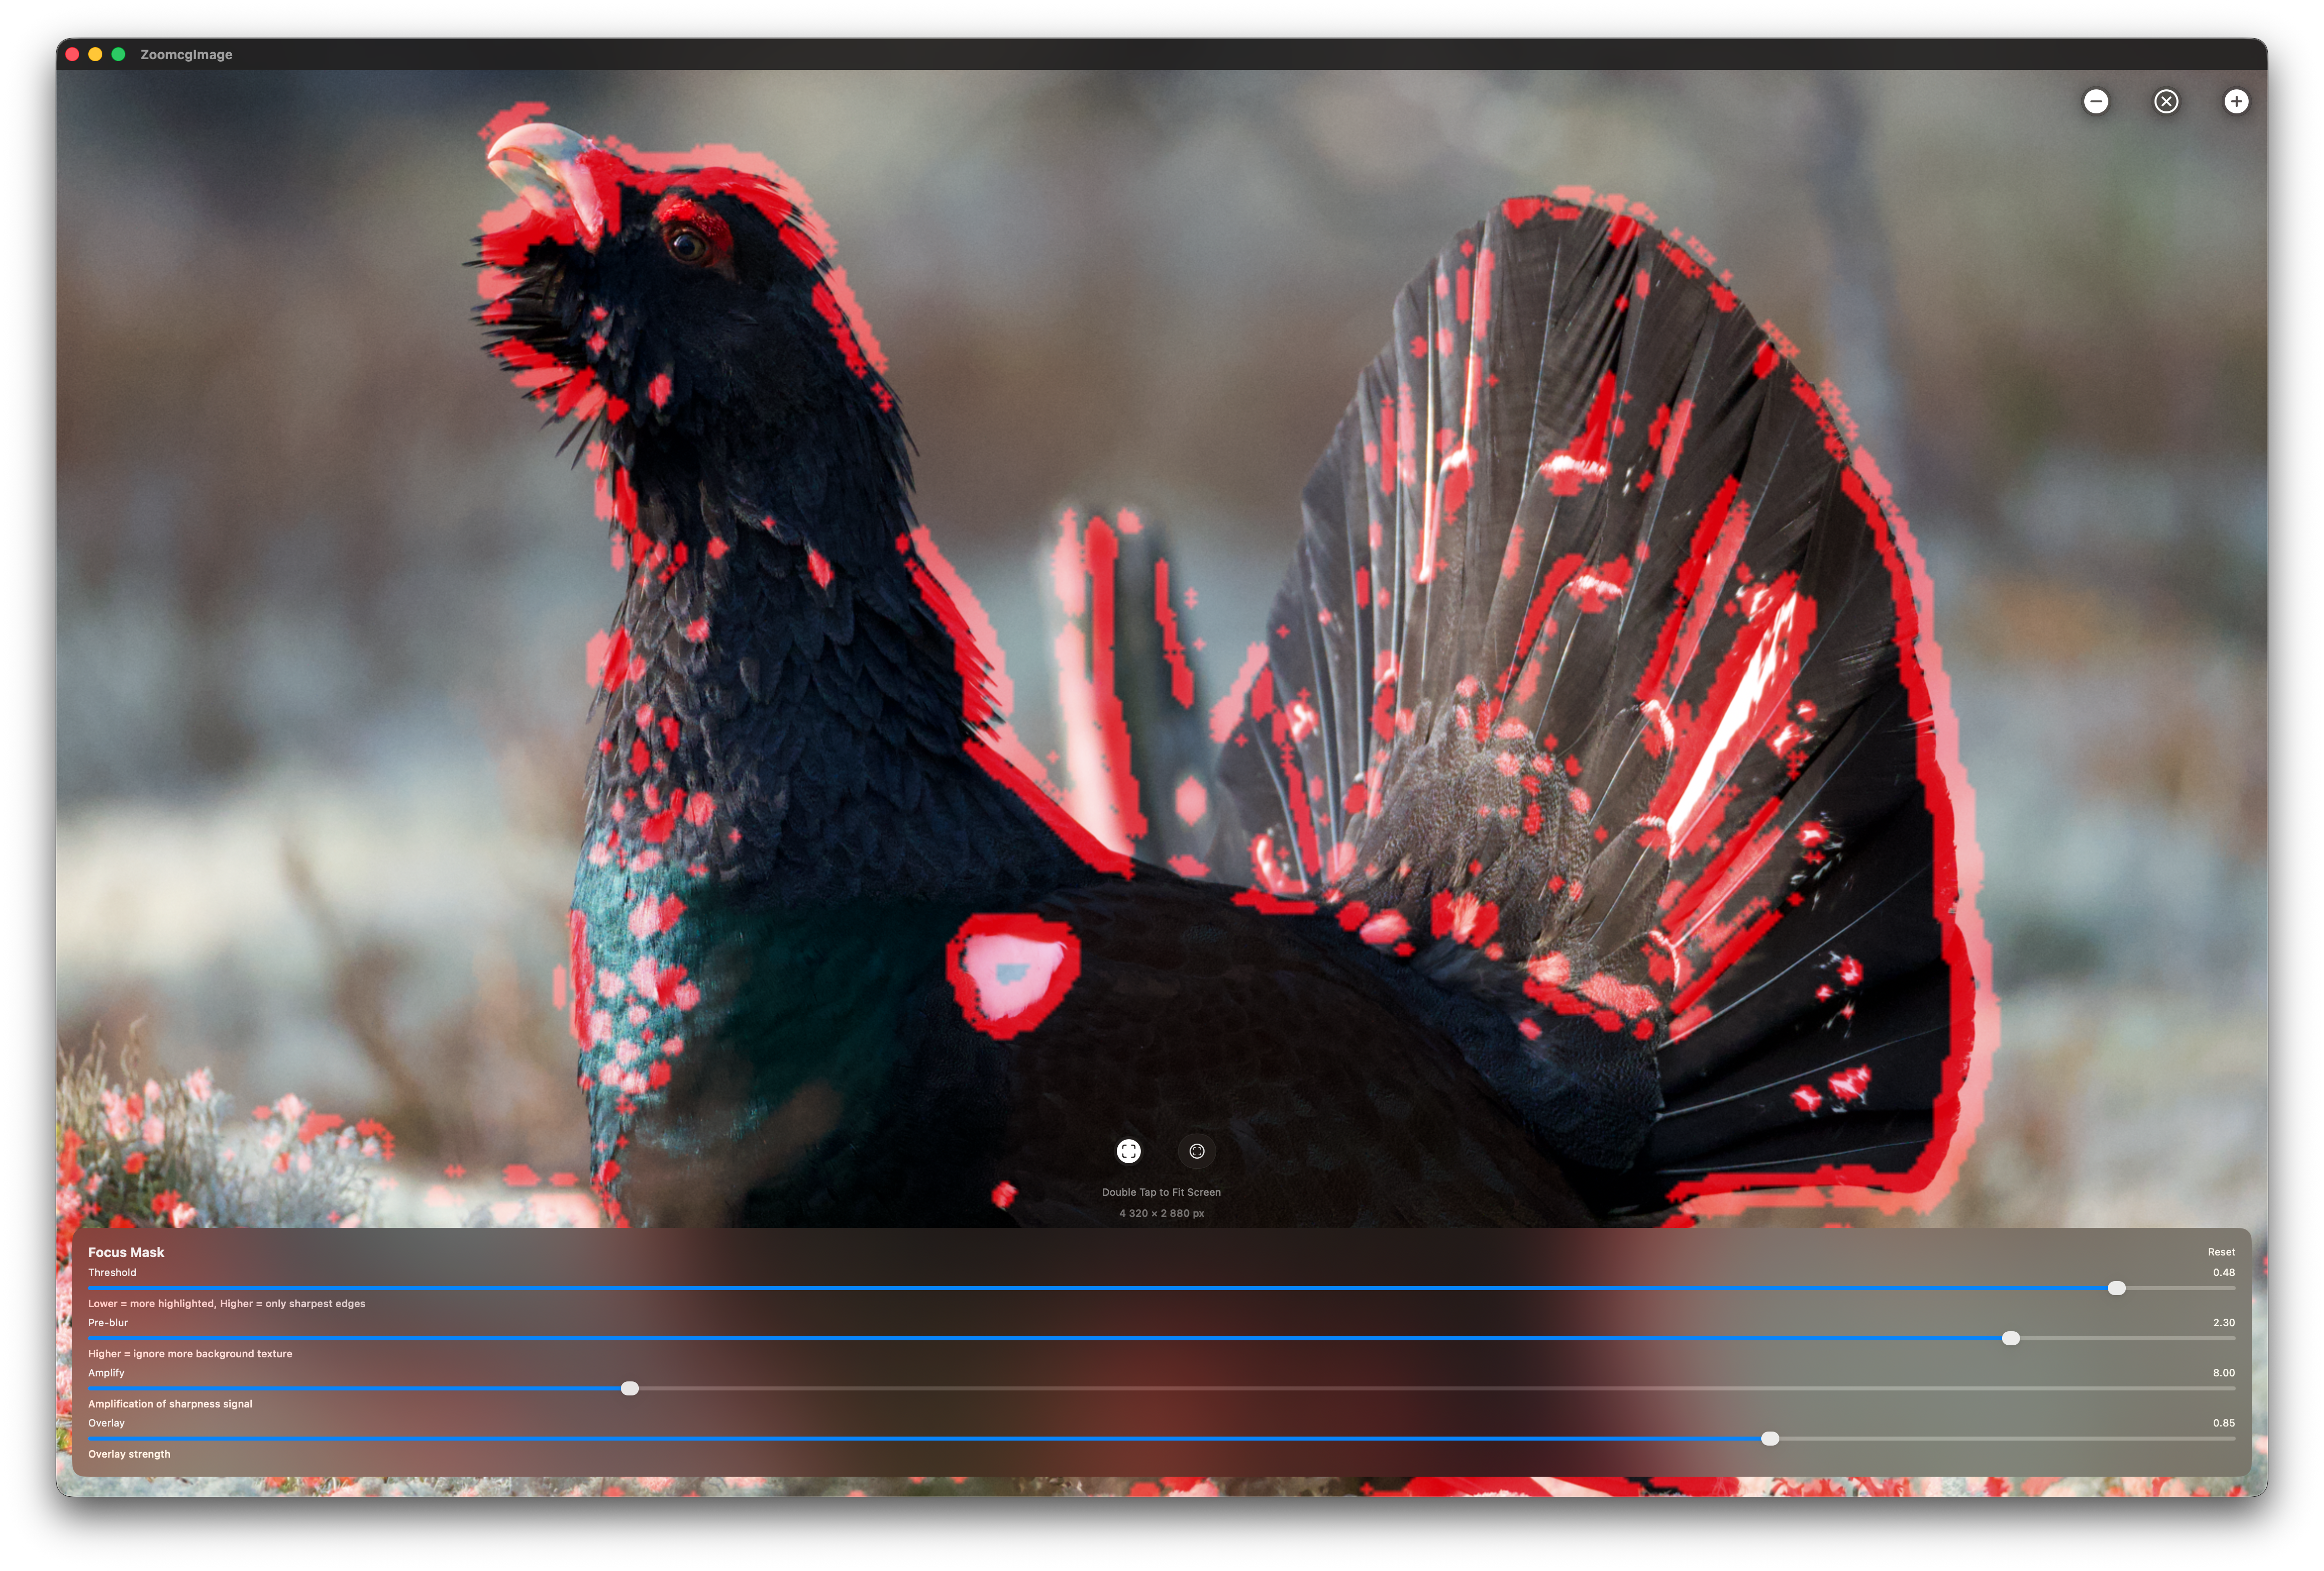
Focus Peeking: The Laplacian of Gaussian Method
The creation of the Focus Mask is executed by the GPU on your Mac, resulting in a relatively swift process, even when the mask is generated on the fly.
Note: To obtain the most optimal results in Focus Peek view (extract), it is recommended to extract the JPG file from the ARW file. While it is possible to view Focus Peek by creating thumbnails, the mask is more effective when applied to JPGs. To access Focus Peek, double-click on the file table row. In the Settings menu, Thumbnails tab, disable the “Use Thumbnail for Zoom” to use JPGs as base for Focus Peek.
What Is Focus Peeking?
Focus peeking is a visual aid that highlights which areas of a photograph are in sharp focus. Rather than relying on your eye alone to judge sharpness, focus peeking overlays a red highlight on pixels where edge detail and contrast are strongest. Those highlighted pixels are the ones in sharpest focus — everything else stays unchanged.
Why the Laplacian of Gaussian?
Several mathematical approaches can measure local sharpness, but the Laplacian of Gaussian (LoG) is one of the most effective for focus peeking because it combines two complementary operations.
The Gaussian blur is applied first, suppressing sensor noise and low-amplitude out-of-focus texture — water ripples, skin, smooth backgrounds — before sharpness detection runs. Without this step, the Laplacian would flag noise and soft texture as “sharp.”
The Laplacian then computes, for each pixel, how much its intensity differs from its immediate neighbours. In a blurry region those differences are small and smooth. At a sharply rendered edge they spike. The key insight is that the Laplacian measures second-order intensity change — it responds to genuine focus-induced contrast spikes rather than gradual gradients, which blurred regions produce even when they have visible texture.
The Kernel
Rather than the classic 4-neighbour approximation, RawCull uses a full 8-neighbour kernel computed on the GPU via Metal:
L = 8 × center − (N + S + E + W + NE + NW + SE + SW)
This 3×3 formulation is more isotropic than the 4-neighbour version — it responds equally to edges in all directions, including diagonals, which matters for natural subjects like feathers and fur.
The sharpness energy at each pixel is then computed as a luminance-weighted magnitude:
This preserves perceptual weighting — the green channel contributes most, matching human sensitivity to luminance detail.
Step-by-Step: How It Works
1. Downscale. The image is reduced to 1024 pixels wide before processing. The algorithm operates on pixel neighbourhoods, so full resolution is unnecessary and the performance gain is significant.
2. Pre-blur (Gaussian). A Gaussian blur is applied to the downscaled image. This suppresses out-of-focus texture and sensor noise before the Laplacian runs, preventing false highlights in blurred regions. The blur radius is user-adjustable — higher values ignore more background texture.
3. Laplacian kernel (Metal GPU). The 8-neighbour kernel runs on every pixel in parallel on the GPU, computing the second-order derivative of brightness across all channels.
4. Energy and amplification. The per-pixel result is converted to a single luminance-weighted sharpness energy value and amplified. The amplification factor is user-adjustable.
5. Threshold. Any pixel below the threshold is discarded (black). Only genuinely sharp pixels survive. The threshold is the primary control — lower values highlight more of the image, higher values restrict highlights to only the sharpest edges.
6. Dilation. Surviving pixels are slightly expanded morphologically, turning scattered dots into solid readable regions without introducing false edges.
7. Red overlay. Surviving pixels are colourised red and composited over the original photograph using a screen blend mode. Black (non-sharp) areas are transparent in screen blending, so only the red sharpness regions show through over the photo.
Tunable Parameters
RawCull exposes four controls in the Focus Mask panel:
Control
Effect
Threshold
Primary sharpness cutoff. Raise to restrict highlights to only the sharpest edges; lower to highlight more of the image.
Pre-blur
Gaussian blur radius applied before detection. Higher values suppress background texture and noise more aggressively.
Amplify
Multiplier applied to the raw sharpness signal. Higher values make weak edges more visible; too high reintroduces noise.
Overlay
Opacity of the red overlay. Affects display only — does not trigger recomputation.
A Reset button returns all values to their defaults.
Practical Considerations
Threshold tuning is the most important variable. Too low and nearly the entire image lights up. Too high and only the absolute sharpest micro-contrast registers. A good starting point is around 0.25–0.35, then adjusted for the scene.
Pre-blur is your noise lever. Scenes with prominent out-of-focus texture — water, foliage backgrounds, bokeh — benefit from a higher pre-blur radius. Scenes with a small sharp subject against a smooth background can use a lower value.
Subject texture matters. Smooth, low-contrast surfaces — clear sky, still water, skin — produce a weak Laplacian response even when perfectly focused, because there is little edge detail to detect. Focus peeking works best on subjects with natural texture: feathers, fur, foliage, fabric.
RAW vs JPG. The mask is more effective when applied to extracted JPGs rather than thumbnails. Thumbnails are heavily processed and downscaled before RawCull sees them, which reduces the fine edge detail the Laplacian depends on.
Summary
RawCull’s focus peeking runs a Laplacian of Gaussian pipeline entirely on the GPU via Metal. A Gaussian pre-blur suppresses noise and out-of-focus texture; an 8-neighbour Laplacian kernel detects genuine sharpness spikes; thresholding and morphological dilation produce a clean binary mask; and screen blending composites the red overlay non-destructively over the original image. The result is a fast, accurate, and visually interpretable sharpness map that makes focus assessment immediate — particularly valuable when reviewing large numbers of action or wildlife shots where critical focus on a small moving subject is difficult to judge from the image alone.
4 - Settings
The initial version exclusively supports culling Sony A1 Mk I and Mk II RAW files. While it may be compatible with other Sony ARW files, this has not been tested.
Settings view
RawCull provides settings to customize your culling experience and optimize performance:
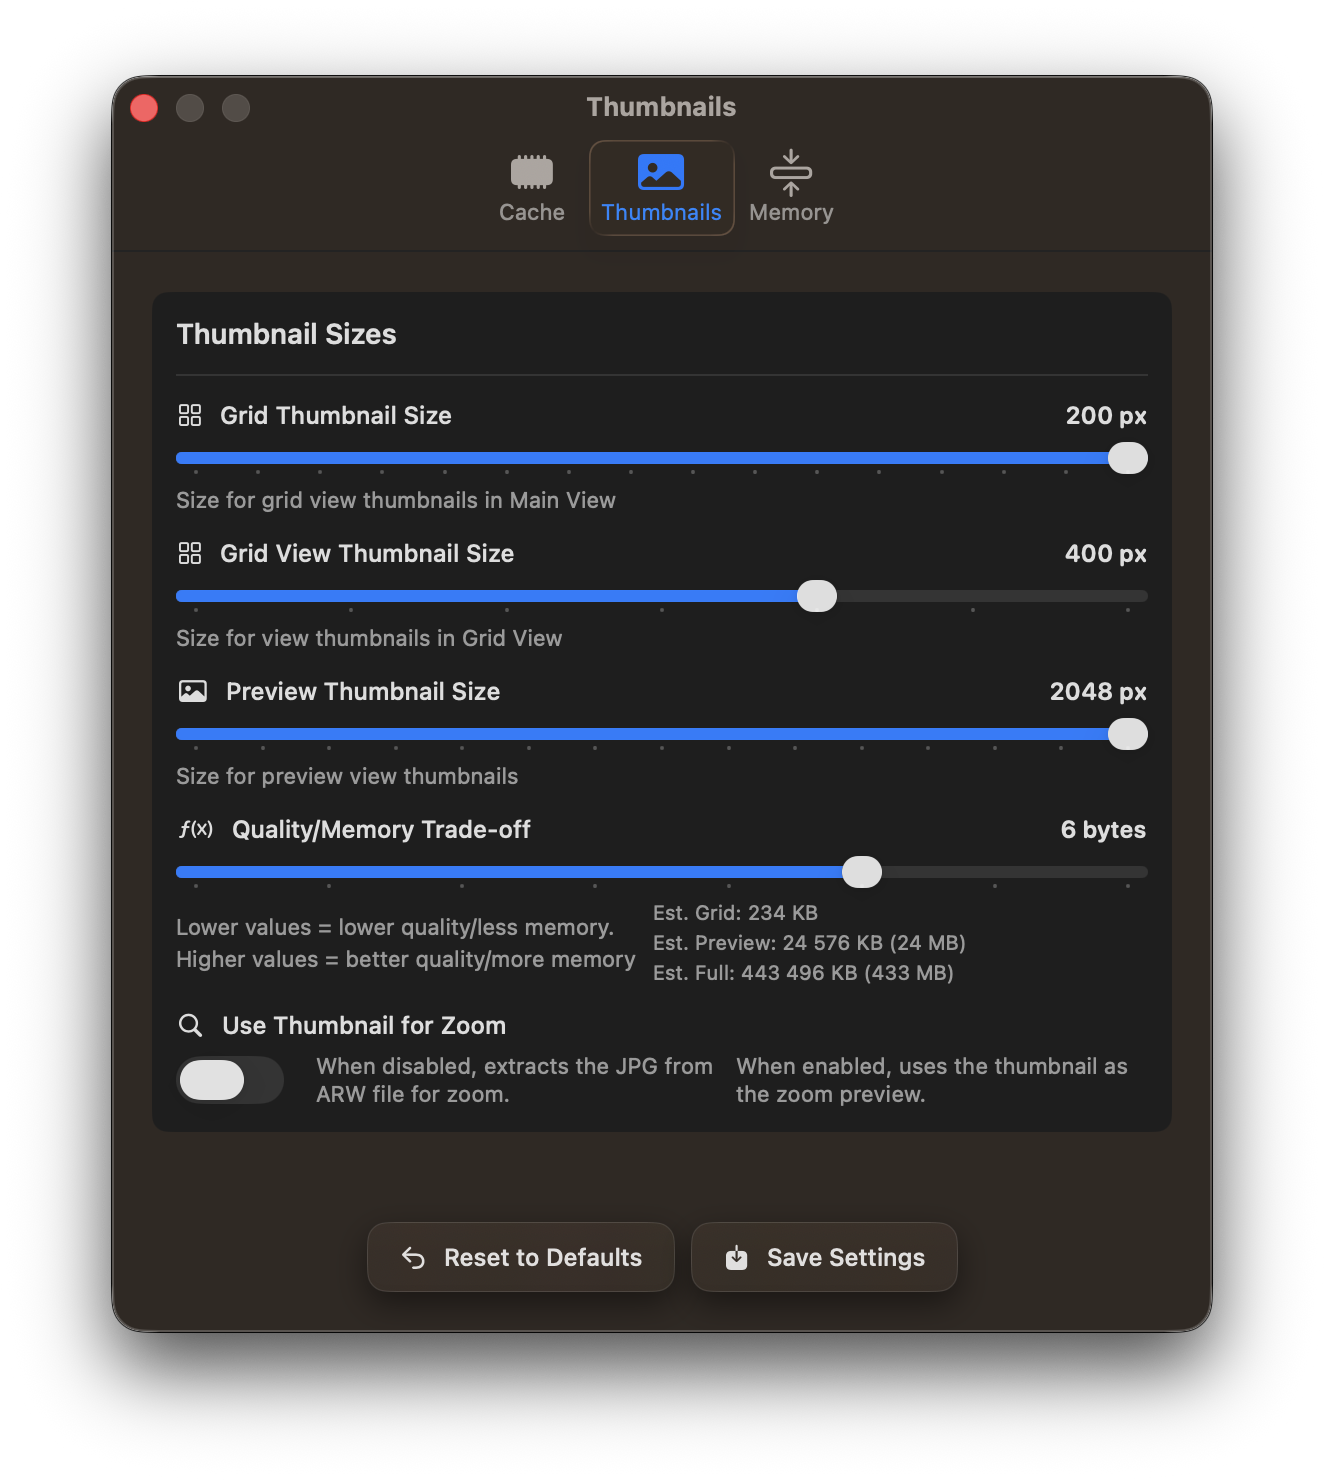
Cache Management: Control thumbnail cache location and size to balance performance with disk space usage
Thumbnail Quality: Adjust thumbnail generation settings to optimize preview quality and loading speed
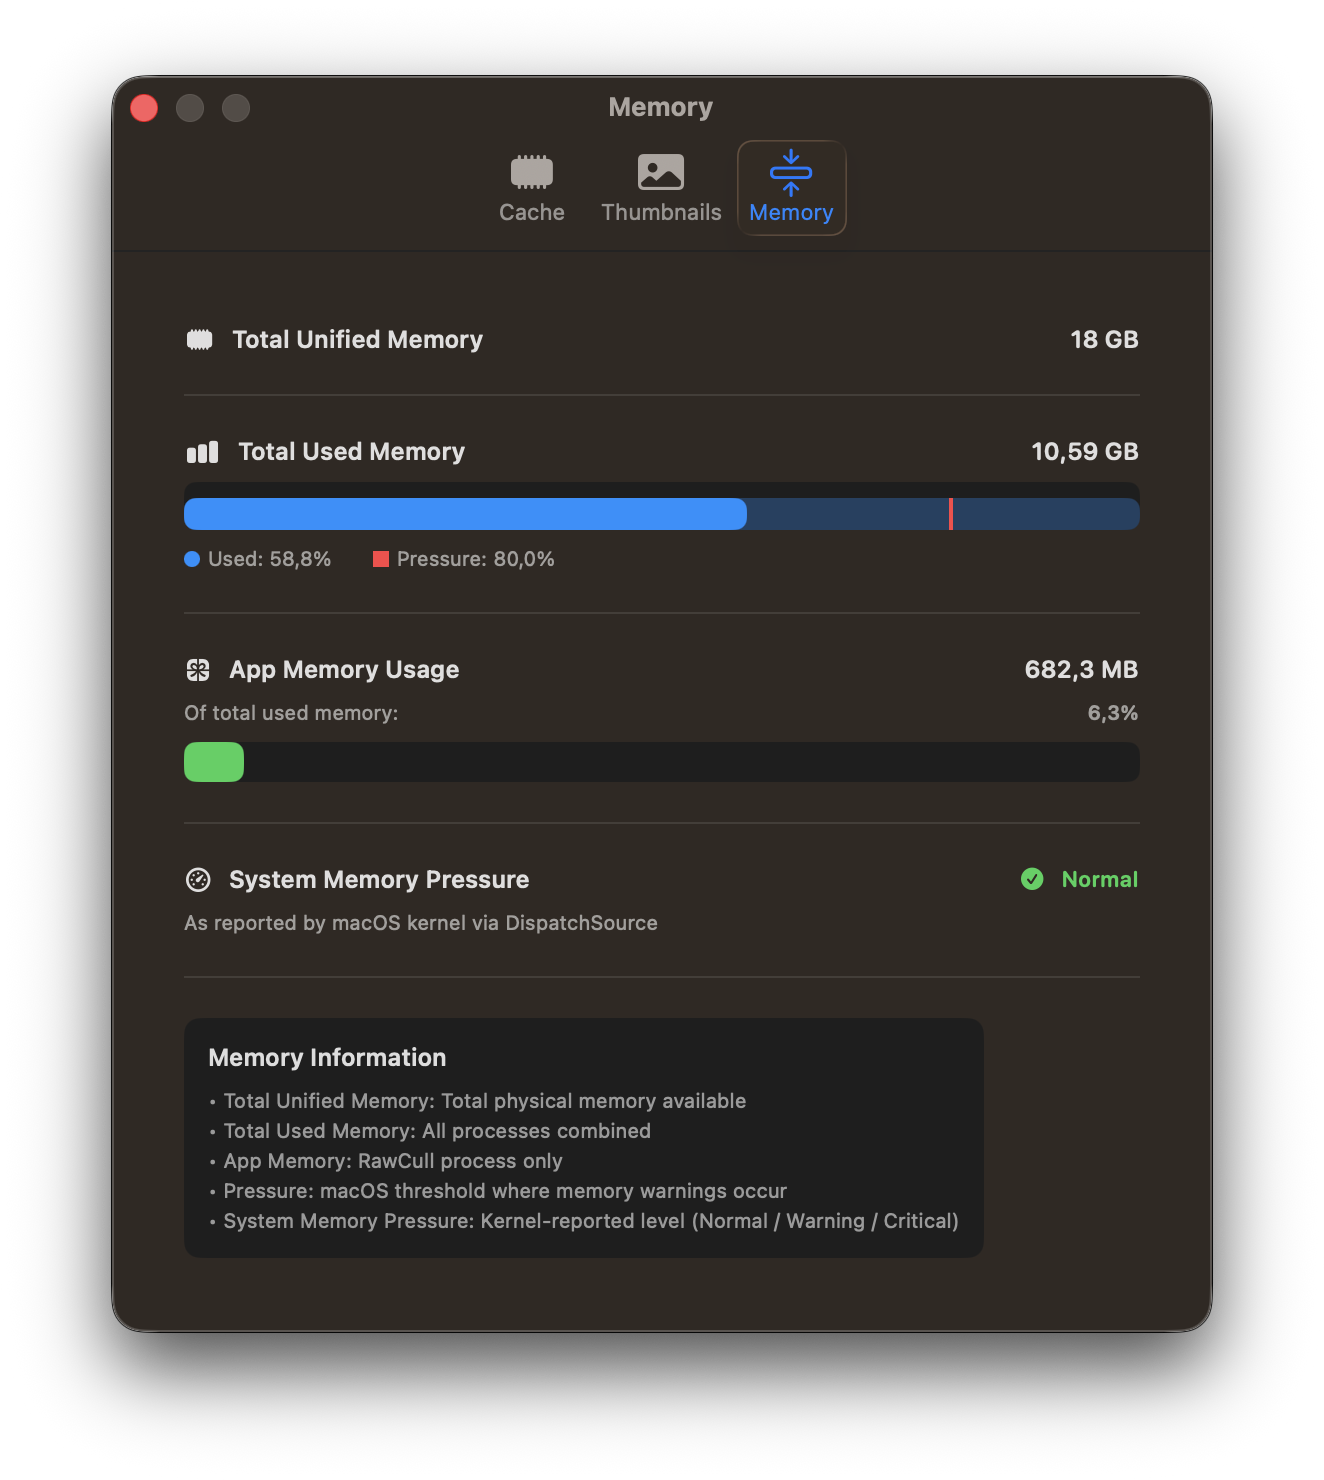
Memory Settings: Configure memory allocation for handling large photo catalogs efficiently
Access these settings from the application menu to fine-tune RawCull for your specific needs and system configuration. The cache statistics present the memory hit-rate when viewing photos.
The memory tab displays the memory utilized, the total memory capacity, and a memory-pressure warning.
5 - Copying Photos
Copying Photos with RawCull
RawCull supports two distinct copy workflows to fit your photo culling process:
Initial Copy: Copy your photos from your camera to a temporary catalog
Final Copy: Copy only your selected and rated photos to your final destination
Understanding both workflows is essential for an efficient culling workflow.
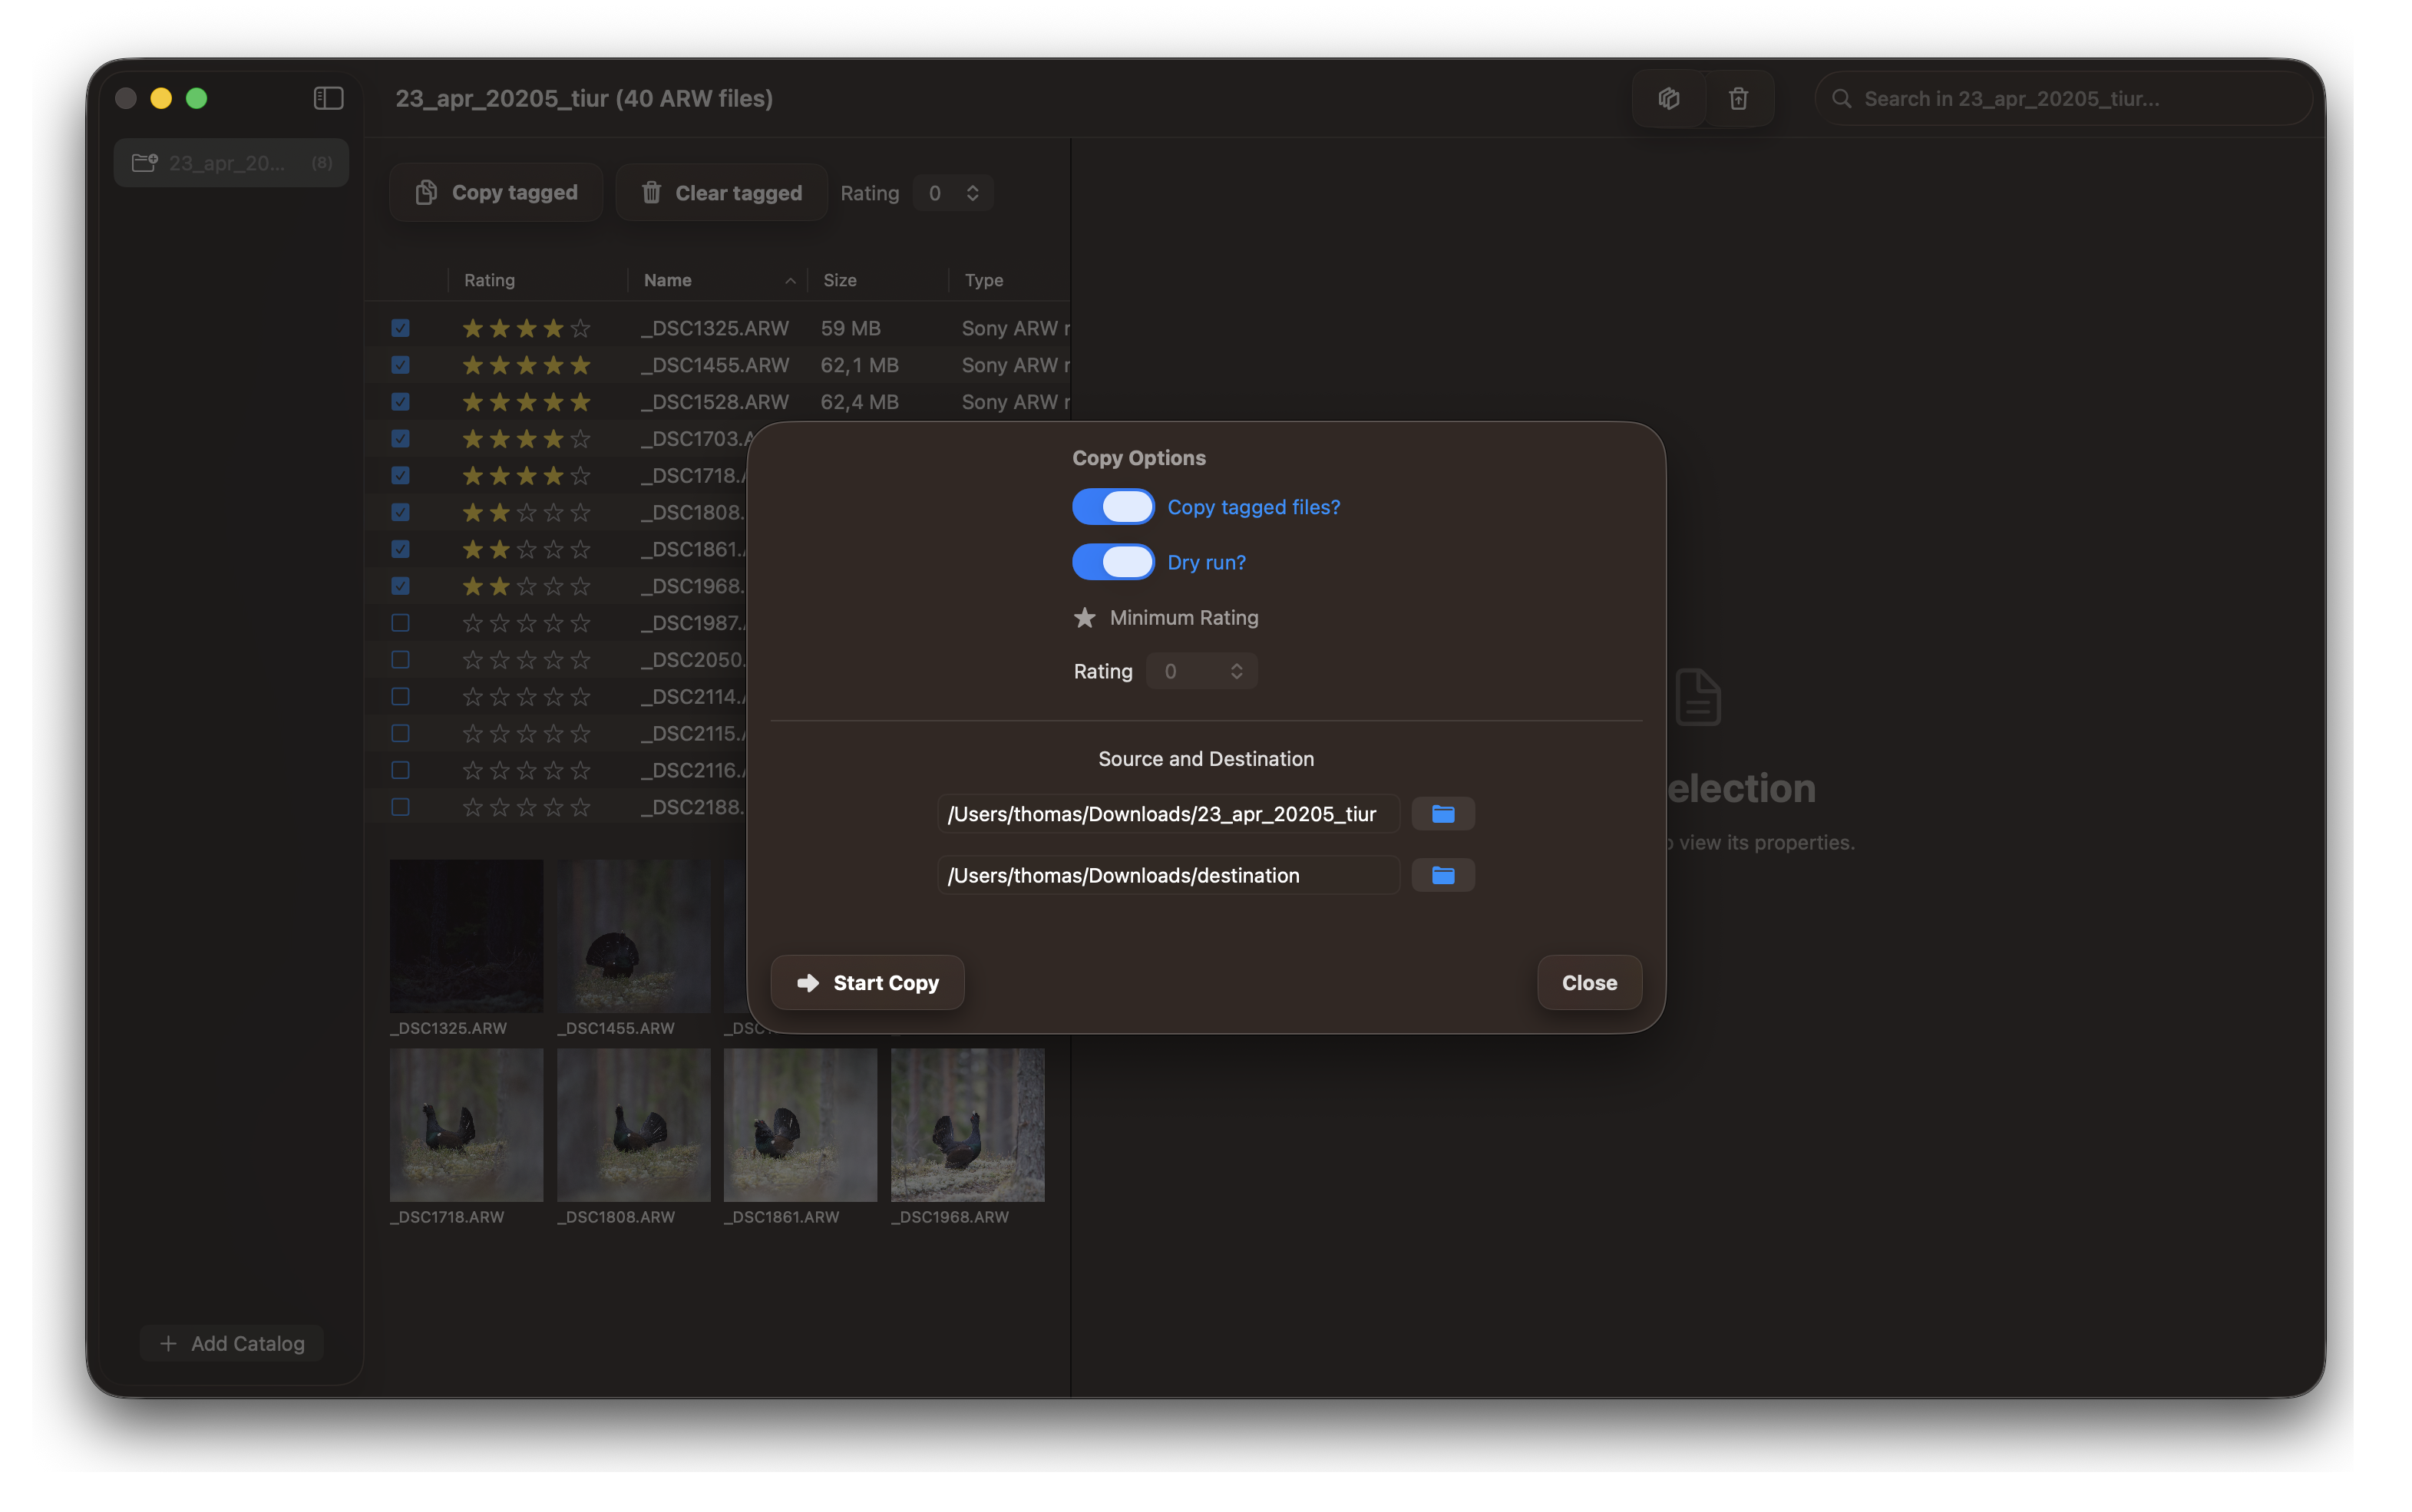
Copy All Tagged Photos
The first workflow copies all photos that have been tagged during your culling process. This is useful when you want to copy a broad selection of marked images to your destination.
Step 1: Tag Your Photos
As you review your images in RawCull, tag all the photos you want to include in your copy operation.
Step 2: Select Tagged Photos for Copy
Use RawCull’s filter to view and select all tagged photos, preparing them for the copy operation.
Step 3: Copy Tagged Photos to Destination
Execute the copy operation to transfer all tagged photos to your destination folder.
Copy Based on Rating
After rating your photos, use this workflow to copy only the images that meet your rating threshold. This is ideal for copying only your best-rated selections to your final destination.
Step 1: Rate Your Photos
Review and rate your images in RawCull, assigning ratings to indicate the quality and value of each photo.
Step 2: Filter by Rating
Use RawCull’s rating filter to display only photos that meet your minimum rating criteria for copying.
Step 3: Copy Rated Photos to Destination
Execute the copy operation to transfer only your highly-rated photos to your final destination folder.
Tips for Efficient Copying
Tagged vs. Rating: Choose the copy method that best fits your workflow—tagged photos for broad selections or rating-based for quality-focused selections
Use Separate Folders: Keep your temporary catalog separate from your final destination to avoid confusion
Name Your Catalogs: Use descriptive names like “2026-02-01-Event-Tagged” or “2026-02-01-Event-Rated”
Verify Completion: Always confirm that all images were successfully copied before deleting the source
Backup First: Consider backing up your original camera files before the culling process begins
Now that you understand both copy workflows, you’re ready to cull your photos using RawCull!
6 - Focus points
Why ExifTool for Focus Points?
RawCull uses Apple’s ImageIO framework (CGImageSourceCopyPropertiesAtIndex) to extract standard EXIF metadata from Sony ARW files — shutter speed, aperture, ISO, focal length, lens model, and camera body are all read natively through Core Graphics. This works well because these fields follow the standard EXIF/TIFF specification.
Focus point data is different. Sony stores autofocus information — specifically the Sony:FocusLocation tag — deep inside a proprietary MakerNote block in the EXIF metadata. Apple’s ImageIO treats MakerNote as an opaque binary blob; it does not parse or expose vendor-specific tags within it. There is no kCGImageProperty key for Sony focus locations, and no Apple framework provides decoded access to this data.
ExifTool, by Phil Harvey, contains camera-vendor-specific parsers that understand Sony’s internal MakerNote structure and can decode FocusLocation into usable coordinates (sensor width, sensor height, x, y). RawCull reads a pre-generated JSON file produced by:
cd catalogARWfiles/
exiftool -Sony:FocusLocation *.ARW -j >> focuspoints.json
In the catalog where the ARW files are stored, the recommended procedure is to copy all ARW files to a temporary catalog before the culling process begins. Subsequently, execute the command provided within that catalog to generate the JSON file, which is automatically imported into RawCull if it exists in the catalog where the ARW files are stored.
RawCull is a sandboxed application, and executing the above command within it is prohibited due to restrictions. Consequently, it is necessary to execute the command and generate the JSON file outside of RawCull.
For the example picture (_DSC5220.ARW) the focus points extracted by ExifTool is:
This gives RawCull the focus point coordinates it needs to overlay AF point markers on thumbnails and zoomed views — something that simply isn’t possible using Apple’s default frameworks alone.
If the file focuspoints.json is present in the catalog for ARW files and contains valid focus points data, RawCull will notify the user of its existence, a yellow mark in the button row.